Advanced widgets in wxPython
In the following chapters we will talk about advanced widgets. A big advantage of wxPython over a competing PyGTK is the availability of a huge amount of advanced widgets. PyGTK is a layer over a C based GKT+ toolkit. It does not provide new widgets. In contrast, wxPython is a layer over wxWidgets a C++ based toolkit. wxWidgets consists of a large group of widgets. All this widgets are created in C++. wxPython is a glue that combines python language with this toolkit. If we want to have a grid widget in our application using PyGTK, we have to create it ourselves. Such a widget is quite complicated. Not to mention the speed penalty. Dynamic languages like Python, PERL or Ruby are not suitable for such tasks.Dynamic languages are great in various areas. They are simple to use. They are great for prototyping, in house developing or for studying computer programming. If we need a quick solution or we need an application, that will change rapidly over a short period of time, dynamic languages are superior to compiled languages. On the other hand, if we develop resource intensive applications, games, high quality multimedia applications, there is no competition to C++.
wxPython has several well known advanced widgets. For example a tree widget, a html window, a grid widget, a listbox widget, a list widget or an editor with advanced styling capabilities.
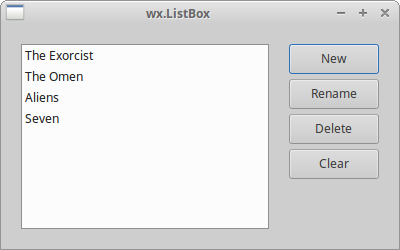
A wx.ListBox widget
A wx.ListBox widget is used for displaying and working with a list of items. As it's name indicates, it is a rectangle that has a list of strings inside. We could use it for displaying a list of mp3 files, book names, module names of a larger project or names of our friends. A wx.ListBox can be created in two different states. In a single selection state or a multiple selection state. The single selection state is the default state. There are two significant events in wx.ListBox. The first one is the wx.EVT_COMMAND_LISTBOX_SELECTED event. This event is generated when we select a string in a wx.ListBox. The second one is the wx.EVT_COMMAND_LISTBOX_DOUBLE_CLICKED event. It is generated when we double click an item in a wx.ListBox. The number of elements inside a wx.ListBox is limited on GTK platform. According to the documentation, it is currently around 2000 elements. Quite enough, I think. The elements are numbered from zero. Scrollbars are displayed automatically if needed.The constructor of a wx.ListBox widget is as follows:
wx.ListBox(wx.Window parent, int id=-1, wx.Point pos=wx.DefaultPosition,There is a choices parameter. If we put some values there, they will be displayed from the construction of the widget. This parameter is empty by default.
wx.Size size=wx.DefaultSize, list choices=[], long style=0,
wx.Validator validator=wx.DefaultValidator, string name=wx.ListBoxNameStr)
In our code example we have a listbox and four buttons. Each of them calls a different method of our listbox. If we want to append a new item, we call the Append() method. If we want to delete an item, we call the Delete()method. To clear all strings in a listbox, we call the Clear() method.
#!/usr/bin/python

# listbox.py

import wx

ID_NEW = 1
ID_RENAME = 2
ID_CLEAR = 3
ID_DELETE = 4


class ListBox(wx.Frame):
    def __init__(self, parent, id, title):
        wx.Frame.__init__(self, parent, id, title, size=(350, 220))

        panel = wx.Panel(self, -1)
        hbox = wx.BoxSizer(wx.HORIZONTAL)

        self.listbox = wx.ListBox(panel, -1)
        hbox.Add(self.listbox, 1, wx.EXPAND | wx.ALL, 20)

        btnPanel = wx.Panel(panel, -1)
        vbox = wx.BoxSizer(wx.VERTICAL)
        new = wx.Button(btnPanel, ID_NEW, 'New', size=(90, 30))
        ren = wx.Button(btnPanel, ID_RENAME, 'Rename', size=(90, 30))
        dlt = wx.Button(btnPanel, ID_DELETE, 'Delete', size=(90, 30))
        clr = wx.Button(btnPanel, ID_CLEAR, 'Clear', size=(90, 30))

        self.Bind(wx.EVT_BUTTON, self.NewItem, id=ID_NEW)
        self.Bind(wx.EVT_BUTTON, self.OnRename, id=ID_RENAME)
        self.Bind(wx.EVT_BUTTON, self.OnDelete, id=ID_DELETE)
        self.Bind(wx.EVT_BUTTON, self.OnClear, id=ID_CLEAR)
        self.Bind(wx.EVT_LISTBOX_DCLICK, self.OnRename)

        vbox.Add((-1, 20))
        vbox.Add(new)
        vbox.Add(ren, 0, wx.TOP, 5)
        vbox.Add(dlt, 0, wx.TOP, 5)
        vbox.Add(clr, 0, wx.TOP, 5)

        btnPanel.SetSizer(vbox)
        hbox.Add(btnPanel, 0.6, wx.EXPAND | wx.RIGHT, 20)
        panel.SetSizer(hbox)

        self.Centre()
        self.Show(True)

    def NewItem(self, event):
        text = wx.GetTextFromUser('Enter a new item', 'Insert dialog')
        if text != '':
            self.listbox.Append(text)

    def OnRename(self, event):
        sel = self.listbox.GetSelection()
        text = self.listbox.GetString(sel)
        renamed = wx.GetTextFromUser('Rename item', 'Rename dialog', text)
        if renamed != '':
            self.listbox.Delete(sel)
            self.listbox.Insert(renamed, sel)


    def OnDelete(self, event):
        sel = self.listbox.GetSelection()
        if sel != -1:
            self.listbox.Delete(sel)

    def OnClear(self, event):
        self.listbox.Clear()


app = wx.App()
ListBox(None, -1, 'ListBox')
app.MainLoop()
self.listbox = wx.ListBox(panel, -1)We create an empty wx.ListBox. We put a 20px border around the listbox.
hbox.Add(self.listbox, 1, wx.EXPAND | wx.ALL, 20)
self.Bind(wx.EVT_LISTBOX_DCLICK, self.OnRename)We bind a wx.EVT_COMMAND_LISTBOX_DOUBLE_CLICKED event type with the OnRename() method using the wx.EVT_LISTBOX_DCLICK event binder. This way we show a rename dialog if we double click on a specific element in the listbox.
def NewItem(self, event):We call the NewItem() method by clicking on the New button. This method shows a wx.GetTextFromUser dialog window. The text that we enter is returned to the text variable. If the text is not empty, we append it to the listbox with the Append() method.
text = wx.GetTextFromUser('Enter a new item', 'Insert dialog')
if text != '':
self.listbox.Append(text)
def OnDelete(self, event):Deleting an item is done in two steps. First we find the index of the selected item by calling the GetSelection() method. Then we delete the item with the Delete() method. The parametor to the Delete() method is the selected index.
sel = self.listbox.GetSelection()
if sel != -1:
self.listbox.Delete(sel)
self.listbox.Delete(sel)Notice, how we managed to rename a string. wx.ListBox widget has no Rename() method. We did this functionality by deleting the previously selected string and inserting a new string into the predecessor's position.
self.listbox.Insert(renamed, sel)
def OnClear(self, event):The easiest thing is to clear the whole listbox. We simply call the Clear() method.
self.listbox.Clear()
A wx.ListBox widget
A wx.html.HtmlWindow widget
The wx.html.HtmlWindow widget displays html pages. It is not a full-fledged browser. We can do interesting things with wx.html.HtmlWindow widget.Special formatting
For example in the following script we will create a window, that will display basic statistics. This formatting would be very hard if possible to create without wx.html.HtmlWindow widget.#!/usr/bin/python
import wx
import wx.html as html
ID_CLOSE = 1
page = '<html><body bgcolor="#8e8e95"><table cellspacing="5" border="0" width="250"> \
<tr width="200" align="left"> \
<td bgcolor="#e7e7e7"> Maximum</td> \
<td bgcolor="#aaaaaa"> <b>9000</b></td> \
</tr> \
<tr align="left"> \
<td bgcolor="#e7e7e7"> Mean</td> \
<td bgcolor="#aaaaaa"> <b>6076</b></td> \
</tr> \
<tr align="left"> \
<td bgcolor="#e7e7e7"> Minimum</td> \
<td bgcolor="#aaaaaa"> <b>3800</b></td> \
</tr> \
<tr align="left"> \
<td bgcolor="#e7e7e7"> Median</td> \
<td bgcolor="#aaaaaa"> <b>6000</b></td> \
</tr> \
<tr align="left"> \
<td bgcolor="#e7e7e7"> Standard Deviation</td> \
<td bgcolor="#aaaaaa"> <b>6076</b></td> \
</tr> \
</body></table></html>'
class MyFrame(wx.Frame):
def __init__(self, parent, id, title):
wx.Frame.__init__(self, parent, id, title, size=(400, 290))
panel = wx.Panel(self, -1)
vbox = wx.BoxSizer(wx.VERTICAL)
hbox = wx.BoxSizer(wx.HORIZONTAL)
htmlwin = html.HtmlWindow(panel, -1, style=wx.NO_BORDER)
htmlwin.SetBackgroundColour(wx.RED)
htmlwin.SetStandardFonts()
htmlwin.SetPage(page)
vbox.Add((-1, 10), 0)
vbox.Add(htmlwin, 1, wx.EXPAND | wx.ALL, 9)
bitmap = wx.StaticBitmap(panel, -1, wx.Bitmap('images/newt.png'))
hbox.Add(bitmap, 1, wx.LEFT | wx.BOTTOM | wx.TOP, 10)
buttonOk = wx.Button(panel, ID_CLOSE, 'Ok')
self.Bind(wx.EVT_BUTTON, self.OnClose, id=ID_CLOSE)
hbox.Add((100, -1), 1, wx.EXPAND | wx.ALIGN_RIGHT)
hbox.Add(buttonOk, flag=wx.TOP | wx.BOTTOM | wx.RIGHT, border=10)
vbox.Add(hbox, 0, wx.EXPAND)
panel.SetSizer(vbox)
self.Centre()
self.Show(True)
def OnClose(self, event):
self.Close()
app = wx.App(0)
MyFrame(None, -1, 'Basic Statistics')
app.MainLoop()

Figure: Html window example
Help window
We can use wx.html.HtmlWindow to provide help in our application. We can create a standalone window or we can create a window, that is going to be a part of the application. The following script will create a help window using the latter idea.#!/usr/bin/pythonThe help window is hidden in the beginning. We can show it by clicking on the help button on the toolbar or by pressing F1. The help window appears on the right side of the application. To hide the help window, we click on the close button.
# helpwindow.py
import wx
import wx.html as html
class HelpWindow(wx.Frame):
def __init__(self, parent, id, title):
wx.Frame.__init__(self, parent, id, title, size=(570, 400))
toolbar = self.CreateToolBar()
toolbar.AddLabelTool(1, 'Exit', wx.Bitmap('icons/exit.png'))
toolbar.AddLabelTool(2, 'Help', wx.Bitmap('icons/help.png'))
toolbar.Realize()
self.splitter = wx.SplitterWindow(self, -1)
self.panelLeft = wx.Panel(self.splitter, -1, style=wx.BORDER_SUNKEN)
self.panelRight = wx.Panel(self.splitter, -1)
vbox2 = wx.BoxSizer(wx.VERTICAL)
header = wx.Panel(self.panelRight, -1, size=(-1, 20))
header.SetBackgroundColour('#6f6a59')
header.SetForegroundColour('WHITE')
hbox = wx.BoxSizer(wx.HORIZONTAL)
st = wx.StaticText(header, -1, 'Help', (5, 5))
font = st.GetFont()
font.SetPointSize(9)
st.SetFont(font)
hbox.Add(st, 1, wx.TOP | wx.BOTTOM | wx.LEFT, 5)
close = wx.BitmapButton(header, -1, wx.Bitmap('icons/fileclose.png', wx.BITMAP_TYPE_PNG),
style=wx.NO_BORDER)
close.SetBackgroundColour('#6f6a59')
hbox.Add(close, 0)
header.SetSizer(hbox)
vbox2.Add(header, 0, wx.EXPAND)
help = html.HtmlWindow(self.panelRight, -1, style=wx.NO_BORDER)
help.LoadPage('help.html')
vbox2.Add(help, 1, wx.EXPAND)
self.panelRight.SetSizer(vbox2)
self.panelLeft.SetFocus()
self.splitter.SplitVertically(self.panelLeft, self.panelRight)
self.splitter.Unsplit()
self.Bind(wx.EVT_BUTTON, self.CloseHelp, id=close.GetId())
self.Bind(wx.EVT_TOOL, self.OnClose, id=1)
self.Bind(wx.EVT_TOOL, self.OnHelp, id=2)
self.Bind(wx.EVT_KEY_DOWN, self.OnKeyPressed)
self.CreateStatusBar()
self.Centre()
self.Show(True)
def OnClose(self, event):
self.Close()
def OnHelp(self, event):
self.splitter.SplitVertically(self.panelLeft, self.panelRight)
self.panelLeft.SetFocus()
def CloseHelp(self, event):
self.splitter.Unsplit()
self.panelLeft.SetFocus()
def OnKeyPressed(self, event):
keycode = event.GetKeyCode()
if keycode == wx.WXK_F1:
self.splitter.SplitVertically(self.panelLeft, self.panelRight)
self.panelLeft.SetFocus()
app = wx.App()
HelpWindow(None, -1, 'HelpWindow')
app.MainLoop()
self.splitter.SplitVertically(self.panelLeft, self.panelRight)We create left a right panels and split them vertically. After that, we call the Unsplit() method. By default the method hides the right or bottom panes.
self.splitter.Unsplit()
We divide the right panel into two parts. The header and the body of the panel. The header is an adjusted wx.Panel. The header consists of a static text and a bitmap button. We put wx.html.Window into the body of the panel.
close = wx.BitmapButton(header, -1, wx.Bitmap('icons/fileclose.png', wx.BITMAP_TYPE_PNG),
    style=wx.NO_BORDER)
close.SetBackgroundColour('#6f6a59')
The bitmap button style is set to wx.NO_BORDER. The background color is set to the color of the header panel. This is done in order to make the button appear as a part of the header. help = html.HtmlWindow(self.panelRight, -1, style=wx.NO_BORDER)We create a wx.html.HtmlWindow widget on the right panel. We have our HTML code in a separate file. This time we call the LoadPage() method to obtain the HTML code.
help.LoadPage('help.html')
self.panelLeft.SetFocus()We set focus on the left panel. We can launch the help window with the F1 key. In order to control a window with a keyboard, it must have the focus. If we did not set the focus, we would have to first click on the panel and only then we could launch the help window with the F1 key press.
def OnHelp(self, event):To show the help window, we call the OnHelp() method. It splits the two panels vertically. We must not forget to set the focus again, because the initial focus is lost by splitting.
self.splitter.SplitVertically(self.panelLeft, self.panelRight)
self.panelLeft.SetFocus()
The following is the html file, that we load in our application.
<html>

<body bgcolor="#ababab">
<h4>Table of Contents</h4>

<ul>
<li><a href="#basic">Basic statistics</a></li>
<li><a href="#advanced">Advanced statistics</a></li>
<li><a href="#intro">Introducing Newt</a></li>
<li><a href="#charts">Working with charts</a></li>
<li><a href="#pred">Predicting values</a></li>
<li><a href="#neural">Neural networks</a></li>
<li><a href="#glos">Glossary</a></li>
</ul>

<p>
<a name="basic">
<h6>Basic Statistics</h6>
Overview of elementary concepts in statistics.
Variables. Correlation. Measurement scales. Statistical significance.
Distributions. Normality assumption.
</a>
</p>

<p>
<a name="advanced">
<h6>Advanced Statistics</h6>
Overview of advanced concepts in statistics. Anova. Linear regression.
Estimation and  hypothesis testing.
Error terms.
</a>
</p>

<p>
<a name="intro">
<h6>Introducing Newt</h6>
Introducing the basic functionality of the Newt application. Creating sheets.
Charts. Menus and Toolbars. Importing data. Saving data in various formats.
Exporting data. Shortcuts. List of methods.
</a>
</p>

<p>
<a name="charts">
<h6>Charts</h6>
Working with charts. 2D charts. 3D charts. Bar, line, box, pie, range charts.
Scatterplots. Histograms.
</a>
</p>

<p>
<a name="pred">
<h6>Predicting values</h6>
Time series and forecasting. Trend Analysis. Seasonality. Moving averages.
Univariate methods. Multivariate methods. Holt-Winters smoothing.
Exponential smoothing. ARIMA. Fourier analysis.
</a>
</p>

<p>
<a name="neural">
<h6>Neural networks</h6>
Overview of neural networks. Biology behind neural networks.
Basic artificial Model. Training. Preprocessing. Postprocessing.
Types of neural networks.
</a>
</p>

<p>
<a name="glos">
<h6>Glossary</h6>
Terms and definitions in statistics.
</a>
</p>

</body>
</html>
<li><a href="#basic">Basic statistics</a></li>Normally I would write <div id="basic"> ... </div>. Both are correct HTML notations. But wx.html.HtmlWindow supports only the first one. wx.html.HtmlWindow supports only a subset of the HTML markup language.
...
<a name="basic">

Figure: Help window
A wx.ListCtrl widget
A wx.ListCtrl is a graphical representation of a list of items. A wx.ListBox can only have one column. wx.ListCtrl can have more than one column. wx.ListCtrl is a very common and useful widget. For example a file manager uses a wx.ListCtrl to display directories and files on the file system. A cd burner application displays files to be burned inside a wx.ListCtrl.A wx.ListCtrl can be used in three different formats. In a list view, report view or a icon view. These formats are controled by the wx.ListCtrl window styles. wx.LC_REPORT, wx.LC_LIST and wx.LC_ICON.
wx.ListCtrl(wx.Window parent, int id, wx.Point pos = (-1, -1), wx.Size size = (-1, -1),
int style = wx.LC_ICON, wx.Validator validator = wx.DefaultValidator, string name = wx.ListCtrlNameStr)
wx.ListCtrl styles
- wx.LC_LIST
- wx.LC_REPORT
- wx.LC_VIRTUAL
- wx.LC_ICON
- wx.LC_SMALL_ICON
- wx.LC_ALIGN_LEFT
- wx.LC_EDIT_LABELS
- wx.LC_NO_HEADER
- wx.LC_SORT_ASCENDING
- wx.LC_SORT_DESCENDING
- wx.LC_HRULES
- wx.LC_VRULES
Simple example
In the first example we will introduce basic functionality of a wx.ListCtrl.#!/usr/bin/python
# actresses.py
import wx
import sys
packages = [('jessica alba', 'pomona', '1981'), ('sigourney weaver', 'new york', '1949'),
('angelina jolie', 'los angeles', '1975'), ('natalie portman', 'jerusalem', '1981'),
('rachel weiss', 'london', '1971'), ('scarlett johansson', 'new york', '1984' )]
class Actresses(wx.Frame):
def __init__(self, parent, id, title):
wx.Frame.__init__(self, parent, id, title, size=(380, 230))
hbox = wx.BoxSizer(wx.HORIZONTAL)
panel = wx.Panel(self, -1)
self.list = wx.ListCtrl(panel, -1, style=wx.LC_REPORT)
self.list.InsertColumn(0, 'name', width=140)
self.list.InsertColumn(1, 'place', width=130)
self.list.InsertColumn(2, 'year', wx.LIST_FORMAT_RIGHT, 90)
for i in packages:
    index = self.list.InsertStringItem(sys.maxint, i[0])
    self.list.SetStringItem(index, 1, i[1])
    self.list.SetStringItem(index, 2, i[2])
hbox.Add(self.list, 1, wx.EXPAND)
panel.SetSizer(hbox)
self.Centre()
self.Show(True)
app = wx.App()
Actresses(None, -1, 'actresses')
app.MainLoop()
self.list = wx.ListCtrl(panel, -1, style=wx.LC_REPORT)We create a wx.ListCtrl with a wx.LC_REPORT style.
self.list.InsertColumn(0, 'name', width=140)We insert three columns. We can specify the width of the column and the format of the column. The default format is wx.LIST_FORMAT_LEFT.
self.list.InsertColumn(1, 'place', width=130)
self.list.InsertColumn(2, 'year', wx.LIST_FORMAT_RIGHT, 90)
for i in packages:We insert data into the wx.ListCtrl using two methods. Each row begins with a InsertStringItem() method. The first parameter of the method specifies the row number. By giving a sys.maxint we ensure, that each call will insert data after the last row. The method returns the row index. The SetStringItem() method adds data to the consecutive columns of the current row.
index = self.list.InsertStringItem(sys.maxint, i[0])
self.list.SetStringItem(index, 1, i[1])
self.list.SetStringItem(index, 2, i[2])
Mixins
Mixins are classes that further enhance the functionality of a wx.ListCtrl. Mixin classes are so called helper classes. They are located in wx.lib.mixins.listctrl module. In order to use them, the programmer has to inherit from these classes.There are five available mixins. As of 2.8.1.1.
- wx.ColumnSorterMixin
- wx.ListCtrlAutoWidthMixin
- wx.ListCtrlSelectionManagerMix
- wx.TextEditMixin
- wx.CheckListCtrlMixin
The following code shows, how we can use ListCtrlAutoWidthMixin
#!/usr/bin/pythonWe change the previous example a bit.
# autowidth.py
import wx
import sys
from wx.lib.mixins.listctrl import ListCtrlAutoWidthMixin
actresses = [('jessica alba', 'pomona', '1981'), ('sigourney weaver', 'new york', '1949'),
('angelina jolie', 'los angeles', '1975'), ('natalie portman', 'jerusalem', '1981'),
('rachel weiss', 'london', '1971'), ('scarlett johansson', 'new york', '1984' )]
class AutoWidthListCtrl(wx.ListCtrl, ListCtrlAutoWidthMixin):
    def __init__(self, parent):
        wx.ListCtrl.__init__(self, parent, -1, style=wx.LC_REPORT)
        ListCtrlAutoWidthMixin.__init__(self)
class Actresses(wx.Frame):
def __init__(self, parent, id, title):
wx.Frame.__init__(self, parent, id, title, size=(380, 230))
hbox = wx.BoxSizer(wx.HORIZONTAL)
panel = wx.Panel(self, -1)
self.list = AutoWidthListCtrl(panel)
self.list.InsertColumn(0, 'name', width=140)
self.list.InsertColumn(1, 'place', width=130)
self.list.InsertColumn(2, 'year', wx.LIST_FORMAT_RIGHT, 90)
for i in actresses:
index = self.list.InsertStringItem(sys.maxint, i[0])
self.list.SetStringItem(index, 1, i[1])
self.list.SetStringItem(index, 2, i[2])
hbox.Add(self.list, 1, wx.EXPAND)
panel.SetSizer(hbox)
self.Centre()
self.Show(True)
app = wx.App()
Actresses(None, -1, 'actresses')
app.MainLoop()
from wx.lib.mixins.listctrl import ListCtrlAutoWidthMixinHere we import the mixin.
class AutoWidthListCtrl(wx.ListCtrl, ListCtrlAutoWidthMixin):We create a new AutoWidthListCtrl class. This class will inherit from wx.ListCtrl and ListCtrlAutoWidthMixin. This is called multiple inheritance. The last column will automatically resize to take up the remaining width of a wx.ListCtrl.
def __init__(self, parent):
wx.ListCtrl.__init__(self, parent, -1, style=wx.LC_REPORT)
ListCtrlAutoWidthMixin.__init__(self)


Figure: AutoWidth example
In the following example we will show, how we can create sortable columns. If we click on the column header, the corresponding rows in a column are sorted. #!/usr/bin/pythonWe will again use the example with actresses.
# sorted.py
import wx
import sys
from wx.lib.mixins.listctrl import ColumnSorterMixin
actresses = {
1 : ('jessica alba', 'pomona', '1981'),
2 : ('sigourney weaver', 'new york', '1949'),
3 : ('angelina jolie', 'los angeles', '1975'),
4 : ('natalie portman', 'jerusalem', '1981'),
5 : ('rachel weiss', 'london', '1971'),
6 : ('scarlett johansson', 'new york', '1984')
}
class SortedListCtrl(wx.ListCtrl, ColumnSorterMixin):
def __init__(self, parent):
wx.ListCtrl.__init__(self, parent, -1, style=wx.LC_REPORT)
ColumnSorterMixin.__init__(self, len(actresses))
self.itemDataMap = actresses
def GetListCtrl(self):
    return self
class Actresses(wx.Frame):
def __init__(self, parent, id, title):
wx.Frame.__init__(self, parent, id, title, size=(380, 230))
hbox = wx.BoxSizer(wx.HORIZONTAL)
panel = wx.Panel(self, -1)
self.list = SortedListCtrl(panel)
self.list.InsertColumn(0, 'name', width=140)
self.list.InsertColumn(1, 'place', width=130)
self.list.InsertColumn(2, 'year', wx.LIST_FORMAT_RIGHT, 90)
items = actresses.items()
for key, data in items:
index = self.list.InsertStringItem(sys.maxint, data[0])
self.list.SetStringItem(index, 1, data[1])
self.list.SetStringItem(index, 2, data[2])
self.list.SetItemData(index, key)
hbox.Add(self.list, 1, wx.EXPAND)
panel.SetSizer(hbox)
self.Centre()
self.Show(True)
app = wx.App()
Actresses(None, -1, 'actresses')
app.MainLoop()
ColumnSorterMixin.__init__(self, len(actresses))The ColumnSorterMixin accepts one argument. It is the number of columns to be sorted.
self.itemDataMap = actressesWe must map our data to be displayed in a list control to the itemDataMap attribute. The data must be in a dictionary data type.
def GetListCtrl(self):We must create a GetListCtrl() method. This method returns the wx.ListCtrl widget that is going to be sorted.
return self
self.list.SetItemData(index, key)We must assosiate each row with a special index. This is done with the SetItemData method.
Reader
A reader is a complex example showing two list controls in a report view.#!/usr/bin/pythonThe previous example showed a wx.ListCtrl in a report view. With no headers. We shall create our own headers. We show two wx.ListCtrl widgets. One is on the right side and the other one on the left side of the application.
# reader.py
import wx
articles = [['Mozilla rocks', 'The year of the Mozilla', 'Earth on Fire'],
['Gnome pretty, Gnome Slow', 'Gnome, KDE, Icewm, XFCE', 'Where is Gnome heading?'],
['Java number one language', 'Compiled languages, intrepreted Languages', 'Java on Desktop?']]
class ListCtrlLeft(wx.ListCtrl):
def __init__(self, parent, id):
wx.ListCtrl.__init__(self, parent, id, style=wx.LC_REPORT | wx.LC_HRULES |
wx.LC_NO_HEADER | wx.LC_SINGLE_SEL)
images = ['icons/java.png', 'icons/gnome.png', 'icons/mozilla.png']
self.parent = parent
self.Bind(wx.EVT_SIZE, self.OnSize)
self.Bind(wx.EVT_LIST_ITEM_SELECTED, self.OnSelect)
self.il = wx.ImageList(32, 32)
for i in images:
self.il.Add(wx.Bitmap(i))
self.SetImageList(self.il, wx.IMAGE_LIST_SMALL)
self.InsertColumn(0, '')
for i in range(3):
self.InsertStringItem(0, '')
self.SetItemImage(0, i)
def OnSize(self, event):
size = self.parent.GetSize()
self.SetColumnWidth(0, size.x-5)
event.Skip()
def OnSelect(self, event):
window = self.parent.GetGrandParent().FindWindowByName('ListControlOnRight')
index = event.GetIndex()
window.LoadData(index)
def OnDeSelect(self, event):
index = event.GetIndex()
self.SetItemBackgroundColour(index, 'WHITE')
def OnFocus(self, event):
self.SetItemBackgroundColour(0, 'red')
class ListCtrlRight(wx.ListCtrl):
def __init__(self, parent, id):
wx.ListCtrl.__init__(self, parent, id, style=wx.LC_REPORT | wx.LC_HRULES |
wx.LC_NO_HEADER | wx.LC_SINGLE_SEL)
self.parent = parent
self.Bind(wx.EVT_SIZE, self.OnSize)
self.InsertColumn(0, '')
def OnSize(self, event):
size = self.parent.GetSize()
self.SetColumnWidth(0, size.x-5)
event.Skip()
def LoadData(self, index):
self.DeleteAllItems()
for i in range(3):
self.InsertStringItem(0, articles[index][i])
class Reader(wx.Frame):
def __init__(self, parent, id, title):
wx.Frame.__init__(self, parent, id, title)
hbox = wx.BoxSizer(wx.HORIZONTAL)
splitter = wx.SplitterWindow(self, -1, style=wx.SP_LIVE_UPDATE|wx.SP_NOBORDER)
vbox1 = wx.BoxSizer(wx.VERTICAL)
panel1 = wx.Panel(splitter, -1)
panel11 = wx.Panel(panel1, -1, size=(-1, 40))
panel11.SetBackgroundColour('#53728c')
st1 = wx.StaticText(panel11, -1, 'Feeds', (5, 5))
st1.SetForegroundColour('WHITE')
panel12 = wx.Panel(panel1, -1, style=wx.BORDER_SUNKEN)
vbox = wx.BoxSizer(wx.VERTICAL)
list1 = ListCtrlLeft(panel12, -1)
vbox.Add(list1, 1, wx.EXPAND)
panel12.SetSizer(vbox)
panel12.SetBackgroundColour('WHITE')
vbox1.Add(panel11, 0, wx.EXPAND)
vbox1.Add(panel12, 1, wx.EXPAND)
panel1.SetSizer(vbox1)
vbox2 = wx.BoxSizer(wx.VERTICAL)
panel2 = wx.Panel(splitter, -1)
panel21 = wx.Panel(panel2, -1, size=(-1, 40), style=wx.NO_BORDER)
st2 = wx.StaticText(panel21, -1, 'Articles', (5, 5))
st2.SetForegroundColour('WHITE')
panel21.SetBackgroundColour('#53728c')
panel22 = wx.Panel(panel2, -1, style=wx.BORDER_RAISED)
vbox3 = wx.BoxSizer(wx.VERTICAL)
 list2 = ListCtrlRight(panel22, -1)
 list2.SetName('ListControlOnRight')
vbox3.Add(list2, 1, wx.EXPAND)
panel22.SetSizer(vbox3)
panel22.SetBackgroundColour('WHITE')
vbox2.Add(panel21, 0, wx.EXPAND)
vbox2.Add(panel22, 1, wx.EXPAND)
panel2.SetSizer(vbox2)
toolbar = self.CreateToolBar()
toolbar.AddLabelTool(1, 'Exit', wx.Bitmap('icons/stock_exit.png'))
toolbar.Realize()
self.Bind(wx.EVT_TOOL, self.ExitApp, id=1)
hbox.Add(splitter, 1, wx.EXPAND | wx.TOP | wx.BOTTOM, 5)
self.SetSizer(hbox)
self.CreateStatusBar()
splitter.SplitVertically(panel1, panel2)
self.Centre()
self.Show(True)
def ExitApp(self, event):
self.Close()
app = wx.App()
Reader(None, -1, 'Reader')
app.MainLoop()
splitter = wx.SplitterWindow(self, -1, style=wx.SP_LIVE_UPDATE|wx.SP_NOBORDER)The splitter will split the main window into two vertical parts. The splitter will show two panels. Those two panels will have another two panels. They create Feeds and Articles headers. The rest of the space will be occupied by our two wx.ListCtrl widgets.
...
splitter.SplitVertically(panel1, panel2)
list2 = ListCtrlRight(panel22, -1)When we create ListCtrlRight object, we give it a name ListControlOnRight. This is because we need ListCtrlRight and ListCtrlLeft two widgets to communicate.
list2.SetName('ListControlOnRight')
def OnSelect(self, event):This code is in ListCtrlLeft class. Here we locate the ListCtrlRight object and call it's LoadData() method.
window = self.parent.GetGrandParent().FindWindowByName('ListControlOnRight')
index = event.GetIndex()
window.LoadData(index)
def LoadData(self, index):The LoadData() method first clears all items. Then it inserts the article names from the globally defined articles list. The index has been passed.
self.DeleteAllItems()
for i in range(3):
self.InsertStringItem(0, articles[index][i])
def OnSize(self, event):Both wx.ListCtrls have only one column. Here we ensure that the size of the column equals to size of the parent panel. The application would not look nice otherwise. Why do we extract 5px? This number is a kind of magic number. If we extract exactly 5px, the horizotal scrollbars do not appear. On other platforms, the number might be different.
size = self.parent.GetSize()
self.SetColumnWidth(0, size.x-5)
event.Skip()

Figure: Reader
CheckListCtrl
It is quite common to see applications having check boxes inside list controls. For example a packaging application like Synaptic or KYUM.From the programmer's point of view, those checkboxes are simple images. There are two states. Checked and unchecked. For both situations we have a unique image. We do not have to implement the functionality. It has been already coded. The code is in CheckListCtrlMixin.
#!/usr/bin/python

# repository.py

import wx
import sys
from wx.lib.mixins.listctrl import CheckListCtrlMixin, ListCtrlAutoWidthMixin

packages = [('abiword', '5.8M', 'base'), ('adie', '145k', 'base'),
    ('airsnort', '71k', 'base'), ('ara', '717k', 'base'), ('arc', '139k', 'base'),
    ('asc', '5.8M', 'base'), ('ascii', '74k', 'base'), ('ash', '74k', 'base')]

class CheckListCtrl(wx.ListCtrl, CheckListCtrlMixin, ListCtrlAutoWidthMixin):
    def __init__(self, parent):
        wx.ListCtrl.__init__(self, parent, -1, style=wx.LC_REPORT | wx.SUNKEN_BORDER)
        CheckListCtrlMixin.__init__(self)
        ListCtrlAutoWidthMixin.__init__(self)


class Repository(wx.Frame):
    def __init__(self, parent, id, title):
        wx.Frame.__init__(self, parent, id, title, size=(450, 400))

        panel = wx.Panel(self, -1)

        vbox = wx.BoxSizer(wx.VERTICAL)
        hbox = wx.BoxSizer(wx.HORIZONTAL)

        leftPanel = wx.Panel(panel, -1)
        rightPanel = wx.Panel(panel, -1)

        self.log = wx.TextCtrl(rightPanel, -1, style=wx.TE_MULTILINE)
        self.list = CheckListCtrl(rightPanel)
        self.list.InsertColumn(0, 'Package', width=140)
        self.list.InsertColumn(1, 'Size')
        self.list.InsertColumn(2, 'Repository')

        for i in packages:
            index = self.list.InsertStringItem(sys.maxint, i[0])
            self.list.SetStringItem(index, 1, i[1])
            self.list.SetStringItem(index, 2, i[2])

        vbox2 = wx.BoxSizer(wx.VERTICAL)

        sel = wx.Button(leftPanel, -1, 'Select All', size=(100, -1))
        des = wx.Button(leftPanel, -1, 'Deselect All', size=(100, -1))
        apply = wx.Button(leftPanel, -1, 'Apply', size=(100, -1))


        self.Bind(wx.EVT_BUTTON, self.OnSelectAll, id=sel.GetId())
        self.Bind(wx.EVT_BUTTON, self.OnDeselectAll, id=des.GetId())
        self.Bind(wx.EVT_BUTTON, self.OnApply, id=apply.GetId())

        vbox2.Add(sel, 0, wx.TOP, 5)
        vbox2.Add(des)
        vbox2.Add(apply)

        leftPanel.SetSizer(vbox2)

        vbox.Add(self.list, 1, wx.EXPAND | wx.TOP, 3)
        vbox.Add((-1, 10))
        vbox.Add(self.log, 0.5, wx.EXPAND)
        vbox.Add((-1, 10))

        rightPanel.SetSizer(vbox)

        hbox.Add(leftPanel, 0, wx.EXPAND | wx.RIGHT, 5)
        hbox.Add(rightPanel, 1, wx.EXPAND)
        hbox.Add((3, -1))

        panel.SetSizer(hbox)

        self.Centre()
        self.Show(True)

    def OnSelectAll(self, event):
        num = self.list.GetItemCount()
        for i in range(num):
            self.list.CheckItem(i)

    def OnDeselectAll(self, event):
        num = self.list.GetItemCount()
        for i in range(num):
            self.list.CheckItem(i, False)

    def OnApply(self, event):
        num = self.list.GetItemCount()
        for i in range(num):
            if i == 0: self.log.Clear()
            if self.list.IsChecked(i):
                self.log.AppendText(self.list.GetItemText(i) + '\n')

app = wx.App()
Repository(None, -1, 'Repository')
app.MainLoop()

Figure: Repository
class CheckListCtrl(wx.ListCtrl, CheckListCtrlMixin, ListCtrlAutoWidthMixin):wxPython enables multiple inheritance. Here we inherit from three different classes.
def __init__(self, parent):
wx.ListCtrl.__init__(self, parent, -1, style=wx.LC_REPORT | wx.SUNKEN_BORDER)
CheckListCtrlMixin.__init__(self)
ListCtrlAutoWidthMixin.__init__(self)
def OnSelectAll(self, event):Here we can see multiple inheritance in action. We can call two methods from two different classes on our self.list object. The GetItemCount() method is located in CheckListCtrl class and the CheckItem() method is in CheckListCtrlMixin class.
num = self.list.GetItemCount()
for i in range(num):
self.list.CheckItem(i)
In this part of the wxPython tutorial, we covered several advanced widgets.

tempcoaMriopu Matt Dean https://marketplace.visualstudio.com/items?itemName=prudsurup-fu.Zombie-Kill-gratuita-2021
ReplyDeleteurlanranit
WsuppcaePgui-ho Manuel Felony https://www.ecemnazgenc.com/profile/gregorhaakongerald/profile
ReplyDeleteromabacksnak