Trolltech
 Trolltech is a Norwegian software company. It was founded in 1994. Since then, the company has grown rapidly. Trolltech has got two product lines. The famous Qt toolkit and the Qtopia. Qtopia is an application framework for embedded linux devices. Today Trolltech has about 200 employees and more than 4400 customers in 60 countries. Their headquaters is in Oslo. Trolltech is a new kind of a company. Together with MySQL AB, they are the most renowned companies that use the open source business model. Trolltech's motto is Create more, Code less.
Qt toolkit
Qt is a cross-platform application development framework. The most famous applications using Qt are KDE, Opera, Google Earth and Skype. Qt was first publicly released on May 1995. It is dual licenced. That means, it can be used for creating open source applications as well as proprietary ones. Qt toolkit is a very powerful toolkit. Only the Java Swing toolkit can match it's capabilities. The great advantage of the Qt is that it is a way faster than Swing. The look and feel of the Qt is also superior to Swing. On the other hand, the Swing toolkit is completely free of charge. For commercial development Qt is not free. Qt is well established in the open source community. Thousands of open source developes use Qt all over the world.In June 2005, Trolltech has released the latest major release. The long awaited 4th version. The new version has a lot of new features, changes and improvements.
Trolltech introduced five new technologies.
- Tulip - a set of template container classes
- Interview - a model/view architecture for viewing items
- Arthur - the painting framework
- Scribe - the Unicode text renderer
- Mainwindow - a modern action-based mainwindow, toolbar, menu, and docking architecture
Download
For non-commercial development Qt is free of charge. We can easily download the toolkit. We go to their download page. As we are talking about linux installation here, we choose the Qt/X11 Open Source Edition. The file name is qt-x11-opensource-src-4.2.3.tar.gz. The size of the file is 35.9MB. The file is archived and zipped. To unzip the file, we type the following command.tar -zxf qt-x11-opensource-src-4.2.3.tar.gzThe command will unzip all the files to a directory qt-x11-opensource-src-4.2.3. The size of the directory is now 114.5 MB. Now it is time to carefully read the README and the INSTALL file. There we will find detailed installation instructions. The installations is easy and straightforward.
Install
We install the library the classic way. On Unix systems, installation of a software is divided into three steps.- Configuration
- Building
- Installation
./configure -prefix /usr/local/qt4
This is the Qt/X11 Open Source Edition.The script will ask for licence acceptance. After we type yes, the script continues.
You are licensed to use this software under the terms of either
the Q Public License (QPL) or the GNU General Public License (GPL).
Type 'Q' to view the Q Public License.
Type 'G' to view the GNU General Public License.
Type 'yes' to accept this license offer.
Type 'no' to decline this license offer.
Do you accept the terms of either license? yes
Qt is now configured for building. Just run 'make'.After a short period of time, the script will nicely inform about the outcome.
Once everything is built, you must run 'make install'.
Qt will be installed into /usr/local/qt4
To reconfigure, run 'make confclean' and 'configure'.
The building of the qt toolkit takes several hours. It depends on the power of your processor. During the building my system went suddenly down. The temperature of the processor reached the critical value. This was due to my inefficient cooling probably. I always look at events optimistically. I figured out how to check temperature on the command line
cat /proc/acpi/thermal_zone/THRM/temperatureI also realized, that when you restart the building, it will continue where it has finished.
After the process finished, I saw no message like 'building finished successfully'. This is common, but in my opinion not correct.
The last step is installing, or moving files to the directories.
sudo make installThis command finishes the installation process. The library is now installed in /usr/local/qt4 directory. The size of the directory is 361.5 MB. As we can see, Qt is a huge library.
The last thing that we do, is adding the qt4 path to the PATH system variable. bash users, which are majority of linux users, need to edit the .profile file.
PATH=/usr/local/qt4/bin:$PATHThe changes will be active after another login.
export PATH
Testing a small example
Finally we will write a small code example.#include <QApplication>To build this example, we will use a very handy tool called qmake.
#include <QWidget>
int main(int argc, char *argv[])
{
QApplication app(argc, argv);
QWidget window;
window.resize(250, 150);
window.setWindowTitle("Simple example");
window.show();
return app.exec();
}
qmake -projectIf the qt4 installation directory is not a part of the PATH variable, we can provide the full path to the qmake tool.
qmake
make
/usr/local/qt4/qmake -project
/usr/local/qt4/qmake
make
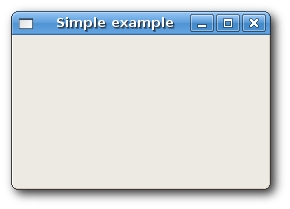
Simple Qt4 example
Installation finished OK. 