Showing posts with label Android. Show all posts

Step By Step Android Programming Tutorials For Beginners

Android tutorial

This is Android development tutorial. The tutorial is suited for beginners. After reading this tutorial, you will be able to program non-trivial Android applications.

Table of contents

Android

Android is a Linux based operating system designed for mobile devices such as smartphones and tablet computers. It is also used for various networking equipments, smart TV systems, wrist watches and household appliences. Applications for Android are developed in a customized version of the Java programming language.
Continue Reading

Drawing in Android Programming

Drawing

In this chapter of the Android development tutorial we will do some drawing. The Android framework API provides 2D drawing API that allows to render custom graphics.
We can either draw directly on a Canvas object or to modify existing Views to customize their look and feel. Drawing is performed in the onDraw() method. Simple graphics can be created in the layout XML file too.
We use the Canvas object to perform drawing. Canvas is an object that has drawing methods to do the drawing. Actual drawing happens in a Bitmap that is placed into a window. The Paint class holds the style and colour information about how to draw geometries, text and bitmaps. A Drawable is an object that can be drawn. Unlike a View, a Drawable does not have any facility to receive events or otherwise interact with the user.

Oval shape

We are going to draw a circle on a View. The circle is defined in an XML file. The manifest file does not need to be modified.
oval.xml
<?xml version="1.0" encoding="utf-8"?>
<shape xmlns:android="http://schemas.android.com/apk/res/android"
android:shape="oval">

<solid
android:color="#666666"/>
<size
android:width="70dp"
android:height="70dp"/>
</shape>
In the oval.xml file we create a circle shape. We define its colour and size. The oval.xml file is located in the res/drawable directory. The directory had to be created.
main.xml
<?xml version="1.0" encoding="utf-8"?>
<LinearLayout xmlns:android="http://schemas.android.com/apk/res/android"
android:orientation="vertical"
android:layout_width="fill_parent"
android:layout_height="fill_parent"
>

<View
android:layout_width="100dp"
android:layout_height="100dp"
android:layout_marginTop="5dp"
android:background="@drawable/oval"
/>

</LinearLayout>
In the main.xml file, we define a simple View. The background of this view is filled with our drawable object.
strings.xml
<?xml version="1.0" encoding="utf-8"?>
<resources>
<string name="app_name">OvalShape</string>
</resources>
Resources file.
MainActivity.java
package com.zetcode.ovalshape;

import android.app.Activity;
import android.os.Bundle;

public class MainActivity extends Activity
{
@Override
public void onCreate(Bundle savedInstanceState)
{
super.onCreate(savedInstanceState);
setContentView(R.layout.main);
}
}
The file just loads the defined layout.
Oval Shape
Figure: Oval Shape

Drawing a rectangle

In the second example, we will draw a rectangle on a View. It will be drawn in the onDraw() method of the View. Since we will be drawing on an existing View, we will have a predefined Canvas with its Bitmap. We do not need to worry about them. The manifest file is not modified. In this example the main.xml file will not be needed.
strings.xml
<?xml version="1.0" encoding="utf-8"?>
<resources>
<string name="app_name">DrawRect</string>
</resources>
Resources.
DrawView.java
package com.zetcode.drawrect;

import android.content.Context;
import android.graphics.Canvas;
import android.graphics.Color;
import android.graphics.Paint;
import android.view.View;

public class DrawView extends View
{
Paint paint = new Paint();

public DrawView(Context context)
{
super(context);
paint.setColor(Color.GREEN);
}

@Override
public void onDraw(Canvas canvas)
{
canvas.drawRect(30, 30, 100, 100, paint);
}
}
We have a custom DrawView class. The file is located in the src/com/zetcode/drawrect/ directory.
public class DrawView extends View 
The custom DrawView class inherits from the base View class.
Paint paint = new Paint();
An instance of the Paint class is created. It will define a colour for drawing.
paint.setColor(Color.GREEN);
We will paint in green colour.
@Override
public void onDraw(Canvas canvas)
{
canvas.drawRect(30, 30, 100, 100, paint);
}
The drawing is performed in the onDraw() method. The method provides the Canvas object for us. We call the drawRect() to draw the rectangle on the View.
MainActivity.java
package com.zetcode.drawrect;

import android.app.Activity;
import android.graphics.Color;
import android.os.Bundle;

public class MainActivity extends Activity
{
@Override
public void onCreate(Bundle savedInstanceState)
{
super.onCreate(savedInstanceState);

DrawView drawView = new DrawView(this);
drawView.setBackgroundColor(Color.WHITE);
setContentView(drawView);
}
}
In the MainActivity.java source file we set the custom DrawView to be the content View of the Activity.
DrawView drawView = new DrawView(this);
We create an instance of the DrawView class.
drawView.setBackgroundColor(Color.WHITE);
We specify the background colour for the View.
setContentView(drawView);
The DrawView becomes the content View of the Activity.
Rectangle
Figure: Rectangle
In this chapter of the Android development tutorial, we did dome basic drawing.
Continue Reading

Android Dialogs Programming Tutorial

Dialogs

In this chapter of the Android development tutorial we will talk about dialogs. We will discuss the Android AlertDialog.
A dialog is defined as a conversation between two or more persons. In a computer application a dialog is a window which is used to "talk" to the application. A dialog is used to input data, modify data, change the application settings etc.
An AlertDialog is a dialog used to display information or receive data. It can display one, two or three buttons. It is created with a Builder subclass.

Displaying a message

We will use the AlertDialog to display a message. In the example, we do not need to modify the manifest file.
main.xml
<?xml version="1.0" encoding="utf-8"?>
<LinearLayout xmlns:android="http://schemas.android.com/apk/res/android"
android:orientation="vertical"
android:layout_width="fill_parent"
android:layout_height="fill_parent"
>

<Button
android:layout_width="wrap_content"
android:layout_height="wrap_content"
android:layout_marginTop="10dip"
android:onClick="onClicked"
android:text="@string/btn_label" />

</LinearLayout>
In the main.xml layout file, we have a Button widget. This button will display an AlertDialog.
strings.xml
<?xml version="1.0" encoding="utf-8"?>
<resources>
<string name="app_name">DisplaySize</string>
<string name="btn_label">Show</string>
</resources>
This is strings.xml file.
MainActivity.java
package com.zetcode.displaysize;

import android.app.Activity;
import android.os.Bundle;
import android.view.View;
import android.graphics.Point;
import android.app.AlertDialog;
import android.content.DialogInterface;
import android.view.WindowManager;
import android.view.Display;

public class MainActivity extends Activity
{
@Override
public void onCreate(Bundle savedInstanceState)
{
super.onCreate(savedInstanceState);
setContentView(R.layout.main);
}

public void onClicked(View view)
{
Point p = getDisplaySize();

AlertDialog ad = new AlertDialog.Builder(this).create();

ad.setTitle("Display size");
String msg = String.format("Width:%d, Height:%d", p.x, p.y);
ad.setMessage(msg);
ad.setIcon(android.R.drawable.ic_dialog_info);

ad.setButton("OK", new DialogInterface.OnClickListener() {
public void onClick(DialogInterface dialog, int which) {
dialog.cancel();
}
});

ad.show();
}

public Point getDisplaySize()
{
WindowManager wm = (WindowManager) getSystemService(WINDOW_SERVICE);
Display ds = wm.getDefaultDisplay();

Point p = new Point();
ds.getSize(p);

return p;
}
}
We use the AlertDialog to display the size of the display.
Point p = getDisplaySize();
In the custom getDisplaySize() method, we determine the size of the display.
AlertDialog ad = new AlertDialog.Builder(this).create();
An instance of the AlertDialog is created.
ad.setTitle("Display size");
String msg = String.format("Width:%d, Height:%d", p.x, p.y);
ad.setMessage(msg);
ad.setIcon(android.R.drawable.ic_dialog_info);
We set a title, message and an icon for the dialog.
ad.setButton("OK", new DialogInterface.OnClickListener() {
public void onClick(DialogInterface dialog, int which) {
dialog.cancel();
}
});
We add a button to the dialog. When we click on the OK button, the dialog is closed.
ad.show();
The show() method shows the dialog.
WindowManager wm = (WindowManager) getSystemService(WINDOW_SERVICE);
Display ds = wm.getDefaultDisplay();
We get the default display.
Point p = new Point();
ds.getSize(p);
We find out the size of the display with the getSize() method.
AlertDialog showing the size of the display
Figure: AlertDialog showing the size of the display

Receiving data

The second example uses the AlertDialog to receive data from a user. The dialog will ask a user for his name. It will then display the input in a TextView widget.
The manifest file is not modified.
main.xml
<?xml version="1.0" encoding="utf-8"?>
<LinearLayout xmlns:android="http://schemas.android.com/apk/res/android"
android:orientation="vertical"
android:layout_width="fill_parent"
android:layout_height="fill_parent"
>

<Button
android:id="@+id/btnId"
android:layout_width="wrap_content"
android:layout_height="wrap_content"
android:layout_marginTop="10dip"
android:onClick="onClicked"
android:text="@string/btn_label" />

<TextView
android:id="@+id/tvId"
android:layout_width="fill_parent"
android:layout_height="wrap_content" />

</LinearLayout>
This is main.xml file. We have a Button widget and a TextView widget. The button will show the dialog window. The TextView will receive the input text from the dialog.
strings.xml
<?xml version="1.0" encoding="utf-8"?>
<resources>
<string name="app_name">InputDialog</string>
<string name="btn_label">Show dialog</string>
</resources>
This is the strings.xml resource file.
MainActivity.java
package com.zetcode.input;

import android.app.Activity;
import android.os.Bundle;
import android.app.AlertDialog;
import android.view.View;
import android.widget.EditText;
import android.widget.TextView;
import android.content.DialogInterface;

public class MainActivity extends Activity
{
private TextView tv;

@Override
public void onCreate(Bundle savedInstanceState)
{
super.onCreate(savedInstanceState);
setContentView(R.layout.main);

tv = (TextView) findViewById(R.id.tvId);
}

public void onClicked(View view)
{
AlertDialog.Builder ad = new AlertDialog.Builder(this);

ad.setTitle("Input");
ad.setMessage("Enter your name");

final EditText input = new EditText(this);
ad.setView(input);

ad.setPositiveButton("Ok", new DialogInterface.OnClickListener() {
public void onClick(DialogInterface dlg, int which) {
String val = input.getText().toString();
String msg = String.format("Hello %s!", val);
tv.setText(msg);
}
});

ad.setNegativeButton("Cancel", new DialogInterface.OnClickListener() {
public void onClick(DialogInterface dlg, int which) {
dlg.cancel();
}
});

ad.show();
}
}
Clicking on the button widget will display the AlertDialog. It has an EditText to receive the input from a user.
AlertDialog.Builder ad = new AlertDialog.Builder(this);

ad.setTitle("Input");
ad.setMessage("Enter your name");
We set a title and a message for the dialog.
final EditText input = new EditText(this);
ad.setView(input);
We add the EditText widget to the dialog.
ad.setPositiveButton("Ok", new DialogInterface.OnClickListener() {
public void onClick(DialogInterface dlg, int which) {
String val = input.getText().toString();
String msg = String.format("Hello %s!", val);
tv.setText(msg);
}
});
Clicking on the OK button of the dialog, we get the text from the EditText widget. The text used to format a greeting which is set to the TextView.
ad.setNegativeButton("Cancel", new DialogInterface.OnClickListener() {
public void onClick(DialogInterface dlg, int which) {
dlg.cancel();
}
});
Clicking on the Cancel button will dismiss the dialog.
Receiving input
Figure: Receiving input
In this chapter of the Android development tutorial, we have shown two cases of the AlertDialog.
Continue Reading

Android Menus Programming Tutorials

Menus

In this chapter of the Android development tutorial we will work with menus. Menus group available commands of an application. In traditional desktop applications menus are part of a menubar which is located mostly in the top area of the application. Context or popup menus are special cases of menus.
There are three kinds of menus in Android. Options menu, context menu and popup menu. The options menu is the primary collection of menu items for an activity. In the options menu we should have commands that have global impact on the applications. For example a Settings menu. It is displayed either at the top or at the bottom of the activity. The context menu shows menu items in a specific context. For example for ListView items. It is shown when the user performs a long-click on an element. A popup menu displays a list of items in a vertical list that's anchored to the view that invoked the menu. It appears below the anchor view if there is room, or above the view otherwise. It should relate to regions of content in the activity.
Menus can be created manually by coding or they can be defined in an XML file. If we define our menus in an XML file we use the MenuInflater object to create menus from the XML file.

Options menu

Our options menu will have two menu items. When we select a menu item a Toast window is shown with the name of the selected menu item. The options menu is displayed after we click on the menu button.
The manifest file is not modified in this example.
Menu button
Figure: Menu button

main.xml
<?xml version="1.0" encoding="utf-8"?>
<LinearLayout xmlns:android="http://schemas.android.com/apk/res/android"
android:orientation="vertical"
android:layout_width="fill_parent"
android:layout_height="fill_parent"
>

<TextView
android:layout_width="fill_parent"
android:layout_height="wrap_content"
android:text="@string/message" />

</LinearLayout>
In the main.xml layout file, we have one TextView widget. It will display a welcome message.
strings.xml
<?xml version="1.0" encoding="utf-8"?>
<resources>
<string name="app_name">OptionsMenu</string>
<string name="message">Demonstrating Options Menu</string>
<string name="om1">Settings</string>
<string name="om2">Tools</string>
</resources>
This is strings.xml file.
options_menu.xml
<?xml version="1.0" encoding="utf-8"?>
<menu xmlns:android="http://schemas.android.com/apk/res/android">
<item android:id="@+id/settings"
android:title="@string/om1" />
<item android:id="@+id/tools"
android:title="@string/om2" />
</menu>
This is options_menu.xml file. It defines two menu items. The file is located in the res/menu/ subdirectory.
MainActivity.java
package com.zetcode.opmenu;

import android.app.Activity;
import android.os.Bundle;
import android.view.Menu;
import android.view.MenuInflater;
import android.view.MenuItem;
import android.widget.Toast;

public class MainActivity extends Activity
{
@Override
public void onCreate(Bundle savedInstanceState)
{
super.onCreate(savedInstanceState);
setContentView(R.layout.main);
}

@Override
public boolean onCreateOptionsMenu(Menu menu)
{
MenuInflater inflater = getMenuInflater();
inflater.inflate(R.menu.options_menu, menu);
return true;
}

@Override
public boolean onOptionsItemSelected(MenuItem item)
{
switch (item.getItemId())
{
case R.id.settings:
Toast.makeText(MainActivity.this, "Settings menu selected.",
Toast.LENGTH_SHORT).show();
return true;

case R.id.tools:
Toast.makeText(MainActivity.this, "Tools menu selected.",
Toast.LENGTH_SHORT).show();
return true;

default:
return super.onOptionsItemSelected(item);
}
}
}
To enable an options menu in an activity, we need to override the onCreateOptionsMenu()and the onOptionsItemSelected() methods.
@Override
public boolean onCreateOptionsMenu(Menu menu)
{
MenuInflater inflater = getMenuInflater();
inflater.inflate(R.menu.options_menu, menu);
return true;
}
Inside the onCreateOptionsMenu() method, we build the options menu from the options_menu.xml file. We use the MenuInflater class to do the job.
@Override
public boolean onOptionsItemSelected(MenuItem item)
{
...
}
The onOptionsItemSelected() method handles the click events on the menu items.
case R.id.settings:
Toast.makeText(MainActivity.this, "Settings menu selected.",
Toast.LENGTH_SHORT).show();
return true;
In case of the selection of the Settings menu item we show a Toast window with "Settings menu selected" message.
Options menu at the bottom of the activity
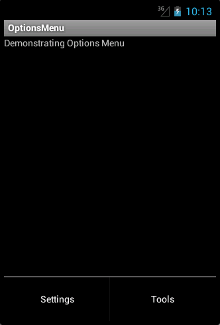
Figure: Options menu at the bottom of the activity

Context menu

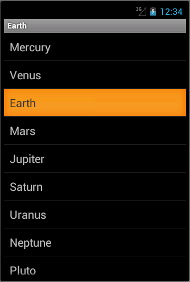
We have a ListView with the names of our planets. A long-click on an element will show a context menu with tree options. Delete, Uppercase and Lowercase.
The manifest file is not modified.
main.xml
<?xml version="1.0" encoding="utf-8"?>
<LinearLayout xmlns:android="http://schemas.android.com/apk/res/android"
android:orientation="vertical"
android:layout_width="fill_parent"
android:layout_height="fill_parent"
>

<ListView
android:id="@+id/lvId"
android:layout_width="fill_parent"
android:layout_height="fill_parent" />

</LinearLayout>
This is main.xml file. It contais a ListView widget.
strings.xml
<?xml version="1.0" encoding="utf-8"?>
<resources>
<string name="app_name">ContextMenu</string>
<string-array name="planets">
<item>Mercury</item>
<item>Venus</item>
<item>Earth</item>
<item>Mars</item>
<item>Jupiter</item>
<item>Saturn</item>
<item>Uranus</item>
<item>Neptune</item>
<item>Pluto</item>
</string-array>
</resources>
This is the strings.xml resource file.
row.xml
<?xml version="1.0" encoding="utf-8"?>
<TextView xmlns:android="http://schemas.android.com/apk/res/android"
android:layout_width="fill_parent"
android:layout_height="fill_parent"
android:padding="10dp"
android:textSize="20sp">
</TextView>
This is the row.xml resource file. Each row of a ListView consists of a single TextView.
MainActivity.java
package com.zetcode.conmenu;

import android.app.Activity;
import android.os.Bundle;
import android.widget.ArrayAdapter;
import android.widget.ListView;
import android.view.View;
import android.view.Menu;
import android.view.MenuInflater;
import android.view.MenuItem;
import android.view.ContextMenu;
import android.view.ContextMenu.ContextMenuInfo;
import android.widget.AdapterView.AdapterContextMenuInfo;

import java.util.Arrays;
import java.util.ArrayList;


public class MainActivity extends Activity
{
private ListView lv;
private ArrayAdapter<String> la;

@Override
public void onCreate(Bundle savedInstanceState)
{
super.onCreate(savedInstanceState);
setContentView(R.layout.main);

setupUI();
}

public void setupUI()
{
lv = (ListView) findViewById(R.id.lvId);
String[] planets = getResources().getStringArray(R.array.planets);
ArrayList<String> lst = new ArrayList<String>();
lst.addAll(Arrays.asList(planets));

la = new ArrayAdapter<String>(this, R.layout.row, lst);
lv.setAdapter(la);
registerForContextMenu(lv);
}

@Override
public void onCreateContextMenu(ContextMenu menu, View v,
ContextMenuInfo menuInfo)
{
super.onCreateContextMenu(menu, v, menuInfo);
MenuInflater inflater = getMenuInflater();
inflater.inflate(R.menu.context_menu, menu);
}

@Override
public boolean onContextItemSelected(MenuItem item)
{
AdapterContextMenuInfo info = (AdapterContextMenuInfo) item.getMenuInfo();

int pos = info.position;
String i = la.getItem(pos);

switch (item.getItemId())
{
case R.id.delId:
la.remove(i);
return true;

case R.id.upId:
String upln = i.toUpperCase();
la.remove(i);
la.insert(upln, pos);
return true;

case R.id.loId:
String lpln = i.toLowerCase();
la.remove(i);
la.insert(lpln, pos);
return true;

default:
return super.onContextItemSelected(item);
}
}
}
In order to implement the context menu, we have to override the onCreateContextMenu() and the onContextItemSelected() methods. We also need to call the registerForContextMenu()method for a specific view.
String[] planets = getResources().getStringArray(R.array.planets); 
ArrayList<String> lst = new ArrayList<String>();
lst.addAll(Arrays.asList(planets));
We will be deleting items of the ListView. Therefore, we need to use an ArrayList. Otherwise the list would be read-only.
registerForContextMenu(lv);
The context menu is registered for the ListView widget.
@Override
public void onCreateContextMenu(ContextMenu menu, View v,
ContextMenuInfo menuInfo)
{
super.onCreateContextMenu(menu, v, menuInfo);
MenuInflater inflater = getMenuInflater();
inflater.inflate(R.menu.context_menu, menu);
}
In the onCreateContextMenu() method we build the context menu from the context_menu.xml file.
@Override
public boolean onContextItemSelected(MenuItem item)
{
...
}
The onContextItemSelected() reacts to list item selection events.
AdapterContextMenuInfo info = (AdapterContextMenuInfo) item.getMenuInfo();

int pos = info.position;
String i = la.getItem(pos);
To find out more about the selected item, we use the AdapterContextMenuInfo class. We get the position and the text of the selected item.
case R.id.delId:
la.remove(i);
return true;
If we select the Delete context menu option, we remove the item from the ArrayAdapter.
case R.id.upId:               
String upln = i.toUpperCase();
la.remove(i);
la.insert(upln, pos);
return true;
For the Uppercase option, we modify the string, remove the original one and insert a new one.
Context menu with three options
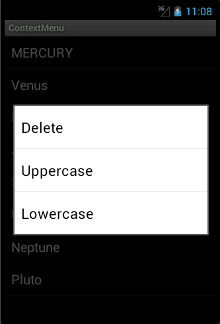
Figure: Context menu with three options

Popup menu

The example shows a PopupMenu after clicking on a button.
The manifest file is not modified.
main.xml
<?xml version="1.0" encoding="utf-8"?>
<LinearLayout xmlns:android="http://schemas.android.com/apk/res/android"
android:orientation="vertical"
android:layout_width="fill_parent"
android:layout_height="fill_parent"
>

<Button
android:id="@+id/btnId"
android:layout_height="wrap_content"
android:layout_width="wrap_content"
android:layout_marginTop="10dip"
android:text="@string/btn_label"
android:onClick="onClick" />

<TextView
android:id="@+id/tvId"
android:layout_width="fill_parent"
android:layout_height="wrap_content"
android:layout_marginTop="10dip" />

</LinearLayout>
This is main.xml file. We have a Button widget and a TextView widget. The button will show a PopupMenu.
strings.xml
<?xml version="1.0" encoding="utf-8"?>
<resources>
<string name="app_name">PopupMenu</string>
<string name="btn_label">Show menu</string>
<string name="pm1">Item 1</string>
<string name="pm2">Item 2</string>
</resources>
This is the strings.xml resource file.
popup_menu.xml
<?xml version="1.0" encoding="utf-8"?>
<menu xmlns:android="http://schemas.android.com/apk/res/android">
<item android:id="@+id/settings"
android:title="@string/pm1" />
<item android:id="@+id/tools"
android:title="@string/pm2" />
</menu>
This is popup_menu.xml file. It defines two menu items. The file is located in the res/menu/ subdirectory.
MainActivity.java
package com.zetcode.popmenu;

import android.app.Activity;
import android.os.Bundle;
import android.view.View;
import android.view.MenuItem;
import android.widget.TextView;
import android.widget.PopupMenu;
import android.widget.PopupMenu.OnMenuItemClickListener;

public class MainActivity extends Activity
implements OnMenuItemClickListener
{
private TextView tv;

@Override
public void onCreate(Bundle savedInstanceState)
{
super.onCreate(savedInstanceState);
setContentView(R.layout.main);

tv = (TextView) findViewById(R.id.tvId);
}

public void onClick(View v)
{
showPopupMenu(v);
}

public void showPopupMenu(View v)
{
PopupMenu pm = new PopupMenu(MainActivity.this, v);
pm.getMenuInflater().inflate(R.menu.popup_menu, pm.getMenu());
pm.setOnMenuItemClickListener(this);
pm.show();
}

@Override
public boolean onMenuItemClick(MenuItem item)
{
tv.setText(item.toString() + " selected");
return true;
}
}
A PopupMenu is displayed after clicking on the button widget.
public void onClick(View v) 
{
showPopupMenu(v);
}
This method is a callback to the button click. The relation is set in the main.xml file via an attribute. The method calls the showPopupMenu() method.
public void showPopupMenu(View v)
{
PopupMenu pm = new PopupMenu(MainActivity.this, v);
pm.getMenuInflater().inflate(R.menu.popup_menu, pm.getMenu());
pm.setOnMenuItemClickListener(this);
pm.show();
}
We create an instance of the PopupMenu class. It builds the menu, sets the OnMenuItemClickListener and shows the PopupMenu.
@Override
public boolean onMenuItemClick(MenuItem item)
{
tv.setText(item.toString() + " selected");
return true;
}
After selecting a menu item the onMenuItemClick() method is called. It sets the item's title to the TextView widget.
In this chapter of the Android development tutorial, we have worked with menus.
Continue Reading

Android Pickers Programming Tutorials

Pickers

In this chapter of the Android development tutorial we will talk about android Pickers. Pickers are widgets that enable us to select a single value from a set of values.
There are number, date or time pickers.

NumberPicker

NumberPicker is a widget that allows us to select a number from a predefined range of values. The manifest file is not modified in this example.
main.xml
<?xml version="1.0" encoding="utf-8"?>
<LinearLayout xmlns:android="http://schemas.android.com/apk/res/android"
android:orientation="vertical"
android:layout_width="fill_parent"
android:layout_height="fill_parent"
>

<NumberPicker android:id="@+id/npId"
android:layout_marginTop="5dp"
android:layout_width="wrap_content"
android:layout_height="wrap_content" />

<TextView
android:id="@+id/tvId"
android:layout_width="wrap_content"
android:layout_height="wrap_content"
android:layout_marginTop="5dp"
android:layout_marginLeft="5dp"
android:text="0"
android:textSize="30sp" />

</LinearLayout>
In the layout file we have a NumberPicker widget and a TextView widget. The TextView widget will display the selected value of the NumberPicker.
strings.xml
<?xml version="1.0" encoding="utf-8"?>
<resources>
<string name="app_name">NumberPicker</string>
</resources>
The strings resource file.
MainActivity.java
package com.zetcode.numpick;

import android.app.Activity;
import android.os.Bundle;
import android.widget.NumberPicker;
import android.widget.TextView;
import android.widget.NumberPicker.OnValueChangeListener;

public class MainActivity extends Activity
{
private TextView tv;

@Override
public void onCreate(Bundle savedInstanceState)
{
super.onCreate(savedInstanceState);
setContentView(R.layout.main);

setupUI();
}

public void setupUI()
{
tv = (TextView) findViewById(R.id.tvId);

NumberPicker np = (NumberPicker) findViewById(R.id.npId);

np.setOnValueChangedListener(new OnValueChangeListener()
{
public void onValueChange(NumberPicker picker, int oldVal,
int newVal)
{
tv.setText(String.valueOf(newVal));
}
});

np.setMaxValue(100);
np.setMinValue(0);
}
}
Clicking on the plus and minus signs of the NumberPicker we select a new value. The currently selected value is displayed in the TextView widget.
NumberPicker np = (NumberPicker) findViewById(R.id.npId);
A reference to the NumberPicker widget is retrieved from the main.xml file.
np.setOnValueChangedListener(new OnValueChangeListener()
{
public void onValueChange(NumberPicker picker, int oldVal,
int newVal)
{
tv.setText(String.valueOf(newVal));
}
});
A OnValueChangeListener is added to the NumberPicker widget. It will call the onValueChange() method when the value of the NumberPicker is changed. Inside this method, we set the currently selected value to the TextView widget.
np.setMaxValue(100);
np.setMinValue(0);
We set the maximum and minimum value for the NumberPicker.
NumberPicker widget
Figure: NumberPicker widget

TimePicker

A TimePicker is a widget for selecting the time of day. It has two modes, 24 hour or AM/PM mode. Selection of the hour and minute digit can be conrolled by vertical spinners. A DatePicker is a widget for selecting a date. It is very similar to the TimePicker.
The manifest file is not modified.
main.xml
<?xml version="1.0" encoding="utf-8"?>
<LinearLayout xmlns:android="http://schemas.android.com/apk/res/android"
android:orientation="vertical"
android:layout_width="fill_parent"
android:layout_height="fill_parent"
>

<TimePicker android:id="@+id/tpId"
android:layout_marginTop="5dp"
android:layout_width="wrap_content"
android:layout_height="wrap_content" />

<TextView
android:id="@+id/tvId"
android:layout_width="wrap_content"
android:layout_height="wrap_content"
android:layout_marginTop="5dp"
android:layout_marginLeft="5dp"
android:textSize="30sp" />

</LinearLayout>
In the main.xml file we have a TimePicker and TextView widgets. The selected time is displayed in the TextView.
strings.xml
<?xml version="1.0" encoding="utf-8"?>
<resources>
<string name="app_name">TimePicker</string>
</resources>
This is the strings.xml resource file.
MainActivity.java
package com.zetcode.timepicker;

import android.app.Activity;
import android.os.Bundle;
import android.widget.TimePicker;
import android.widget.TextView;
import android.widget.TimePicker.OnTimeChangedListener;

public class MainActivity extends Activity
{
private TextView tv;

@Override
public void onCreate(Bundle savedInstanceState)
{
super.onCreate(savedInstanceState);
setContentView(R.layout.main);

setupUI();
}

public void setupUI()
{
tv = (TextView) findViewById(R.id.tvId);

TimePicker tp = (TimePicker) findViewById(R.id.tpId);
displayCurrentTime(tp);

tp.setOnTimeChangedListener(new OnTimeChangedListener()
{
public void onTimeChanged(TimePicker view, int hourOfDay,
int minute)
{
StringBuilder tm = new StringBuilder();
tm.append(hourOfDay);
tm.append(" h ");
tm.append(minute);
tm.append(" m");
tv.setText(tm);
}
});
}

public void displayCurrentTime(TimePicker tp)
{
int h = tp.getCurrentHour();
int m = tp.getCurrentMinute();

StringBuilder tm = new StringBuilder();
tm.append(h);
tm.append(" h ");
tm.append(m);
tm.append(" m");
tv.setText(tm);
}
}
The TimePicker listens to the OnTimeChangedListener. When the time is changed, the new time value is set to the TextView inside the onTimeChanged() method.
tp.setOnTimeChangedListener(new OnTimeChangedListener()
{
public void onTimeChanged(TimePicker view, int hourOfDay,
int minute)
{
StringBuilder tm = new StringBuilder();
tm.append(hourOfDay);
tm.append(" h ");
tm.append(minute);
tm.append(" m");
tv.setText(tm);
}
});
Inside an anonymous OnTimeChangedListener class we implement the onTimeChanged() method. With the StringBuilder we build the string to be displayed and set it to the TextView widget.
public void displayCurrentTime(TimePicker tp)
{
int h = tp.getCurrentHour();
int m = tp.getCurrentMinute();

StringBuilder tm = new StringBuilder();
tm.append(h);
tm.append(" h ");
tm.append(m);
tm.append(" m");
tv.setText(tm);
}
When the activity is first shown, we display the current time.
TimePicker
Figure: TimePicker widget
In this chapter of the Android development tutorial, we have written about Pickers.
Continue Reading

Android ListView widget Programming Tutorial

ListView widget

In this chapter of the Android development tutorial, we will explore the ListView widget.
A ListView is a widget that shows items in a verticall scrolling list. An Adapter object is used to fill the ListView with data.

ListView widget I

In the example, we show a ListView widget with the names of the planets of our solar system. We use an ArrayAdapter to fill the ListView with data.
main.xml
<?xml version="1.0" encoding="utf-8"?>  
<LinearLayout xmlns:android="http://schemas.android.com/apk/res/android"
android:orientation="vertical"
android:layout_width="fill_parent"
android:layout_height="fill_parent">

<ListView
android:id="@+id/lvId"
android:layout_width="fill_parent"
android:layout_height="fill_parent" />

</LinearLayout>
In the main.xml file we define one ListView widget.
row.xml
<?xml version="1.0" encoding="utf-8"?>
<TextView xmlns:android="http://schemas.android.com/apk/res/android"
android:layout_width="fill_parent"
android:layout_height="fill_parent"
android:padding="10dp"
android:textSize="20sp">
</TextView>
In the row.xml file we define, how a list row will look like. We will have one TextView in each row of a ListView. The sp is a unit used for setting the font size.
strings.xml
<?xml version="1.0" encoding="utf-8"?>
<resources>
<string name="app_name">ListView</string>
<string-array name="planets">
<item>Mercury</item>
<item>Venus</item>
<item>Earth</item>
<item>Mars</item>
<item>Jupiter</item>
<item>Saturn</item>
<item>Uranus</item>
<item>Neptune</item>
<item>Pluto</item>
</string-array>
</resources>
The names of the planets are specified in the strings.xml file within a string array attribute.
MainActivity.java
package com.zetcode.listview;

import android.app.Activity;
import android.os.Bundle;
import android.widget.ArrayAdapter;
import android.widget.ListView;

public class MainActivity extends Activity
{
private ListView lv;
private ArrayAdapter<String> la;

@Override
public void onCreate(Bundle savedInstanceState)
{
super.onCreate(savedInstanceState);
setContentView(R.layout.main);

setupUI();
}

public void setupUI()
{
lv = (ListView) findViewById(R.id.lvId);
String[] planets = getResources().getStringArray(R.array.planets);
lv.setAdapter(new ArrayAdapter<String>(this, R.layout.row, planets));
}
}
This is the MainActivity.java source file.
lv = (ListView) findViewById(R.id.lvId);  
We get the reference to the ListView widget.
String[] planets = getResources().getStringArray(R.array.planets);
This code line retrieves the names of the planets from the resource file.
lv.setAdapter(new ArrayAdapter<String>(this, R.layout.row, planets));
An ArrayAdapter is created and set to the ListView.
ListView widget
Figure: ListView widget

ListView widget II

A ListActivity is a special activity that holds a ListView object. ListView is a common widget and it typically takes the whole screen. Therefore a special activity was created. In the example, the manifest file is not modified. We will also not need the main.xml layout file.
row.xml
<?xml version="1.0" encoding="utf-8"?>
<TextView xmlns:android="http://schemas.android.com/apk/res/android"
android:layout_width="fill_parent"
android:layout_height="fill_parent"
android:padding="10dp"
android:textSize="20sp">
</TextView>
In the row.xml file we define one TextView in each row of a ListView.
strings.xml
<?xml version="1.0" encoding="utf-8"?>
<resources>
<string name="app_name">ListView2</string>
</resources>
This is the strings.xml resource file.
MainActivity.java
package com.zetcode.listview2;

import android.app.ListActivity;
import android.os.Bundle;
import android.view.View;
import android.widget.ArrayAdapter;
import android.widget.AdapterView;
import android.widget.AdapterView.OnItemClickListener;
import android.widget.AdapterView.OnItemSelectedListener;
import android.widget.ListView;
import android.widget.TextView;

public class MainActivity extends ListActivity
implements OnItemClickListener, OnItemSelectedListener
{
@Override
public void onCreate(Bundle savedInstanceState)
{
super.onCreate(savedInstanceState);
setupUI();
}

public void setupUI()
{
ArrayAdapter<String> la = new ArrayAdapter<String>(this, R.layout.row);
la.add("Mercury");
la.add("Venus");
la.add("Earth");
la.add("Mars");
la.add("Jupiter");
la.add("Saturn");
la.add("Uranus");
la.add("Neptune");
la.add("Pluto");

setListAdapter(la);

ListView lv = getListView();
lv.setOnItemClickListener(this);
lv.setOnItemSelectedListener(this);
}

public void onItemClick(AdapterView<?> parent, View view,
int position, long id)
{
String planet = ((TextView) view).getText().toString();
setTitle(planet);
}

public void onItemSelected(AdapterView<?> parent, View view,
int position, long id)
{
String planet = ((TextView) view).getText().toString();
setTitle(planet);
}

public void onNothingSelected(AdapterView<?> parent)
{
// not implemented
}
}
We programatically create the items of the ListView. We react to click and select events of the ListView. The planet that we select or click on will be shown in the titlebar.
public class MainActivity extends ListActivity 
implements OnItemClickListener, OnItemSelectedListener
The MainActivity extends the ListActivity and implements two listeners. By implementing these two listeners, we must implement three abstract methods that are associated with these listeners.
@Override
public void onCreate(Bundle savedInstanceState)
{
super.onCreate(savedInstanceState);
setupUI();
}
In the onCreate() method we do not call the setContentView() method. The ListView widget of the ListActivity will take up the whole screen.
ArrayAdapter<String> la = new ArrayAdapter<String>(this, R.layout.row);  
la.add("Mercury");
la.add("Venus");
la.add("Earth");
...
We create an instance of the ArrayAdapter. We add names of the planets to the adapter.
setListAdapter(la);
Sets the adapter for the associated ListView object.
ListView lv = getListView();
lv.setOnItemClickListener(this);
lv.setOnItemSelectedListener(this);
From the ListActivity we get the ListView widget. The two listeners are set for the ListView widget.
public void onItemClick(AdapterView<?> parent, View view,
int position, long id)
{
String planet = ((TextView) view).getText().toString();
setTitle(planet);
}
Implementing the OnItemClickListener, we have to define the onItemClick() method. We get the planet name from the TextView of the clicked row and set it to the titlebar.
public void onItemSelected(AdapterView<?> parent, View view,
int position, long id)
{
String planet = ((TextView) view).getText().toString();
setTitle(planet);
}

public void onNothingSelected(AdapterView<?> parent)
{
// not implemented
}
After implementing the OnItemSelectedListener we have to define two abstract methods. The first method sets the currently selected planet to the titlebar. The second method is not implemented.
Selected row of a ListView widget
Figure: Selected row of a ListView widget
In this chapter of the Android development tutorial, we have mentioned the ListView widget.
Continue Reading

ProgressBar widget in Android Programming

ProgressBar widget

In this chapter of the Android development tutorial we will present the ProgressBar widget. A ProgressBar is a widget that shows visually a progress of some task. The widget comes in two basic modes. There is a circular bar and a horizontal bar.
We will have two examples to demonstrate both of them.

ProgressBar I

We have a horizontal ProgressBar widget and a TextView widget, that shows the percentage of the task completed. The manifest file is left untouched.
main.xml
<?xml version="1.0" encoding="utf-8"?>
<LinearLayout xmlns:android="http://schemas.android.com/apk/res/android"
android:orientation="vertical"
android:layout_width="fill_parent"
android:layout_height="fill_parent"
>
<ProgressBar
android:id="@+id/pbId"
android:layout_width="fill_parent"
android:layout_height="wrap_content"
style="?android:attr/progressBarStyleHorizontal"
android:layout_margin="10dp"
/>
<TextView
android:id="@+id/tvId"
android:layout_width="fill_parent"
android:layout_height="wrap_content"
android:layout_margin="10dp"
/>
</LinearLayout>
In the main.xml layout file, we have a ProgressBar and a TextView. The style="?android:attr/progressBarStyleHorizontal" style makes the ProgressBar horizontal. The default mode of the ProgressBar is the circular mode.
strings.xml
<?xml version="1.0" encoding="utf-8"?>
<resources>
<string name="app_name">ProgBar</string>
</resources>
String resource file.
MainActivity.java
package com.zetcode.progbar2;

import android.app.Activity;
import android.os.Bundle;
import android.os.Handler;
import android.os.Message;
import android.widget.ProgressBar;
import android.widget.TextView;
import android.util.Log;


public class MainActivity extends Activity
{
ProgressBar pb;
TextView tv;
int prg = 0;

@Override
public void onCreate(Bundle savedInstanceState)
{
super.onCreate(savedInstanceState);
setContentView(R.layout.main);

pb = (ProgressBar) findViewById(R.id.pbId);
tv = (TextView) findViewById(R.id.tvId);

new Thread(myThread).start();
}

private Runnable myThread = new Runnable()
{
@Override
public void run()
{
while (prg < 100)
{
try
{
hnd.sendMessage(hnd.obtainMessage());
Thread.sleep(100);
}
catch(InterruptedException e)
{
Log.e("ERROR", "Thread was Interrupted");
}
}

runOnUiThread(new Runnable() {
public void run() {
tv.setText("Finished");
}
});
}

Handler hnd = new Handler()
{
@Override
public void handleMessage(Message msg)
{
prg++;
pb.setProgress(prg);

String perc = String.valueOf(prg).toString();
tv.setText(perc+"% completed");
}
};
};
}
We create a thread to control the progress of a ProgressBar.
new Thread(myThread).start();
A new thread is started. In Android, lengthy tasks should by performed inside a thread to prevent the application from appearing unresponsive. A thread ends by returning from its main() method, or by an exception.
@Override
public void run()
{
while (prg < 100)
{
try
{
hnd.sendMessage(hnd.obtainMessage());
Thread.sleep(100);
}
catch(InterruptedException e)
{
Log.e("ERROR", "Thread was Interrupted");
}
}

runOnUiThread(new Runnable() {
public void run() {
tv.setText("Finished");
}
});
}
The code in a thread is placed in the run() method. We will simulate a lengthy task by calling the Thread.sleep() method. This forces us to handle the InterruptedException. Android application runs in a single-thread model. All components of the main activity are created in the main thread. These components cannot be manipulated in other threads. To work around this, we use either the Handlerobject or call the runOnUiThread() method.
runOnUiThread(new Runnable() { 
public void run() {
tv.setText("Finished");
}
});
Only the original thread that created a view hierarchy can touch its views. Here we are modifying the TextView widget. Therefore we have put the code into the runOnUiThread() method, which runs the code in the main, UI thread, where the widget was created.
Handler hnd = new Handler()
{
@Override
public void handleMessage(Message msg)
{
prg++;
pb.setProgress(prg);

String perc = String.valueOf(prg).toString();
tv.setText(perc+"% completed");
}
};
Another way to touch widgets from another thread is to use the Handler object. It is used to enqueue an action to be performed on a different thread than its own. We update the progress bar and set a percentage of the task completed to the text view.
ProgressBar widget
Figure: ProgressBar widget

ProgressBar II

In the second example, we show the usage of the ProgressBar in a circular mode. The manifest file does not need to be modified.
main.xml
<?xml version="1.0" encoding="utf-8"?>
<LinearLayout xmlns:android="http://schemas.android.com/apk/res/android"
android:orientation="vertical"
android:layout_width="fill_parent"
android:layout_height="fill_parent"
>
<ProgressBar
android:id="@+id/pbId"
android:layout_width="wrap_content"
android:layout_height="wrap_content"
/>
<TextView
android:id="@+id/tvId"
android:layout_width="fill_parent"
android:layout_height="wrap_content"
android:text="@string/msg"
/>
</LinearLayout>
In the main.xml file we have a ProgressBar and a TextView. The ProgressBar has the default style, which is the circular style. This is the same as if we have used the style="?android:attr/progressBarStyle" attribute.
strings.xml
<?xml version="1.0" encoding="utf-8"?>
<resources>
<string name="app_name">CirProgBar</string>
<string name="msg">Please wait...</string>
</resources>
We have two string resources in the strings.xml file.
MainActivity.java
package com.zetcode.progbar;

import android.app.Activity;
import android.os.Bundle;
import android.os.Handler;
import android.os.Message;
import android.widget.ProgressBar;
import android.widget.TextView;
import android.view.View;
import android.util.Log;

public class MainActivity extends Activity
{
ProgressBar pb;
TextView tv;
int prg = 0;

@Override
public void onCreate(Bundle savedInstanceState)
{
super.onCreate(savedInstanceState);
setContentView(R.layout.main);

pb = (ProgressBar) findViewById(R.id.pbId);
tv = (TextView) findViewById(R.id.tvId);

new Thread(myThread).start();
}

private Runnable myThread = new Runnable()
{
@Override
public void run()
{
while (prg < 100)
{
try
{
hnd.sendMessage(hnd.obtainMessage());
Thread.sleep(100);
}
catch(InterruptedException e)
{
Log.e("ERROR", "Thread was Interrupted");
}
}

runOnUiThread(new Runnable() {
public void run() {
tv.setText("Finished");
pb.setVisibility(View.GONE);
}
});
}

Handler hnd = new Handler()
{
@Override
public void handleMessage(Message msg)
{
prg++;
pb.setProgress(prg);
}
};
};
}
The code is similar to the first example with a few modifications.
runOnUiThread(new Runnable() { 
public void run() {
tv.setText("Finished");
pb.setVisibility(View.GONE);
}
});
After the task was completed, we hide the ProgressBar using the setVisibility() method. The circle itself is an endless animation, so after the task was finished, we need to hide the widget.
Circular ProgressBar widget
Figure: Circular ProgressBar widget
In this chapter of the Android development tutorial, we have mentioned ProgressBar widget.
Continue Reading

SeekBar widget in Android Programming

SeekBar widget

In this chapter of the Android development tutorial we will present the SeekBar widget.
The SeekBar widget is used to select a value from a range of values. The user drags a thumb of the widget to select a specific value. To process the SeekBar events, we implement the SeekBar.OnSeekBarChangeListener listener.

SeekBar example

We have a SeekBar widget and a TextView widget. The current value from the SeekBar is displayed in the TextView. Android manifest file is left untouched.
main.xml
<?xml version="1.0" encoding="utf-8"?>
<LinearLayout xmlns:android="http://schemas.android.com/apk/res/android"
android:orientation="vertical"
android:layout_width="fill_parent"
android:layout_height="fill_parent"
>
<SeekBar
android:id="@+id/sbId"
android:layout_width="fill_parent"
android:layout_height="wrap_content"
android:layout_margin="10dp"
android:max="100"
android:progress="50"
/>
<TextView
android:id="@+id/tvId"
android:layout_width="fill_parent"
android:layout_height="wrap_content"
android:layout_marginLeft="10dp"
/>
</LinearLayout>
In the main.xml layout file, we have two widgets defined. The SeekBar widget and the TextView widget.
strings.xml
<?xml version="1.0" encoding="utf-8"?>
<resources>
<string name="app_name">SeekBar</string>
<string name="init_tv_value">50</string>
</resources>
This is strings.xml resource file. The init_tv_value is the initial value of the TextView widget.
MainActivity.java
package com.zetcode.seekbar;

import android.app.Activity;
import android.os.Bundle;
import android.widget.TextView;
import android.widget.SeekBar;
import android.widget.SeekBar.OnSeekBarChangeListener;

public class MainActivity extends Activity implements
OnSeekBarChangeListener
{
TextView tv;

@Override
public void onCreate(Bundle savedInstanceState)
{
super.onCreate(savedInstanceState);
setContentView(R.layout.main);

SeekBar sb = (SeekBar) findViewById(R.id.sbId);
sb.setOnSeekBarChangeListener(this);

tv = (TextView) findViewById(R.id.tvId);
String val = this.getString(R.string.init_tv_value);
tv.setText(val);
}

@Override
public void onProgressChanged(SeekBar seekBar, int progress,
boolean fromUser)
{
tv.setText(String.valueOf(progress));
}

@Override
public void onStartTrackingTouch(SeekBar seekBar)
{
// not implemented
}

@Override
public void onStopTrackingTouch(SeekBar seekBar)
{
// not implemented
}
}
The current value from the SeekBar is set to the TextView widget.
public class MainActivity extends Activity implements 
OnSeekBarChangeListener
The MainActivity class implements the OnSeekBarChangeListener. We neet to define three abstract methods. The onProgressChanged(), the onStartTrackingTouch() and the onStopTrackingTouch() method. The last two methods are not implemented. They are related to touch gestures. We provide only empty methods.
SeekBar sb = (SeekBar) findViewById(R.id.sbId);
sb.setOnSeekBarChangeListener(this);
We get the reference to the SeekBar widget and set a listener for it.
tv = (TextView) findViewById(R.id.tvId);
String val = this.getString(R.string.init_tv_value);
tv.setText(val);
We get the reference to the TextView widget. We retrieve the init_tv_value from the string resources and set it to the TextView.
@Override
public void onProgressChanged(SeekBar seekBar, int progress,
boolean fromUser)
{
tv.setText(String.valueOf(progress));
}
When we move the thumb of the SeekBar, the onProgressChanged()method is called. The progress parameter is the current value of the SeekBar. The default range is 0..100. We set the current value of the SeekBar to the TextView widget.
SeekBar widget
Figure: SeekBar widget
In this chapter of the Android development tutorial, we have written about the SeekBar widget.
Continue Reading

Spinner widget in Android Programming

Spinner widget

In this chapter of the Android development tutorial we will present a spinner widget.
A spinner widget enables a user to select an item from a list of options. In the normal state it shows the currently selected item. Clicking on the spinner widget shows a dropdown menu with all available items. The user can choose a new one from the list. The Spinner class is used to create a spinner widget.
The Spinner widget can be populated in the XML file. Or it can be programatically filled. In the latter case we need an Adapter class to populate the Spinner widget. An adapter is a bridge between a Spinner and its data.

Spinner I

In the first example we have a Spinner widget whose items are defined in an XML file.
AndroidManifest.xml
<?xml version="1.0" encoding="utf-8"?>
<manifest xmlns:android="http://schemas.android.com/apk/res/android"
package="com.zetcode.finish"
android:versionCode="1"
android:versionName="1.0">
<application android:label="@string/app_name" android:icon="@drawable/ic_launcher">
<activity android:name="MainActivity"
android:label="@string/app_name">
<intent-filter>
<action android:name="android.intent.action.MAIN" />
<category android:name="android.intent.category.LAUNCHER" />
</intent-filter>
</activity>
</application>
</manifest>
This is the manifest file for the program.
main.xml
<?xml version="1.0" encoding="utf-8"?>
<LinearLayout xmlns:android="http://schemas.android.com/apk/res/android"
android:orientation="vertical"
android:layout_width="fill_parent"
android:layout_height="fill_parent"
>
<Spinner
android:id="@+id/spn"
android:layout_width="wrap_content"
android:layout_height="wrap_content"
android:entries="@array/dlangs"
android:layout_marginTop="10dip"
android:prompt="@string/spn_title" />

<TextView
android:id="@+id/tvId"
android:layout_width="fill_parent"
android:layout_height="wrap_content"
android:layout_marginTop="10dip"
/>

</LinearLayout>
In the main.xml layout file, we have a Spinner and a TextView. The android:entries="@array/dlangs" attribute defines a XML resource that provides an array of strings. The strings are written in the strings.xmlfile.
strings.xml
<?xml version="1.0" encoding="utf-8"?>
<resources>
<string name="app_name">Spinner</string>
<string name="spn_title">Choose a language</string>

<string-array name="dlangs">
<item>Python</item>
<item>PHP</item>
<item>Perl</item>
<item>Tcl</item>
<item>Ruby</item>
</string-array>

</resources>
In the strings.xml file we have the elements of the string array. These are displayed when we click on the Spinner widget.
MainActivity.java
package com.zetcode.spinner;

import android.app.Activity;
import android.os.Bundle;
import android.view.View;
import android.widget.TextView;
import android.widget.Spinner;
import android.widget.AdapterView;
import android.widget.AdapterView.OnItemSelectedListener;


public class MainActivity extends Activity implements OnItemSelectedListener
{
private TextView tv;

@Override
public void onCreate(Bundle savedInstanceState)
{
super.onCreate(savedInstanceState);
setContentView(R.layout.main);

tv = (TextView) findViewById(R.id.tvId);

Spinner spn = (Spinner) findViewById(R.id.spn);
spn.setOnItemSelectedListener(this);
}

@Override
public void onItemSelected(AdapterView<?> parent, View v, int pos, long id)
{
String item = parent.getItemAtPosition(pos).toString();
tv.setText(item);
}

@Override
public void onNothingSelected(AdapterView<?> arg0)
{
tv.setText("");
}
}
The selected item from the Spinner widget is displayed in the TextView widget.
public class MainActivity extends Activity implements OnItemSelectedListener 
The MainActivity class implements the OnItemSelectedListener. The class must now implement two methods. The onItemSelected() and onNothingSelected() methods.
Spinner spn = (Spinner) findViewById(R.id.spn);
spn.setOnItemSelectedListener(this);
These two lines get the reference to the Spinner widget and set the OnItemSelectedListener for it.
@Override
public void onItemSelected(AdapterView<?> parent, View v, int pos, long id)
{
String item = parent.getItemAtPosition(pos).toString();
tv.setText(item);
}
In the onItemSelected() method we get the currently selected Spinner item with the getItemAtPosition(). The item is transformed to a string and set to the TextView.
Spinner widget
Figure: Spinner widget

Spinner II

In the second spinner example, we will define our list of spinner elements programatically. For this we will use the ArrayAdapter in conjunction with the ArrayList.
An Adapter design pattern is used by Android platform to work with the Spinner widget. The ArrayAdapter is an intermediary between the data source and the data view. In this case the data source is the ArrayList and the view is the Spinner widget. Using an adapter we are decoupling our code.
AndroidManifest.xml
<?xml version="1.0" encoding="utf-8"?>
<manifest xmlns:android="http://schemas.android.com/apk/res/android"
package="com.zetcode.toast"
android:versionCode="1"
android:versionName="1.0">
<application android:label="@string/app_name"
android:icon="@drawable/ic_launcher">
<activity android:name="MainActivity"
android:label="@string/app_name">
<intent-filter>
<action android:name="android.intent.action.MAIN" />
<category android:name="android.intent.category.LAUNCHER" />
</intent-filter>
</activity>
</application>
</manifest>
This is the manifest file.
main.xml
<?xml version="1.0" encoding="utf-8"?>
<LinearLayout xmlns:android="http://schemas.android.com/apk/res/android"
android:orientation="vertical"
android:layout_width="fill_parent"
android:layout_height="fill_parent"
>

<Spinner
android:id="@+id/spnId"
android:layout_width="wrap_content"
android:layout_height="wrap_content"
android:layout_marginTop="10dip"
android:prompt="@string/spn_title" />

<TextView
android:id="@+id/tvId"
android:layout_width="fill_parent"
android:layout_height="wrap_content"
android:layout_marginTop="10dip" />

</LinearLayout>
In the main.xml file we have two widgets. The Spinner and the TextView widget. This time we do not define the array data entries for the Spinner.
strings.xml
<?xml version="1.0" encoding="utf-8"?>
<resources>
<string name="app_name">Spinner2</string>
<string name="spn_title">Choose a language</string>
</resources>
This is the strings.xml resource file.
MainActivity.java
package com.zetcode.spinner2;

import java.util.ArrayList;
import java.util.List;

import android.app.Activity;
import android.os.Bundle;
import android.view.View;
import android.widget.Spinner;
import android.widget.ArrayAdapter;
import android.widget.TextView;
import android.widget.AdapterView;
import android.widget.AdapterView.OnItemSelectedListener;


public class MainActivity extends Activity implements OnItemSelectedListener
{
private TextView tv;
private Spinner spn;

@Override
public void onCreate(Bundle savedInstanceState)
{
super.onCreate(savedInstanceState);
setContentView(R.layout.main);

setup();
}

public void setup()
{
tv = (TextView) findViewById(R.id.tvId);

spn = (Spinner) findViewById(R.id.spnId);
fillSpinner(spn);
spn.setOnItemSelectedListener(this);
}

public void fillSpinner(Spinner spn)
{
List<String> lst = new ArrayList<String>();
lst.add("Python");
lst.add("PHP");
lst.add("Perl");
lst.add("Tcl");
lst.add("Ruby");

ArrayAdapter<String> da = new ArrayAdapter<String>(this,
android.R.layout.simple_spinner_item, lst);
da.setDropDownViewResource(android.R.layout.simple_spinner_item);

spn.setAdapter(da);
}

@Override
public void onItemSelected(AdapterView<?> parent, View v, int pos, long id)
{
String item = parent.getItemAtPosition(pos).toString();
tv.setText(item);
}

@Override
public void onNothingSelected(AdapterView<?> arg0)
{
tv.setText("");
}
}
In the MainActivity.java source file we fill the Spinner widget with data and implement the OnItemSelectedListener for the widget.
spn = (Spinner) findViewById(R.id.spnId);
fillSpinner(spn);
We get the reference to the Spinner widget and call the fillSpinner() method to populate it with data.
List<String> lst = new ArrayList<String>();
lst.add("Python");
lst.add("PHP");
lst.add("Perl");
lst.add("Tcl");
lst.add("Ruby");
An ArrayList is created and filled with strings.
ArrayAdapter<String> da = new ArrayAdapter<String>(this,
android.R.layout.simple_spinner_item, lst);
The instance of the ArrayAdapter is created. It takes the ArrayList as a parameter.
da.setDropDownViewResource(android.R.layout.simple_spinner_item);
This line determines the look of the dropdown menu of the Spinner widget. This one is a dropdown without radio buttons. A spinner with the android.R.layout.simple_spinner_dropdown_item defined has radio buttons in its rows.
spn.setAdapter(da);
The adapter is set for the Spinner widget.
Spinner dropdown menu
Figure: Spinner dropdown menu
In this chapter of the Android development tutorial, we have written about a spinner widget.
Continue Reading

Layout management in Android Programming

Layout management

In this chapter of the Android development tutorial we will talk about layout management. widgets.
When we design the user interface of our application, we decide what components we will use and how we will organize those components in the application. To organize our components, we use specialized non visible objects called layout managers.
There are several layout managers in Android. A LinearLayout lines up its views in one row or column. A FrameLayout is a simple layout manager used to display one view. A RelativeLayout is a layout manager in which the views are positioned in relation to each other or to the parent. The most powerful layout manager is the GridLayout manager. It arranges the views in a grid.

Showing an image with FrameLayout

The first example shows an image using the FrameLayout manager.
$ ls res/drawable-hdpi/
ic_launcher.png zamok.jpg
Depending on a android virtual device we are using, we put the image in the corresponding subdirectory of the res directory.
main.xml
<?xml version="1.0" encoding="utf-8"?>
<FrameLayout xmlns:android="http://schemas.android.com/apk/res/android"
android:layout_gravity="top"
android:layout_width="wrap_content"
android:layout_height="wrap_content"
>

<ImageView
android:layout_height="match_parent"
android:layout_width="match_parent"
android:src="@drawable/zamok" />

</FrameLayout>
In the FrameLayout manager, we put one ImageView.
<FrameLayout xmlns:android="http://schemas.android.com/apk/res/android"
android:layout_gravity="top"
android:layout_width="wrap_content"
android:layout_height="wrap_content"
>
The FrameLayout is big enough to display the ImageViewby setting the layout width and height to wrap_content. It is pushed to the top using the layout_gravity attribute.
<ImageView  
android:layout_height="match_parent"
android:layout_width="match_parent"
android:src="@drawable/zamok" />
The ImageView displays an image. The image is located in a subdirectory of the res directory.
Showing an image with a FrameLayout
Figure: Showing an image with a FrameLayout

A row of buttons

In the example we create a row of four buttons.
main.xml
<?xml version="1.0" encoding="utf-8"?>
<LinearLayout xmlns:android="http://schemas.android.com/apk/res/android"
android:orientation="horizontal"
android:layout_width="match_parent"
android:layout_height="match_parent"
>

<Button
android:layout_height="wrap_content"
android:layout_width="wrap_content"
android:text="Button1" />

<Button
android:layout_height="wrap_content"
android:layout_width="wrap_content"
android:text="Button2" />

<Button
android:layout_height="wrap_content"
android:layout_width="wrap_content"
android:text="Button3" />

<Button
android:layout_height="wrap_content"
android:layout_width="wrap_content"
android:text="Button4" />

</LinearLayout>
We have a horizontal LinearLayout. In this layout, we add four buttons.
<LinearLayout xmlns:android="http://schemas.android.com/apk/res/android"
android:orientation="horizontal"
android:layout_width="match_parent"
android:layout_height="match_parent"
>
We create a horizontal LinearLayout manager. The width and height of the layout match the parent which means that it fills the entire screen.
<Button
android:layout_height="wrap_content"
android:layout_width="wrap_content"
android:text="Button1" />
Each of the four buttons use the wrap_content property. They are then just big enough to display their content.
A row of buttons
Figure: A row of buttons

A row of buttons II

In the third example of this chapter, we show how to programatically create a row of buttons with a LinearLayout manager.
MainActivity.java
package com.zetcode.btnrow2;

import android.app.Activity;
import android.os.Bundle;
import android.widget.Button;
import android.widget.LinearLayout;

public class ButtonRow2 extends Activity
{
@Override
public void onCreate(Bundle savedInstanceState)
{
super.onCreate(savedInstanceState);

initUI();
}

public void initUI()
{
Button btn1 = new Button(this);
btn1.setText("Button");

Button btn2 = new Button(this);
btn2.setText("Button");

Button btn3 = new Button(this);
btn3.setText("Button");

Button btn4 = new Button(this);
btn4.setText("Button");

LinearLayout ll = new LinearLayout(this);
ll.setOrientation(LinearLayout.HORIZONTAL);

ll.addView(btn1);
ll.addView(btn2);
ll.addView(btn3);
ll.addView(btn4);

setContentView(ll);
}
}
Four buttons are placed in a horizontal LinearLayout. We will not use the layout XML file in this sample.
Button btn1 = new Button(this);
btn1.setText("Button");
A Button widget is created. The text is set for the button with the setText() method.
LinearLayout ll = new LinearLayout(this);
ll.setOrientation(LinearLayout.HORIZONTAL);
A horizontal LinearLayout is created.
ll.addView(btn1);
ll.addView(btn2);
ll.addView(btn3);
ll.addView(btn4);
Buttons are added to the layout manager.
setContentView(ll);
The linear layout manager is set to be the content view of the activity.

A column of buttons

We use the FrameLayout and the LinearLayout managers to create a column of buttons centered on the screen.
main.xml
<?xml version="1.0" encoding="utf-8"?>  
<FrameLayout
xmlns:android="http://schemas.android.com/apk/res/android"
android:layout_width="wrap_content"
android:layout_height="wrap_content"
android:layout_gravity="center"
>

<LinearLayout xmlns:android="http://schemas.android.com/apk/res/android"
android:orientation="vertical"
android:layout_width="match_parent"
android:layout_height="match_parent"
>

<Button
android:layout_height="wrap_content"
android:layout_width="wrap_content"
android:text="Button" />

<Button
android:layout_height="wrap_content"
android:layout_width="wrap_content"
android:text="Button" />

<Button
android:layout_height="wrap_content"
android:layout_width="wrap_content"
android:text="Button" />

<Button
android:layout_height="wrap_content"
android:layout_width="wrap_content"
android:text="Button" />

</LinearLayout>

</FrameLayout>
A LinearLayout manager with four buttons is placed in the FrameLayout manager.
<FrameLayout  
xmlns:android="http://schemas.android.com/apk/res/android"
android:layout_width="wrap_content"
android:layout_height="wrap_content"
android:layout_gravity="center"
>
The FrameLayout does not occupy all the available space. It is just big enough to take all the four buttons. And therefore we can use the layout_gravityattribute to center the LinearLayout and its four buttons.
<LinearLayout xmlns:android="http://schemas.android.com/apk/res/android"
android:orientation="vertical"
android:layout_width="match_parent"
android:layout_height="match_parent"
>
A vertical LinearLayout is created.
A column of buttons
Figure: A column of buttons

RelativeLayout

RelativeLayout lets child views specify their position relative to the parent view or to each other. The views are referenced by their ids.
main.xml
<?xml version="1.0" encoding="utf-8"?>
<RelativeLayout xmlns:android="http://schemas.android.com/apk/res/android"
android:layout_width="fill_parent"
android:layout_height="fill_parent"
>

<EditText
android:id="@+id/etId"
android:layout_marginTop="10dp"
android:layout_width="match_parent"
android:layout_height="wrap_content" />

<Button
android:id="@+id/btn_sendId"
android:layout_below="@+id/etId"
android:layout_width="wrap_content"
android:layout_height="wrap_content"
android:text="Send" />

<Button
android:id="@+id/btn_clearId"
android:layout_below="@+id/etId"
android:layout_toRightOf="@+id/btn_sendId"
android:layout_width="wrap_content"
android:layout_height="wrap_content"
android:text="Clear" />

</RelativeLayout>
The XML code displays an EditText with two buttons.
<EditText
android:id="@+id/etId"
android:layout_marginTop="10dp"
android:layout_width="match_parent"
android:layout_height="wrap_content" />
The EditText will be stretched from right to left by setting the android:layout_width to android:match_parent. The widget will be high enough to show its contents. We specify some gap between the widget and the border of the screen with android:layout_marginTopproperty.
<Button
android:id="@+id/btn_sendId"
android:layout_below="@+id/etId"
android:layout_width="wrap_content"
android:layout_height="wrap_content"
android:text="Send" />
The Send button widget will be placed below the EditText widget. To accomplish this, we use the android:layout_below property. Note that we reference the id of the widget that we relate to.
<Button
android:id="@+id/btn_clearId"
android:layout_below="@+id/etId"
android:layout_toRightOf="@+id/btn_sendId"
android:layout_width="wrap_content"
android:layout_height="wrap_content"
android:text="Clear" />
The Clear button is placed below the EditText widget and to the right of the Send button. We accomplish this by two properties. The android:layout_below and the android:layout_toRightOfproperty.
RelativeLayout example
Figure: RelativeLayout example

Grid

A GridLayout manager places its children in a rectangular grid. The grid consists of row and columns. The intersections of rows and columns are cells. Each cell is referenced by its index. A view in a grid can occupy one or more cells. The gravity is a property that specifies how a view should be placed in its group of cells.
main.xml
<?xml version="1.0" encoding="utf-8"?>
<GridLayout xmlns:android="http://schemas.android.com/apk/res/android"
android:layout_width="match_parent"
android:layout_height="match_parent"
>

<Button
android:text="(0, 0)"
android:layout_row="0"
android:layout_column="0" />

<Button
android:layout_row="0"
android:layout_column="1"
android:layout_columnSpan="2"
android:layout_gravity="fill_horizontal" />

<Button
android:text="(0, 3)"
android:layout_row="0"
android:layout_column="3" />

<Button
android:text="(0, 4)"
android:layout_row="0"
android:layout_column="4" />

<Button
android:layout_row="1"
android:layout_column="0"
android:layout_rowSpan="3"
android:layout_columnSpan="5"
android:layout_gravity="fill" />

<Button
android:text="Center"
android:layout_row="4"
android:layout_column="0"
android:layout_columnSpan="5"
android:layout_gravity="center_horizontal" />

<Button
android:text="Right"
android:layout_row="5"
android:layout_column="0"
android:layout_columnSpan="5"
android:layout_gravity="right" />

</GridLayout>
In the example we put a few buttons in a GridLayout. We show how a button can stretch over several cells.
<Button
android:text="(0, 0)"
android:layout_row="0"
android:layout_column="0" />
Using the layout_row and layout_column properties, we place a button at top-left cell. The indeces start from zero.
<Button
android:layout_row="0"
android:layout_column="1"
android:layout_columnSpan="2"
android:layout_gravity="fill_horizontal" />
This button will span two columns. The layout_gravity property will cause the button to fill the two columns.
<Button      
android:layout_row="1"
android:layout_column="0"
android:layout_rowSpan="3"
android:layout_columnSpan="5"
android:layout_gravity="fill" />
This button will span three rows and five columns.
<Button
android:text="Center"
android:layout_row="4"
android:layout_column="0"
android:layout_columnSpan="5"
android:layout_gravity="center_horizontal" />
A view may not occupy all the space that was allotted to it. This button is horizontally centered within five columns.
GridLayout example
Figure: GridLayout example
In this chapter of the Android development tutorial we worked with layout management.
Continue Reading