Showing posts with label Java SWT. Show all posts
Showing posts with label Java SWT. Show all posts
Nibbles Clone in Java SWT
Nibbles
In this part of the Java SWT tutorial, we will create a Nibbles game clone.Nibbles is an older classic video game. It was first created in late 70s. Later it was brought to PCs. In this game the player controls a snake. The objective is to eat as many apples as possible. Each time the snake eats an apple, its body grows. The snake must avoid the walls and its own body.
Development
The size of each of the joints of a snake is 10px. The snake is controlled with the cursor keys. Initially, the snake has three joints. The game starts immediately. When the game is finished, we display "Game Over" message in the center of the window.package com.zetcode;First we will define some globals used in our game.
import org.eclipse.swt.SWT;
import org.eclipse.swt.events.KeyAdapter;
import org.eclipse.swt.events.PaintEvent;
import org.eclipse.swt.events.PaintListener;
import org.eclipse.swt.graphics.Color;
import org.eclipse.swt.graphics.Font;
import org.eclipse.swt.graphics.Image;
import org.eclipse.swt.graphics.ImageData;
import org.eclipse.swt.graphics.Point;
import org.eclipse.swt.widgets.Canvas;
import org.eclipse.swt.widgets.Display;
import org.eclipse.swt.widgets.Shell;
public class Board extends Canvas {
private final int WIDTH = 300;
private final int HEIGHT = 300;
private final int DOT_SIZE = 10;
private final int ALL_DOTS = 900;
private final int RAND_POS = 29;
private final int DELAY = 140;
private int x[] = new int[ALL_DOTS];
private int y[] = new int[ALL_DOTS];
private int dots;
private int apple_x;
private int apple_y;
private boolean left = false;
private boolean right = true;
private boolean up = false;
private boolean down = false;
private boolean inGame = true;
private Image ball;
private Image apple;
private Image head;
private Display display;
private Shell shell;
private Runnable runnable;
public Board(Shell shell) {
super(shell, SWT.NULL);
this.shell = shell;
display = shell.getDisplay();
setSize(WIDTH, HEIGHT);
this.addPaintListener(new BoardPaintListener());
this.addKeyListener(new BoardKeyListener());
Color col = new Color(shell.getDisplay(), 0, 0, 0);
this.setBackground(col);
col.dispose();
ImageData iib = new ImageData("dot.png");
ball = new Image(display, iib);
ImageData iia = new ImageData("apple.png");
apple = new Image(display, iia);
ImageData iih = new ImageData("head.png");
head = new Image(display, iih);
initGame(shell.getDisplay());
}
public void initGame(final Display display) {
dots = 3;
for (int z = 0; z < dots; z++) {
x[z] = 50 - z*10;
y[z] = 50;
}
locateApple();
runnable = new Runnable() {
  public void run() {
      if (inGame) {
        checkApple();
        checkCollision();
        move();
    }
    display.timerExec(DELAY, this);
    redraw();
  }
};
display.timerExec(DELAY, runnable);
};
private class BoardPaintListener implements PaintListener {
public void paintControl(PaintEvent e) {
Color col = new Color(shell.getDisplay(), 0, 0, 0);
e.gc.setBackground(col);
col.dispose();
e.gc.setAntialias(SWT.ON);
if (inGame) {
    drawObjects(e);
} else {
    gameOver(e);
}
e.gc.dispose();
}
}
public void drawObjects(PaintEvent e) {
    e.gc.drawImage(apple, apple_x, apple_y);

    for (int z = 0; z < dots; z++) {
        if (z == 0) {
            e.gc.drawImage(head, x[z], y[z]);
        } else {
            e.gc.drawImage(ball, x[z], y[z]);
        }
    }
}
public void gameOver(PaintEvent e) {
String msg = "Game Over";
Font font = new Font(e.display, "Helvetica",
12, SWT.NORMAL);
Color white = new Color(shell.getDisplay(),
255, 255, 255);
Point size = e.gc.textExtent (msg);
e.gc.setForeground(white);
e.gc.setFont(font);
e.gc.drawText(msg, (WIDTH - size.x) / 2, (HEIGHT - size.y) / 2);
font.dispose();
white.dispose();
e.gc.dispose();
display.timerExec(-1, runnable);
}
public void checkApple() {

    if ((x[0] == apple_x) && (y[0] == apple_y)) {
        dots++;
        locateApple();
    }
}
public void move() {
for (int z = dots; z > 0; z--) {
    x[z] = x[(z - 1)];
    y[z] = y[(z - 1)];
}
if (left) {
    x[0] -= DOT_SIZE;
}
if (right) {
x[0] += DOT_SIZE;
}
if (up) {
y[0] -= DOT_SIZE;
}
if (down) {
y[0] += DOT_SIZE;
}
}
public void checkCollision() {
for (int z = dots; z > 0; z--) {

    if ((z > 4) && (x[0] == x[z]) && (y[0] == y[z])) {
    inGame = false;
    }
}
if (y[0] > HEIGHT - DOT_SIZE) {
    inGame = false;
}
if (y[0] < 0) {
inGame = false;
}
if (x[0] > WIDTH - DOT_SIZE) {
inGame = false;
}
if (x[0] < 0) {
inGame = false;
}
}
public void locateApple() {
int r = (int) (Math.random() * RAND_POS);
apple_x = ((r * DOT_SIZE));
r = (int) (Math.random() * RAND_POS);
apple_y = ((r * DOT_SIZE));
}
private class BoardKeyListener extends KeyAdapter {
@Override
public void keyPressed(org.eclipse.swt.events.KeyEvent e) {
int key = e.keyCode;
if ((key == SWT.ARROW_LEFT) && (!right)) {
    left = true;
    up = false;
    down = false;
}
if ((key == SWT.ARROW_RIGHT) && (!left)) {
right = true;
up = false;
down = false;
}
if ((key == SWT.ARROW_UP) && (!down)) {
up = true;
right = false;
left = false;
}
if ((key == SWT.ARROW_DOWN) && (!up)) {
down = true;
right = false;
left = false;
}
}
}
}
The WIDTH and HEIGHT constants determine the size of the Board. The DOT_SIZE is the size of the apple and the dot of the snake. The ALL_DOTS constant defines the maximum number of possible dots on the Board. The RAND_POS constant is used to calculate a random position of an apple. The DELAY constant determines the speed of the game.
private int x[] = new int[ALL_DOTS];These two arrays store x, y coordinates of all possible joints of a snake.
private int y[] = new int[ALL_DOTS];
The initGame() method initializes variables, loads images and starts a timeout function.
runnable = new Runnable() {
public void run() {
if (inGame) {
checkApple();
checkCollision();
move();
}
display.timerExec(DELAY, this);
redraw();
}
};
Every DELAY ms, the run() method is called. If we are in the game, we call three methods, that build the logic of the game. if (inGame) {
drawObjects(e);
} else {
gameOver(e);
}
Inside the paintControl() method, we check the inGame variable. If it is true, we draw our objects. The apple and the snake joints. Otherwise we display "Game over" text. public void drawObjects(PaintEvent e) {
e.gc.drawImage(apple, apple_x, apple_y);
for (int z = 0; z < dots; z++) {
if (z == 0) {
e.gc.drawImage(head, x[z], y[z]);
} else {
e.gc.drawImage(ball, x[z], y[z]);
}
}
}
The drawObjects() method draws the apple and the joints of the snake. The first joint of a snake is its head, which is represented by a red circle. public void checkApple() {
if ((x[0] == apple_x) && (y[0] == apple_y)) {
dots++;
locateApple();
}
}
The checkApple() method checks, if the snake has hit the apple object. If so, we add another snake joint and call the locateApple() method, which randomly places a new apple object. In the move() method we have the key algorithm of the game. To understand it, look at how the snake is moving. You control the head of the snake. You can change its direction with the cursor keys. The rest of the joints move one position up the chain. The second joint moves where the first was, the third joint where the second was etc.
for (int z = dots; z > 0; z--) {
x[z] = x[(z - 1)];
y[z] = y[(z - 1)];
}
This code moves the joints up the chain. if (left) {
x[0] -= DOT_SIZE;
}
Move the head to the left. In the checkCollision() method, we determine if the snake has hit itself or one of the walls.
for (int z = dots; z > 0; z--) {
if ((z > 4) && (x[0] == x[z]) && (y[0] == y[z])) {
inGame = false;
}
}
Finish the game, if the snake hits one of its joints with the head. if (y[0] > HEIGHT - DOT_SIZE) {
inGame = false;
}
Finish the game, if the snake hits the bottom of the Board. The locateApple() method locates an apple randomly on the board.
int r = (int) (Math.random() * RAND_POS);We get a random number from 0 to RAND_POS - 1.
apple_x = ((r * DOT_SIZE));These line set the x, y coordinates of the apple object.
...
apple_y = ((r * DOT_SIZE));
In the
keyPressed() method of the BoardKeyListener class, we determine the keys that were pressed. if ((key == SWT.ARROW_LEFT) && (!right)) {
left = true;
up = false;
down = false;
}
If we hit the left cursor key, we set left variable to true. This variable is used in the move() method to change coordinates of the snake object. Notice also, that when the snake is heading to the right, we cannot turn immediately to the left. package com.zetcode;In this class, we set up the Nibbles game.
import org.eclipse.swt.layout.FillLayout;
import org.eclipse.swt.widgets.Display;
import org.eclipse.swt.widgets.Shell;
/**
* ZetCode Java SWT tutorial
*
* In this code example, we create
* a Nibbles game clone
*
* @author jan bodnar
* website zetcode.com
* last modified June 2009
*/
public class SWTApp {
private Shell shell;
public SWTApp(Display display) {
shell = new Shell(display);
shell.setText("Nibbles");
initUI();
shell.setSize(305, 330);
shell.setLocation(300, 300);
shell.open();
while (!shell.isDisposed()) {
if (!display.readAndDispatch()) {
display.sleep();
}
}
}
public void initUI() {
FillLayout layout = new FillLayout();
shell.setLayout(layout);
new Board(shell);
}
public static void main(String[] args) {
Display display = new Display();
new SWTApp(display);
display.dispose();
}
}
shell.setSize(305, 330);In SWT library, there is no platform independent way of calculating the size of the decorations of the window. Borders and title bar. Or I didn't find it. These two numbers fit my case. You may need to update the width and height of the window to fit your case.
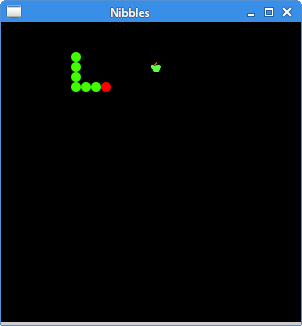
Figure: Nibbles
This was the Nibbles computer game programmed with the SWT library and the Java programming language. Painting in Java SWT
Painting in Java SWT
In this part of the Java SWT tutorial, we will do some painting.When do we need to paint? There are situations, when we need to create a widget from scratch. In such a case, we need to do painting. Or we want to create charts, special ornaments, effects or widget enhancements.
Colors
In the first example, we will work with colors. A color is an object representing a combination of Red, Green, and Blue (RGB) intensity values. In Java SWT, valid RGB values are in the range 0 to 255.package com.zetcode;In our example, we will draw three rectangles and fill them with three different colors.
import org.eclipse.swt.events.PaintEvent;
import org.eclipse.swt.events.PaintListener;
import org.eclipse.swt.graphics.Color;
import org.eclipse.swt.widgets.Display;
import org.eclipse.swt.widgets.Shell;
/**
* ZetCode Java SWT tutorial
*
* This program draws three rectangles.
* The interiors are filled with
* different colors.
*
* @author jan bodnar
* website zetcode.com
* last modified June 2009
*/
public class SWTApp {
private Shell shell;
public SWTApp(Display display) {
shell = new Shell(display);
shell.addPaintListener(new ColorsPaintListener());
shell.setText("Colors");
shell.setSize(360, 120);
shell.setLocation(300, 300);
shell.open();
while (!shell.isDisposed()) {
if (!display.readAndDispatch()) {
display.sleep();
}
}
}
private class ColorsPaintListener implements PaintListener {

    public void paintControl(PaintEvent e) {

        drawRectangles(e);

        e.gc.dispose();
    }
}
private void drawRectangles(PaintEvent e) {
Color c1 = new Color(e.display, 50, 50, 200);
e.gc.setBackground(c1);
e.gc.fillRectangle(10, 15, 90, 60);
Color c2 = new Color(e.display, 105, 90, 60);
e.gc.setBackground(c2);
e.gc.fillRectangle(130, 15, 90, 60);
Color c3 = new Color(e.display, 33, 200, 100);
e.gc.setBackground(c3);
e.gc.fillRectangle(250, 15, 90, 60);
c1.dispose();
c2.dispose();
c3.dispose();
}
public static void main(String[] args) {
Display display = new Display();
new SWTApp(display);
display.dispose();
}
}
shell.addPaintListener(new ColorsPaintListener());We create a listener for paint events.
private class ColorsPaintListener implements PaintListener {
public void paintControl(PaintEvent e) {
drawRectangles(e);
e.gc.dispose();
}
}
When a paint event is received, the paintControl() is executed. The actual drawing is delegated to the drawRectangles() method. Color c1 = new Color(e.display, 50, 50, 200);We create a color object and fill a rectangle with it.
e.gc.setBackground(c1);
e.gc.fillRectangle(10, 15, 90, 60);
c1.dispose();Resources are released.
c2.dispose();
c3.dispose();
e.gc.dispose();

Figure: Colors
Basic shapes
The next example draws some basic shapes onto the window.package com.zetcode;In this example, we will create a rectangle, a square, an ellipse, a circle, a rounded rectangle, and an arc.
import org.eclipse.swt.SWT;
import org.eclipse.swt.events.PaintEvent;
import org.eclipse.swt.events.PaintListener;
import org.eclipse.swt.graphics.Color;
import org.eclipse.swt.widgets.Display;
import org.eclipse.swt.widgets.Shell;
/**
* ZetCode Java SWT tutorial
*
* In this program, we draw some
* basic shapes of the Java SWT library
*
* @author jan bodnar
* website zetcode.com
* last modified June 2009
*/
public class SWTApp {
private Shell shell;
public SWTApp(Display display) {
shell = new Shell(display);
shell.addPaintListener(new ArcExamplePaintListener());
shell.setText("Basic shapes");
shell.setSize(430, 300);
shell.setLocation(300, 300);
shell.open();
while (!shell.isDisposed()) {
if (!display.readAndDispatch()) {
display.sleep();
}
}
}
private class ArcExamplePaintListener implements PaintListener {
public void paintControl(PaintEvent e) {
drawShapes(e);
e.gc.dispose();
}
}
private void drawShapes(PaintEvent e) {
e.gc.setAntialias(SWT.ON);
e.gc.setBackground(new Color(e.display, 150, 150, 150));
e.gc.fillRectangle(20, 20, 120, 80);
e.gc.fillRectangle(180, 20, 80, 80);
e.gc.fillOval(290, 20, 120, 70);
e.gc.fillOval(20, 150, 80, 80);
e.gc.fillRoundRectangle(150, 150, 100, 80, 25, 25);
e.gc.fillArc(280, 150, 100, 100, 0, 115);
}
public static void main(String[] args) {
Display display = new Display();
new SWTApp(display);
display.dispose();
}
}
e.gc.fillRectangle(20, 20, 120, 80);These lines draw a rectangle a square and an ellipse.
e.gc.fillRectangle(180, 20, 80, 80);
e.gc.fillOval(290, 20, 120, 70);
e.gc.fillOval(20, 150, 80, 80);Here the
fillOval() method draws a circle. e.gc.fillRoundRectangle(150, 150, 100, 80, 25, 25);These two lines draw a rounded rectangle and an arc.
e.gc.fillArc(280, 150, 100, 100, 0, 115);

Figure: Basic shapes
Transparent rectangles
Transparency is the quality of being able to see through a material. The easiest way to understand transparency is to imagine a piece of glass or water. Technically, the rays of light can go through the glass and this way we can see objects behind the glass.In computer graphics, we can achieve transparency effects using alpha compositing. Alpha compositing is the process of combining an image with a background to create the appearance of partial transparency. The composition process uses an alpha channel. (wikipedia.org, answers.com)
package com.zetcode;In the example we will draw ten rectangles with different levels of transparency.
import org.eclipse.swt.events.PaintEvent;
import org.eclipse.swt.events.PaintListener;
import org.eclipse.swt.graphics.Color;
import org.eclipse.swt.widgets.Display;
import org.eclipse.swt.widgets.Shell;
/**
* ZetCode Java SWT tutorial
*
* This program draws ten
* rectangles with different
* levels of transparency
*
* @author jan bodnar
* website zetcode.com
* last modified June 2009
*/
public class SWTApp {
private Shell shell;
public SWTApp(Display display) {
shell = new Shell(display);
shell.addPaintListener(new ArcExamplePaintListener());
shell.setText("Transparent rectangles");
shell.setSize(590, 120);
shell.setLocation(300, 300);
shell.open();
while (!shell.isDisposed()) {
if (!display.readAndDispatch()) {
display.sleep();
}
}
}
private class ArcExamplePaintListener implements PaintListener {
public void paintControl(PaintEvent e) {
drawRectangles(e);
e.gc.dispose();
}
}
private void drawRectangles(PaintEvent e) {
Color blue = new Color(e.display, 0, 0, 255);
e.gc.setBackground(blue);
for (int i = 1; i < 11; i++) {
e.gc.setAlpha(i * 25);
e.gc.fillRectangle(50 * i, 20, 40, 40);
}
blue.dispose();
}
public static void main(String[] args) {
Display display = new Display();
new SWTApp(display);
display.dispose();
}
}
e.gc.setAlpha(i * 25);Here we set the aplha transparency value for the painting process.

Figure: Transparent rectangles
Donut
In the following example we create an complex shape by rotating a bunch of ellipses.package com.zetcode;In this example, we create a donut. The shapes resembles a cookie, hence the name donut.
import org.eclipse.swt.SWT;
import org.eclipse.swt.events.PaintEvent;
import org.eclipse.swt.events.PaintListener;
import org.eclipse.swt.graphics.Transform;
import org.eclipse.swt.widgets.Display;
import org.eclipse.swt.widgets.Shell;
/**
* ZetCode Java SWT tutorial
*
* This program creates a donut shape
*
* @author jan bodnar
* website zetcode.com
* last modified June 2009
*/
public class SWTApp {
private Shell shell;
public SWTApp(Display display) {
shell = new Shell(display);
shell.addPaintListener(new DonutPaintListener());
shell.setText("Donut");
shell.setSize(430, 300);
shell.setLocation(300, 300);
shell.open();
while (!shell.isDisposed()) {
if (!display.readAndDispatch()) {
display.sleep();
}
}
}
private class DonutPaintListener implements PaintListener {
public void paintControl(PaintEvent e) {
drawDonut(e);
e.gc.dispose();
}
}
private void drawDonut(PaintEvent e) {
int w = e.width;
int h = e.height;
e.gc.setAntialias(SWT.ON);
Transform tr = new Transform(e.display);
tr.translate(w / 2, h / 2);
e.gc.setTransform(tr);
for (int rot = 0; rot < 36; rot++) {
    tr.rotate(5f);
    e.gc.drawOval(-125, -40, 250, 80);
    e.gc.setTransform(tr);
}
}
public static void main(String[] args) {
Display display = new Display();
new SWTApp(display);
display.dispose();
}
}
Transform tr = new Transform(e.display);We move the middle of the axis to the center of the window.
tr.translate(w / 2, h / 2);
e.gc.setTransform(tr);
for (int rot = 0; rot < 36; rot++) {
tr.rotate(5f);
e.gc.drawOval(-125, -40, 250, 80);
e.gc.setTransform(tr);
}
We do several rotations and draw the ellipses. 
Figure: Donut
Drawing text
In the next example, we draw some text on the window.package com.zetcode;We display part of the lyrics from the Natasha Bedingfields Soulmate song.
import org.eclipse.swt.SWT;
import org.eclipse.swt.events.PaintEvent;
import org.eclipse.swt.events.PaintListener;
import org.eclipse.swt.graphics.Color;
import org.eclipse.swt.graphics.Font;
import org.eclipse.swt.widgets.Display;
import org.eclipse.swt.widgets.Shell;
/**
* ZetCode Java SWT tutorial
*
* This program draws text
* on the window
*
* @author jan bodnar
* website zetcode.com
* last modified June 2009
*/
public class SWTApp {
Shell shell;
public SWTApp(Display display) {
shell = new Shell(display);
shell.addPaintListener(new LyricsExamplePaintListener());
shell.setText("Soulmate");
shell.setSize(380, 300);
shell.setLocation(300, 300);
shell.open();
while (!shell.isDisposed()) {
if (!display.readAndDispatch()) {
display.sleep();
}
}
}
private class LyricsExamplePaintListener implements PaintListener {
public void paintControl(PaintEvent e) {
drawLyrics(e);
e.gc.dispose();
}
}
private void drawLyrics(PaintEvent e) {
e.gc.setAntialias(SWT.ON);
Font font = new Font(e.display, "Purisa", 10, SWT.NORMAL);
Color color = new Color(e.display, 25, 25, 25);
e.gc.setForeground(color);
e.gc.setFont(font);
e.gc.drawText("Most relationships seem so transitory", 20, 30);
e.gc.drawText("They're good but not the permanent one", 20, 60);
e.gc.drawText("Who doesn't long for someone to hold", 20, 120);
e.gc.drawText("Who knows how to love without being told", 20, 150);
e.gc.drawText("Somebody tell me why I'm on my own", 20, 180);
e.gc.drawText("If there's a soulmate for everyone", 20, 210);
font.dispose();
}
public static void main(String[] args) {
Display display = new Display();
new SWTApp(display);
display.dispose();
}
}
Font font = new Font(e.display, "Purisa", 10, SWT.NORMAL);Here we specify the font, that we use. Purisa, 10px, normal.
e.gc.drawText("Most relationships seem so transitory", 20, 30);
The drawText() method draws text onto the window. 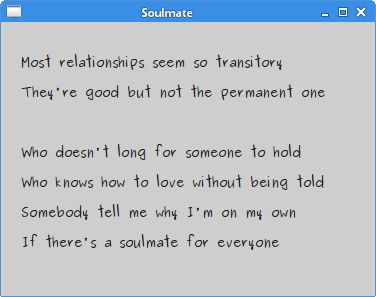
Figure: Soulmate
In this chapter of the Java SWT tutorial, we did some painting. Dialogs in Java SWT
Dialogs
In this part of the Java SWT tutorial, we will introduce dialogs.Dialog windows or dialogs are an indispensable part of most modern GUI applications. A dialog is defined as a conversation between two or more persons. In a computer application a dialog is a window which is used to "talk" to the application. A dialog is used to input data, modify data, change the application settings etc. Dialogs are important means of communication between a user and a computer program.
Directory dialog
The directory dialog is a dialog, which is used to select a path to a certain directory.package com.zetcode;In our example, we use the directory dialog to select a directory. The path to the directory is shown in the status label. The dialog is shown by clicking on the area of the window.
import org.eclipse.swt.SWT;
import org.eclipse.swt.events.MouseAdapter;
import org.eclipse.swt.events.MouseEvent;
import org.eclipse.swt.layout.FormAttachment;
import org.eclipse.swt.layout.FormData;
import org.eclipse.swt.layout.FormLayout;
import org.eclipse.swt.widgets.DirectoryDialog;
import org.eclipse.swt.widgets.Display;
import org.eclipse.swt.widgets.Label;
import org.eclipse.swt.widgets.Shell;
/**
* ZetCode Java SWT tutorial
*
* This example shows a directory dialog
*
* @author jan bodnar
* website zetcode.com
* last modified June 2009
*/
public class SWTApp {
private Shell shell;
public SWTApp(Display display) {
shell = new Shell(display);
shell.setText("DirectoryDialog");
initUI();
shell.setSize(350, 250);
shell.setLocation(300, 300);
shell.open();
while (!shell.isDisposed()) {
if (!display.readAndDispatch()) {
display.sleep();
}
}
}
public void initUI() {
final Label status = new Label(shell, SWT.BORDER);
status.setText("Ready");
FormLayout layout = new FormLayout();
shell.setLayout(layout);
FormData labelData = new FormData();
labelData.left = new FormAttachment(0);
labelData.right = new FormAttachment(100);
labelData.bottom = new FormAttachment(100);
status.setLayoutData(labelData);
shell.addMouseListener(new MouseAdapter() {
@Override
public void mouseDown(MouseEvent event) {
DirectoryDialog dialog = new DirectoryDialog(shell);
String path = dialog.open();
if (path != null)
    status.setText(path);
}
});
}
public static void main(String[] args) {
Display display = new Display();
new SWTApp(display);
display.dispose();
}
}
DirectoryDialog dialog = new DirectoryDialog(shell);
DirectoryDialog is created. String path = dialog.open();We get the path to the selected directory.
if (path != null)If the path is not null, we show the path in the status label.
status.setText(path);
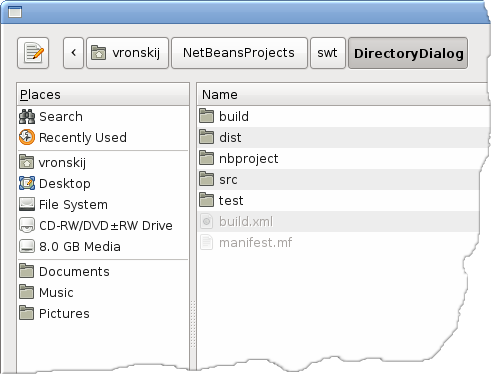
Figure: Directory dialog
FontDialog
TheFontDialog is a dialog for selecting fonts. It is typically used in applications, that do some text editing or formatting. package com.zetcode;In the code example, we use a
import org.eclipse.swt.SWT;
import org.eclipse.swt.events.MouseAdapter;
import org.eclipse.swt.events.MouseEvent;
import org.eclipse.swt.graphics.Font;
import org.eclipse.swt.graphics.FontData;
import org.eclipse.swt.widgets.Display;
import org.eclipse.swt.widgets.FontDialog;
import org.eclipse.swt.widgets.Label;
import org.eclipse.swt.widgets.Shell;
/**
* ZetCode Java SWT tutorial
*
* This example shows a font dialog
*
* @author jan bodnar
* website zetcode.com
* last modified June 2009
*/
public class SWTApp {
private Shell shell;
public SWTApp(Display display) {
shell = new Shell(display);
shell.setText("FontDialog");
initUI();
shell.setSize(350, 250);
shell.setLocation(300, 300);
shell.open();
while (!shell.isDisposed()) {
if (!display.readAndDispatch()) {
display.sleep();
}
}
}
public void initUI() {
final Label label = new Label(shell, SWT.NONE);
label.setText("ZetCode Java SWT tutorial");
label.setLocation(50, 50);
label.pack();
shell.addMouseListener(new MouseAdapter() {
@Override
public void mouseDown(MouseEvent event) {
FontDialog dialog = new FontDialog(shell);
FontData fdata = dialog.open();
if (fdata != null) {
Font font = new Font(shell.getDisplay(), fdata);
label.setFont(font);
label.pack();
font.dispose();
}
}
});
}
public static void main(String[] args) {
Display display = new Display();
new SWTApp(display);
display.dispose();
}
}
FontDialog to change the font of a label. FontDialog dialog = new FontDialog(shell);We create the
FontDialog. Font font = new Font(shell.getDisplay(), fdata);
Font object is created from the font data, returned by the font dialog. 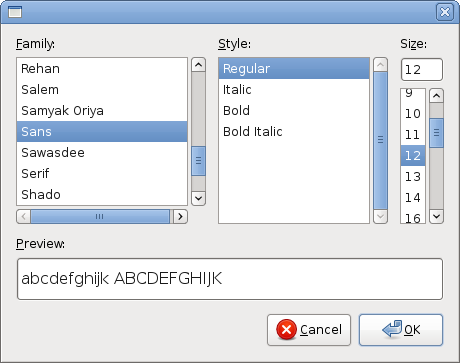
Figure: FontDialog
ColorDialog
ColorDialog is a dialog for selecting a color. package com.zetcode;The example is very similar to the previous one. This time we change the color of the label.
import org.eclipse.swt.SWT;
import org.eclipse.swt.events.MouseAdapter;
import org.eclipse.swt.events.MouseEvent;
import org.eclipse.swt.graphics.Color;
import org.eclipse.swt.graphics.RGB;
import org.eclipse.swt.widgets.ColorDialog;
import org.eclipse.swt.widgets.Display;
import org.eclipse.swt.widgets.Label;
import org.eclipse.swt.widgets.Shell;
/**
* ZetCode Java SWT tutorial
*
* This example shows a color dialog
*
* @author jan bodnar
* website zetcode.com
* last modified June 2009
*/
public class SWTApp {
private Shell shell;
public SWTApp(Display display) {
shell = new Shell(display);
shell.setText("ColorDialog");
initUI();
shell.setSize(350, 250);
shell.setLocation(300, 300);
shell.open();
while (!shell.isDisposed()) {
if (!display.readAndDispatch()) {
display.sleep();
}
}
}
public void initUI() {
final Label label = new Label(shell, SWT.NONE);
label.setText("ZetCode Java SWT tutorial");
label.setLocation(50, 50);
label.pack();
shell.addMouseListener(new MouseAdapter() {
@Override
public void mouseDown(MouseEvent event) {
ColorDialog dialog = new ColorDialog(shell);
RGB rgb = dialog.open();
if (rgb != null) {
Color col = new Color(shell.getDisplay(), rgb);
label.setForeground(col);
col.dispose();
}
}
});
}
public static void main(String[] args) {
Display display = new Display();
new SWTApp(display);
display.dispose();
}
}
ColorDialog dialog = new ColorDialog(shell);We create the
ColorDialog. RGB rgb = dialog.open();We get the RGB value.
Color col = new Color(shell.getDisplay(), rgb);We get the color value and modify the color of the label.
label.setForeground(col);
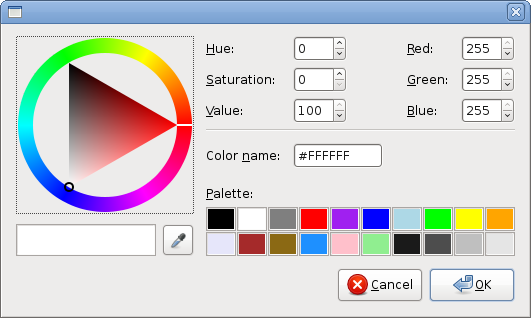
Figure: ColorDialog
FileDialog
TheFileDialog is used to select a name of a file. package com.zetcode;The code example uses a
import org.eclipse.swt.SWT;
import org.eclipse.swt.events.MouseAdapter;
import org.eclipse.swt.events.MouseEvent;
import org.eclipse.swt.widgets.Display;
import org.eclipse.swt.widgets.FileDialog;
import org.eclipse.swt.widgets.Label;
import org.eclipse.swt.widgets.Shell;
/**
* ZetCode Java SWT tutorial
*
* This example shows a file dialog
*
* @author jan bodnar
* website zetcode.com
* last modified June 2009
*/
public class SWTApp {
private Shell shell;
public SWTApp(Display display) {
shell = new Shell(display);
shell.setText("FileDialog");
initUI();
shell.setSize(350, 250);
shell.setLocation(300, 300);
shell.open();
while (!shell.isDisposed()) {
if (!display.readAndDispatch()) {
display.sleep();
}
}
}
public void initUI() {
final Label label = new Label(shell, SWT.NONE);
label.setText("ZetCode Java SWT tutorial");
label.setLocation(50, 50);
label.pack();
shell.addMouseListener(new MouseAdapter() {
@Override
public void mouseDown(MouseEvent event) {
FileDialog dialog = new FileDialog(shell, SWT.OPEN);
String[] filterNames = new String[]
{"Java sources", "All Files (*)"};

String[] filterExtensions = new String[]
    {"*.java", "*"};

dialog.setFilterNames(filterNames);
dialog.setFilterExtensions(filterExtensions);
String path = dialog.open();
if (path != null) {
label.setText(path);
label.pack();
}
}
});
}
public static void main(String[] args) {
Display display = new Display();
new SWTApp(display);
display.dispose();
}
}
FileDialog to select a file. The dialog uses a filter to show only the java sources. The name of the file is shown in the label. FileDialog dialog = new FileDialog(shell, SWT.OPEN);We create an
FileDialog with a SWT.OPEN flag. The dialog can be used to open or save files. String[] filterNames = new String[]We use a filter to narrow the files to Java sources.
{"Java sources", "All Files (*)"};
String[] filterExtensions = new String[]
{"*.java", "*"};
dialog.setFilterNames(filterNames);
dialog.setFilterExtensions(filterExtensions);
This part of the Java SWT tutorial was about dialogs in SWT.
Menus And toolbars in Java SWT
Menus And toolbars
In this part of the Java SWT tutorial, we will work with menus & toolbars.A menubar is one of the most common parts of the GUI application. It is a group of commands located in various menus. While in console applications you have to remember all those arcane commands, here we have most of the commands grouped into logical parts. These are accepted standards that further reduce the amount of time spending to learn a new application.
Simple menu
In our first example, we will create a menubar with one file menu. The menu will have only one menu item. By selecting the item the application quits.package com.zetcode;This is a small example with minimal menubar functionality.
import org.eclipse.swt.SWT;
import org.eclipse.swt.events.SelectionAdapter;
import org.eclipse.swt.events.SelectionEvent;
import org.eclipse.swt.widgets.Display;
import org.eclipse.swt.widgets.Menu;
import org.eclipse.swt.widgets.MenuItem;
import org.eclipse.swt.widgets.Shell;
/**
* ZetCode Java SWT tutorial
*
* This program creates a simple menu
*
* @author jan bodnar
* website zetcode.com
* last modified June 2009
*/
public class SWTApp {
private Shell shell;
public SWTApp(Display display) {
shell = new Shell(display);
shell.setText("Simple menu");
initUI();
shell.setSize(250, 200);
shell.setLocation(300, 300);
shell.open();
while (!shell.isDisposed()) {
if (!display.readAndDispatch()) {
display.sleep();
}
}
}
public void initUI() {
Menu menuBar = new Menu(shell, SWT.BAR);
MenuItem cascadeFileMenu = new MenuItem(menuBar, SWT.CASCADE);
cascadeFileMenu.setText("&File");
Menu fileMenu = new Menu(shell, SWT.DROP_DOWN);
cascadeFileMenu.setMenu(fileMenu);
MenuItem exitItem = new MenuItem(fileMenu, SWT.PUSH);
exitItem.setText("&Exit");
shell.setMenuBar(menuBar);
exitItem.addSelectionListener(new SelectionAdapter() {
    @Override
    public void widgetSelected(SelectionEvent e) {
        shell.getDisplay().dispose();
        System.exit(0);
    }
});
}
public static void main(String[] args) {
Display display = new Display();
new SWTApp(display);
display.dispose();
}
}
Menu menuBar = new Menu(shell, SWT.BAR);Here we create a menu bar.
MenuItem cascadeFileMenu = new MenuItem(menuBar, SWT.CASCADE);Toplevel menu items are cascade menu items.
cascadeFileMenu.setText("&File");
Menu fileMenu = new Menu(shell, SWT.DROP_DOWN);We create a drop down menu.
cascadeFileMenu.setMenu(fileMenu);
MenuItem exitItem = new MenuItem(fileMenu, SWT.PUSH);A push menu item is plugged into a drop down menu.
exitItem.setText("&Exit");
shell.setMenuBar(menuBar);We set a menu bar for our shell.
exitItem.addSelectionListener(new SelectionAdapter() {
@Override
public void widgetSelected(SelectionEvent e) {
shell.getDisplay().dispose();
System.exit(0);
}
});
When we select the exit push menu item, we terminate the application. 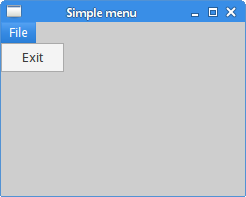
Figure: Simple menu
Submenu
The next example demonstrates how to create a submenu in Java SWT.package com.zetcode;Submenu creation.
import org.eclipse.swt.SWT;
import org.eclipse.swt.events.SelectionAdapter;
import org.eclipse.swt.events.SelectionEvent;
import org.eclipse.swt.widgets.Display;
import org.eclipse.swt.widgets.Menu;
import org.eclipse.swt.widgets.MenuItem;
import org.eclipse.swt.widgets.Shell;
/**
* ZetCode Java SWT tutorial
*
* This program creates a submenu
*
* @author jan bodnar
* website zetcode.com
* last modified June 2009
*/
public class SWTApp {
private Shell shell;
public SWTApp(Display display) {
shell = new Shell(display);
shell.setText("Submenu");
initUI();
shell.setSize(250, 200);
shell.setLocation(300, 300);
shell.open();
while (!shell.isDisposed()) {
if (!display.readAndDispatch()) {
display.sleep();
}
}
}
public void initUI() {
Menu menuBar = new Menu(shell, SWT.BAR);
MenuItem cascadeFileMenu = new MenuItem(menuBar, SWT.CASCADE);
cascadeFileMenu.setText("&File");
Menu fileMenu = new Menu(shell, SWT.DROP_DOWN);
cascadeFileMenu.setMenu(fileMenu);
MenuItem cascadeMenu = new MenuItem(menuBar, SWT.CASCADE);
cascadeMenu.setText("&File");
MenuItem subMenuItem = new MenuItem(fileMenu, SWT.CASCADE);
subMenuItem.setText("Import");
Menu submenu = new Menu(shell, SWT.DROP_DOWN);
subMenuItem.setMenu(submenu);
MenuItem feedItem = new MenuItem(submenu, SWT.PUSH);
feedItem.setText("&Import news feed...");
MenuItem bmarks = new MenuItem(submenu, SWT.PUSH);
bmarks.setText("&Import bookmarks...");
MenuItem mailItem = new MenuItem(submenu, SWT.PUSH);
mailItem.setText("&Import mail...");
MenuItem exitItem = new MenuItem(fileMenu, SWT.PUSH);
exitItem.setText("&Exit");
shell.setMenuBar(menuBar);
exitItem.addSelectionListener(new SelectionAdapter() {
@Override
public void widgetSelected(SelectionEvent e) {
shell.getDisplay().dispose();
System.exit(0);
}
});
}
public static void main(String[] args) {
Display display = new Display();
new SWTApp(display);
display.dispose();
}
}
MenuItem subMenuItem = new MenuItem(fileMenu, SWT.CASCADE);A submenu creation is similar to creating a normal menu. First, we create a cascade menu item. The only difference is the parent widget. This time the parent is the menu object, to which the submenu belongs.
subMenuItem.setText("Import");
MenuItem feedItem = new MenuItem(submenu, SWT.PUSH);We create a push menu item. The parent widget is the submenu object.
feedItem.setText("&Import news feed...");
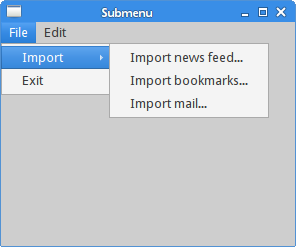
Figure: Submenu
CheckMenuItem
ACheckMenuItem is a menu item with a check box. It can be used to work with boolean properties. package com.zetcode;In our code example we show a check menu item. If the check box is activated, the statusbar widget is shown. If not, the statusbar is hidden.
import org.eclipse.swt.SWT;
import org.eclipse.swt.events.SelectionAdapter;
import org.eclipse.swt.events.SelectionEvent;
import org.eclipse.swt.layout.FormAttachment;
import org.eclipse.swt.layout.FormData;
import org.eclipse.swt.layout.FormLayout;
import org.eclipse.swt.widgets.Display;
import org.eclipse.swt.widgets.Event;
import org.eclipse.swt.widgets.Label;
import org.eclipse.swt.widgets.Listener;
import org.eclipse.swt.widgets.Menu;
import org.eclipse.swt.widgets.MenuItem;
import org.eclipse.swt.widgets.Shell;
/**
* ZetCode Java SWT tutorial
*
* This program creates a check menu item.
* It will show or hide a statusbar.
*
* @author jan bodnar
* website zetcode.com
* last modified June 2009
*/
public class SWTApp {
private Shell shell;
private Label status;
private MenuItem statItem;
public SWTApp(Display display) {
shell = new Shell(display);
shell.setText("Check menu item");
initUI();
shell.setSize(300, 250);
shell.setLocation(300, 300);
shell.open();
while (!shell.isDisposed()) {
if (!display.readAndDispatch()) {
display.sleep();
}
}
}
Listener statListener = new Listener() {
public void handleEvent(Event event) {
if (statItem.getSelection()) {
    status.setVisible(true);
} else {
    status.setVisible(false);
}
}
};
public void initUI() {
Menu menuBar = new Menu(shell, SWT.BAR);
shell.setMenuBar(menuBar);
MenuItem cascadeFileMenu = new MenuItem(menuBar, SWT.CASCADE);
cascadeFileMenu.setText("&File");
Menu fileMenu = new Menu(shell, SWT.DROP_DOWN);
cascadeFileMenu.setMenu(fileMenu);
MenuItem exitItem = new MenuItem(fileMenu, SWT.PUSH);
exitItem.setText("&Exit");
MenuItem cascadeViewMenu = new MenuItem(menuBar, SWT.CASCADE);
cascadeViewMenu.setText("&View");
Menu viewMenu = new Menu(shell, SWT.DROP_DOWN);
cascadeViewMenu.setMenu(viewMenu);
statItem = new MenuItem(viewMenu, SWT.CHECK);
statItem.setSelection(true);
statItem.setText("&View Statusbar");
statItem.addListener(SWT.Selection, statListener);
exitItem.addSelectionListener(new SelectionAdapter() {
@Override
public void widgetSelected(SelectionEvent e) {
shell.getDisplay().dispose();
System.exit(0);
}
});
status = new Label(shell, SWT.BORDER);
status.setText("Ready");
FormLayout layout = new FormLayout();
shell.setLayout(layout);
FormData labelData = new FormData();
labelData.left = new FormAttachment(0);
labelData.right = new FormAttachment(100);
labelData.bottom = new FormAttachment(100);
status.setLayoutData(labelData);
}
public static void main(String[] args) {
Display display = new Display();
new SWTApp(display);
display.dispose();
}
}
statItem = new MenuItem(viewMenu, SWT.CHECK);The
SWT.CHECK flag will create a check menu item. statItem.setSelection(true);The
setSelection() method checks/unchecks the check menu item. if (statItem.getSelection()) {
status.setVisible(true);
} else {
status.setVisible(false);
}
Depending on the state of the check menu item, we show or hide the statusbar widget. 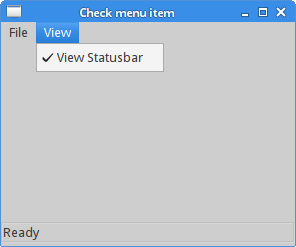
Figure: CheckMenuItem
Popup menu
In the next example, we will create a popup menu. It is also called a context menu. This type of menu is shown, when we right click on an object.package com.zetcode;In our code example, we create a popup menu with two menu items. The first will minimize the window and the second will terminate the application.
import org.eclipse.swt.SWT;
import org.eclipse.swt.events.SelectionAdapter;
import org.eclipse.swt.events.SelectionEvent;
import org.eclipse.swt.widgets.Display;
import org.eclipse.swt.widgets.Menu;
import org.eclipse.swt.widgets.MenuItem;
import org.eclipse.swt.widgets.Shell;
/**
* ZetCode Java SWT tutorial
*
* This program creates a popup
* menu
*
* @author jan bodnar
* website zetcode.com
* last modified June 2009
*/
public class SWTApp {
private Shell shell;
public SWTApp(Display display) {
shell = new Shell(display);
shell.setText("Popup menu");
initUI();
shell.setSize(300, 250);
shell.setLocation(300, 300);
shell.open();
while (!shell.isDisposed()) {
if (!display.readAndDispatch()) {
display.sleep();
}
}
}
public void initUI() {
Menu menu = new Menu(shell, SWT.POP_UP);
MenuItem minItem = new MenuItem(menu, SWT.PUSH);
minItem.setText("Minimize");
minItem.addSelectionListener(new SelectionAdapter() {
@Override
public void widgetSelected(SelectionEvent e) {
    shell.setMinimized(true);
}
});
MenuItem exitItem = new MenuItem(menu, SWT.PUSH);
exitItem.setText("Exit");
exitItem.addSelectionListener(new SelectionAdapter() {
@Override
public void widgetSelected(SelectionEvent e) {
shell.getDisplay().dispose();
System.exit(0);
}
});
shell.setMenu(menu);
}
public static void main(String[] args) {
Display display = new Display();
new SWTApp(display);
display.dispose();
}
}
Menu menu = new Menu(shell, SWT.POP_UP);Popup menu is created with the
SWT.POP_UPflag. MenuItem minItem = new MenuItem(menu, SWT.PUSH);Menu items inside a popup menu are normal push menu items.
minItem.setText("Minimize");
public void widgetSelected(SelectionEvent e) {
shell.setMinimized(true);
}
This code will minimize the window. shell.setMenu(menu);We set a popup menu for the shell.
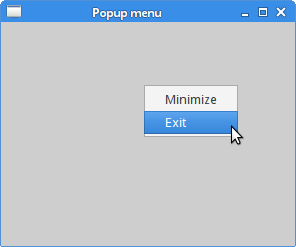
Figure: Popup menu
Simple toolbar
Menus group commands that we can use in application. Toolbars provide a quick access to the most frequently used commands. In the following example, we will create a simple toolbar.package com.zetcode;The example shows a toolbar and three tool items.
import org.eclipse.swt.SWT;
import org.eclipse.swt.events.SelectionAdapter;
import org.eclipse.swt.events.SelectionEvent;
import org.eclipse.swt.graphics.Device;
import org.eclipse.swt.graphics.Image;
import org.eclipse.swt.widgets.Display;
import org.eclipse.swt.widgets.Shell;
import org.eclipse.swt.widgets.ToolBar;
import org.eclipse.swt.widgets.ToolItem;
/**
* ZetCode Java SWT tutorial
*
* This program creates a simple toolbar
*
* @author jan bodnar
* website zetcode.com
* last modified June 2009
*/
public class SWTApp {
private Shell shell;
private Image newi;
private Image opei;
private Image quii;
public SWTApp(Display display) {
shell = new Shell(display);
shell.setText("Simple toolbar");
initUI();
shell.setSize(300, 250);
shell.setLocation(300, 300);
shell.open();
while (!shell.isDisposed()) {
if (!display.readAndDispatch()) {
display.sleep();
}
}
}
public void initUI() {
Device dev = shell.getDisplay();
try {
newi = new Image(dev, "new.png");
opei = new Image(dev, "open.png");
quii = new Image(dev, "quit.png");
} catch (Exception e) {
System.out.println("Cannot load images");
System.out.println(e.getMessage());
System.exit(1);
}
ToolBar toolBar = new ToolBar(shell, SWT.BORDER);
ToolItem item1 = new ToolItem(toolBar, SWT.PUSH);
item1.setImage(newi);
ToolItem item2 = new ToolItem(toolBar, SWT.PUSH);
item2.setImage(opei);
new ToolItem(toolBar, SWT.SEPARATOR);
ToolItem item3 = new ToolItem(toolBar, SWT.PUSH);
item3.setImage(quii);
toolBar.pack();
item3.addSelectionListener(new SelectionAdapter() {
@Override
public void widgetSelected(SelectionEvent e) {
shell.getDisplay().dispose();
System.exit(0);
}
});
}
public static void main(String[] args) {
Display display = new Display();
new SWTApp(display);
display.dispose();
}
}
ToolBar toolBar = new ToolBar(shell, SWT.BORDER);Toolbar widget is created.
ToolItem item1 = new ToolItem(toolBar, SWT.PUSH);We create a tool item with an image.
item1.setImage(newi);
new ToolItem(toolBar, SWT.SEPARATOR);Here we create a vertical separator.

Figure: Toolbar
In this chapter of the Java SWT tutorial, we showed, how to work with menus & toolbars. Widgets in Java SWT
Widgets in SWT
In this part of the Java SWT programming tutorial, we will introduce some SWT widgets.Widgets are basic building blocks of a GUI application. Think of widgets as parts of a lego. Over the years, several widgets became a standard in all toolkits on all OS platforms. For example a button, a check box or a scroll bar.
Label
ALabel widget shows text. package com.zetcode;The code example shows some lyrics on the window.
import org.eclipse.swt.SWT;
import org.eclipse.swt.graphics.Point;
import org.eclipse.swt.widgets.Display;
import org.eclipse.swt.widgets.Label;
import org.eclipse.swt.widgets.Shell;
/**
* ZetCode Java SWT tutorial
*
* This program uses the Label widget to
* show lyrics of a song
*
* @author jan bodnar
* website zetcode.com
* last modified June 2009
*/
public class SWTApp {
Shell shell;
String lyrics =
"And I know that he knows I'm unfaithful\n"+
"And it kills him inside\n"+
"To know that I am happy with some other guy\n"+
"I can see him dyin'\n"+
"\n"+
"I don't wanna do this anymore\n"+
"I don't wanna be the reason why\n"+
"Every time I walk out the door\n"+
"I see him die a little more inside\n"+
"I don't wanna hurt him anymore\n"+
"I don't wanna take away his life\n"+
"I don't wanna be...A murderer";
public SWTApp(Display display) {
shell = new Shell(display);
shell.setText("Unfaithful");
initUI();
shell.pack();
shell.setLocation(300, 300);
shell.open();
while (!shell.isDisposed()) {
if (!display.readAndDispatch()) {
display.sleep();
}
}
}
public void initUI() {
Label label = new Label(shell, SWT.LEFT);
label.setText(lyrics);
Point p = label.computeSize(SWT.DEFAULT, SWT.DEFAULT);
label.setBounds(5, 5, p.x+5, p.y+5);
}
public static void main(String[] args) {
Display display = new Display();
new SWTApp(display);
display.dispose();
}
}
String lyrics =We build a multiline text.
"And I know that he knows I'm unfaithful\n"+
"And it kills him inside\n"+
...
Label label = new Label(shell, SWT.LEFT);The
label.setText(lyrics);
Label widget is created. Text is left aligned. Point p = label.computeSize(SWT.DEFAULT, SWT.DEFAULT);We compute the size of the text in order put some space round the text.
label.setBounds(5, 5, p.x+5, p.y+5);
Figure: Label Widget
CheckButton
In SWT, check button is a special case of aButton. It is a widget, that has two states. On and Off. The On state is visualised by a check mark. It is used to denote some boolean property. package com.zetcode;We will display a title in the titlebar of the window, depending on the state of the check button.
import org.eclipse.swt.SWT;
import org.eclipse.swt.events.SelectionAdapter;
import org.eclipse.swt.events.SelectionEvent;
import org.eclipse.swt.widgets.Button;
import org.eclipse.swt.widgets.Display;
import org.eclipse.swt.widgets.Shell;
/**
* ZetCode Java SWT tutorial
*
* This program uses a check button
* widget to show/hide the title
* of the window
*
* @author jan bodnar
* website zetcode.com
* last modified June 2009
*/
public class SWTApp {
private Shell shell;
private Button cb;
public SWTApp(Display display) {
shell = new Shell(display);
shell.setText("Check button");
initUI();
shell.setSize(250, 200);
shell.setLocation(300, 300);
shell.open();
while (!shell.isDisposed()) {
if (!display.readAndDispatch()) {
display.sleep();
}
}
}
public void initUI() {
cb = new Button(shell, SWT.CHECK);
cb.setText("Show title");
cb.setSelection(true);
cb.setLocation(50, 50);
cb.pack();
cb.addSelectionListener(new SelectionAdapter() {
@Override
public void widgetSelected(SelectionEvent e) {
if (cb.getSelection()) {
    shell.setText("Check button");
} else {
    shell.setText("");
}
}
});
}
public static void main(String[] args) {
Display display = new Display();
new SWTApp(display);
display.dispose();
}
}
cb = new Button(shell, SWT.CHECK);
cb.setText("Show title");
CheckButton widget is created. cb.setSelection(true);The title is visible by default, so we check the check button by default.
if (cb.getSelection()) {
shell.setText("Check button");
} else {
shell.setText("");
}
Depending on the state of the CheckButton, we show or hide the title of the window. 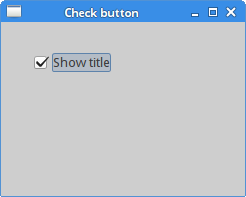
Figure: CheckButton
List widget
The next example introduces theList widget. This widget enables a user to select an option from a list of items. package com.zetcode;In this example, the selected item from the list widget is shown in the statusbar.
import org.eclipse.swt.SWT;
import org.eclipse.swt.layout.FormAttachment;
import org.eclipse.swt.layout.FormData;
import org.eclipse.swt.layout.FormLayout;
import org.eclipse.swt.widgets.Display;
import org.eclipse.swt.widgets.Event;
import org.eclipse.swt.widgets.Label;
import org.eclipse.swt.widgets.List;
import org.eclipse.swt.widgets.Listener;
import org.eclipse.swt.widgets.Shell;
/**
* ZetCode Java SWT tutorial
*
* This program shows the List
* widget
*
* @author jan bodnar
* website zetcode.com
* last modified June 2009
*/
public class SWTApp {
Shell shell;
public SWTApp(Display display) {
shell = new Shell(display);
shell.setText("List");
initUI();
shell.setSize(300, 250);
shell.setLocation(300, 300);
shell.open();
while (!shell.isDisposed()) {
if (!display.readAndDispatch()) {
display.sleep();
}
}
}
public void initUI() {
final Label status = new Label(shell, SWT.BORDER);
status.setText("Ready");
FormLayout layout = new FormLayout();
shell.setLayout(layout);
FormData labelData = new FormData();
labelData.left = new FormAttachment(0);
labelData.right = new FormAttachment(100);
labelData.bottom = new FormAttachment(100);
status.setLayoutData(labelData);
final List list = new List(shell, SWT.BORDER);
list.add("Aliens");
list.add("Capote");
list.add("Neverending story");
list.add("Starship troopers");
list.add("Exorcist");
list.add("Omen");
list.addListener(SWT.Selection, new Listener () {
    public void handleEvent (Event e) {
        String[] items = list.getSelection();
        status.setText(items[0]);
    }
});
FormData listData = new FormData();
listData.left = new FormAttachment(shell, 30, SWT.LEFT);
listData.top = new FormAttachment(shell, 30, SWT.TOP);
list.setLayoutData(listData);
}
public static void main(String[] args) {
Display display = new Display();
new SWTApp(display);
display.dispose();
}
}
final Label status = new Label(shell, SWT.BORDER);SWT library has no statusbar widget. We use a simple label for this. The label has a border.
status.setText("Ready");
FormLayout layout = new FormLayout();We use the
shell.setLayout(layout);
FormLayout widget to arrange our widgets on the window. FormData labelData = new FormData();This code will attach the status label to the bottom of the window. Where we usually see the statusbar.
labelData.left = new FormAttachment(0);
labelData.right = new FormAttachment(100);
labelData.bottom = new FormAttachment(100);
status.setLayoutData(labelData);
final List list = new List(shell, SWT.BORDER);The
List widget is created. list.add("Aliens");
list.add("Capote");
list.add("Neverending story");
list.add("Starship troopers");
list.add("Exorcist");
list.add("Omen");
It is filled with data. list.addListener(SWT.Selection, new Listener () {
public void handleEvent (Event e) {
String[] items = list.getSelection();
status.setText(items[0]);
}
});
We add a listener to the List widget. When we select an option, the handleEvet() method is executed. In this method, we set the selected text to the status label. FormData listData = new FormData();This code puts the
listData.left = new FormAttachment(shell, 30, SWT.LEFT);
listData.top = new FormAttachment(shell, 30, SWT.TOP);
list.setLayoutData(listData);
List widget at x = 30px, y = 30px. 
Figure: List widget
Slider
TheSlider is a widget, that lets the user graphically select a value by sliding a knob within a bounded interval. Our example will show a volume control. package com.zetcode;In the example above, we have
import org.eclipse.swt.SWT;
import org.eclipse.swt.graphics.Device;
import org.eclipse.swt.graphics.Image;
import org.eclipse.swt.widgets.Display;
import org.eclipse.swt.widgets.Event;
import org.eclipse.swt.widgets.Label;
import org.eclipse.swt.widgets.Listener;
import org.eclipse.swt.widgets.Shell;
import org.eclipse.swt.widgets.Slider;
/**
* ZetCode Java SWT tutorial
*
* In this program, we use the slider
* widget to create a volume control
*
* @author jan bodnar
* website zetcode.com
* last modified June 2009
*/
public class SWTApp {
private Shell shell;
private Image mute;
private Image min;
private Image med;
private Image max;
public SWTApp(Display display) {
shell = new Shell(display);
Device dev = shell.getDisplay();
try {
mute = new Image(dev, "mute.png");
min = new Image(dev, "min.png");
med = new Image(dev, "med.png");
max = new Image(dev, "max.png");
} catch(Exception e) {
System.out.println("Cannot load images");
System.out.println(e.getMessage());
System.exit(1);
}
shell.setText("Slider");
initUI();
shell.setSize(350, 200);
shell.setLocation(300, 300);
shell.open();
while (!shell.isDisposed()) {
if (!display.readAndDispatch()) {
display.sleep();
}
}
}
public void initUI() {
final Label label = new Label(shell, SWT.IMAGE_PNG);
label.setImage(mute);
label.pack();
label.setLocation(240, 30);
final Slider slider = new Slider(shell, SWT.HORIZONTAL);
slider.setMaximum(100);
slider.setBounds(30, 30, 180, 30);
slider.addListener (SWT.Selection, new Listener () {
public void handleEvent (Event e) {
int value = slider.getSelection();
if (value == 0) {
    label.setImage(mute);
    label.pack();
} else if (value > 0 && value <= 30) {
    label.setImage(min);
} else if (value > 30 && value < 80) {
    label.setImage(med);
} else {
    label.setImage(max);
}
}
});
}
@Override
public void finalize() {
    System.out.println("disposing");
    mute.dispose();
    med.dispose();
    min.dispose();
    max.dispose();
}
public static void main(String[] args) {
Display display = new Display();
SWTApp app = new SWTApp(display);
app.finalize();
display.dispose();
}
}
Slider and Image widgets. By dragging the knob of the slider we change the picture on the Label widget. final Slider slider = new Slider(shell, SWT.HORIZONTAL);Slider widget is created. Its maximum value is 100.
slider.setMaximum(100);
int value = slider.getSelection();Inside the listener object, we obtain the value of the slider widget.
if (value == 0) {
label.setImage(mute);
label.pack();
} else if (value > 0 && value <= 30) {
label.setImage(min);
} else if (value > 30 && value < 80) {
label.setImage(med);
} else {
label.setImage(max);
}
Depending on the obtained value, we change the picture in the label widget. @OverrideWe release the resources.
public void finalize() {
System.out.println("disposing");
mute.dispose();
med.dispose();
min.dispose();
max.dispose();
}
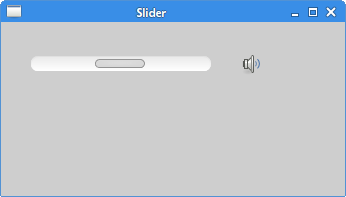
Figure: Slider widget
Combo widget
Combo is a widget that allows the user to choose from a drop down list of options.package com.zetcode;The example shows a combo box and a label. The combo box has a list of six options. These are the names of Linux Distros. The label widget shows the selected option from the combo box.
import org.eclipse.swt.SWT;
import org.eclipse.swt.events.SelectionAdapter;
import org.eclipse.swt.events.SelectionEvent;
import org.eclipse.swt.widgets.Combo;
import org.eclipse.swt.widgets.Display;
import org.eclipse.swt.widgets.Label;
import org.eclipse.swt.widgets.Shell;
/**
* ZetCode Java SWT tutorial
*
* In this program, we use the Combo
* widget to select an option.
* The selected option is shown in the
* Label widget.
*
* @author jan bodnar
* website zetcode.com
* last modified June 2009
*/
public class SWTApp {
Shell shell;
public SWTApp(Display display) {
shell = new Shell(display);
shell.setText("Combo");
initUI();
shell.setSize(300, 250);
shell.setLocation(300, 300);
shell.open();
while (!shell.isDisposed()) {
if (!display.readAndDispatch()) {
display.sleep();
}
}
}
public void initUI() {
final Label label = new Label(shell, SWT.LEFT);
label.setText("...");
label.setLocation(50, 100);
label.pack();
final Combo combo = new Combo(shell, SWT.DROP_DOWN);
combo.add("Ubuntu");
combo.add("Fedora");
combo.add("Mandriva");
combo.add("Red Hat");
combo.add("Mint");
combo.addSelectionListener(new SelectionAdapter() {
@Override
public void widgetSelected(SelectionEvent e) {
    label.setText(combo.getText());
    label.pack();
};
});
combo.setLocation(50, 30);
combo.pack();
}
public static void main(String[] args) {
Display display = new Display();
new SWTApp(display);
display.dispose();
}
}
final Combo combo = new Combo(shell, SWT.DROP_DOWN);
Combo widget is created. combo.add("Ubuntu");
combo.add("Fedora");
combo.add("Mandriva");
combo.add("Red Hat");
combo.add("Mint");
It is filled with data. @OverrideWe set the selected text to the label widget.
public void widgetSelected(SelectionEvent e) {
label.setText(combo.getText());
label.pack();
};
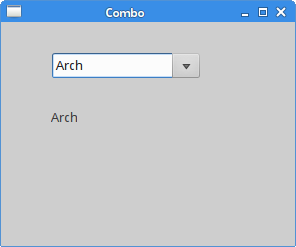
Figure: Combo widget
In this part of the Java SWT tutorial, we described some widgets of the SWT library. Layout management in Java SWT
Layout management
In this chapter we will show how to lay out our widgets in windows or dialogs.When we design the GUI of our application, we decide what widgets we will use and how we will organize those widgets in the application. To organize our widgets, we use specialized non visible widgets called layout containers. In this chapter, we will mention absolute positioning,
FillLayout, RowLayout, GridLayout and FormLayout.Absolute positioning
In most cases, programmers should use layout managers. There are a few situations, where we can use absolute positioning. In absolute positioning, the programmer specifies the position and the size of each widget in pixels. The size and the position of a widget do not change, if you resize a window. Applications look different on various platforms, and what looks OK on Linux, might not look OK on Mac. Changing fonts in your application might spoil the layout. If you translate your application into another language, you must redo your layout. For all these issues, use the absolute positioning only when you have a reason to do so.package com.zetcode;In our example, we place two buttons on the window using absolute positioning.
import org.eclipse.swt.SWT;
import org.eclipse.swt.widgets.Button;
import org.eclipse.swt.widgets.Display;
import org.eclipse.swt.widgets.Shell;
/**
* ZetCode Java SWT tutorial
*
* In this program, we position two
* buttons using absolute coordinates
*
* @author jan bodnar
* website zetcode.com
* last modified June 2009
*/
public class SWTApp {
private Shell shell;
public SWTApp(Display display) {
shell = new Shell(display);
shell.setText("Absolute");
initUI();
shell.setSize(250, 200);
shell.setLocation(300, 300);
shell.open();
while (!shell.isDisposed()) {
if (!display.readAndDispatch()) {
display.sleep();
}
}
}
public void initUI() {
Button button1 = new Button(shell, SWT.PUSH);
button1.setText("Button");
button1.setBounds(20, 50, 80, 30);
Button button2 = new Button(shell, SWT.PUSH);
button2.setText("Button");
button2.setSize(80, 30);
button2.setLocation(50, 100);
}
public static void main(String[] args) {
Display display = new Display();
new SWTApp(display);
display.dispose();
}
}
button1.setBounds(20, 50, 80, 30);The
setBounds() method does two things. It positions the button at x=20, y=50 coordinates. It also sizes the button, width=80, height=30. button2.setSize(80, 30);Here we do the same in two steps. First we size the button using the
button2.setLocation(50, 100);
setSize() method. Then we locate it on the window using the setLocation() method. 
Figure: Absolute
FillLayout manager
TheFillLayout manager lays out widgets in a single row or column. It makes them to be the same size. package com.zetcode;In our example, we use this manager to display an image.
import org.eclipse.swt.SWT;
import org.eclipse.swt.graphics.Device;
import org.eclipse.swt.graphics.Image;
import org.eclipse.swt.graphics.Rectangle;
import org.eclipse.swt.layout.FillLayout;
import org.eclipse.swt.widgets.Display;
import org.eclipse.swt.widgets.Label;
import org.eclipse.swt.widgets.Shell;
/**
* ZetCode Java SWT tutorial
*
* This program demonstrates the FillLayout
* manager
*
* @author jan bodnar
* website zetcode.com
* last modified June 2009
*/
public class SWTApp {
private Shell shell;
private Image castle;
public SWTApp(Display display) {
shell = new Shell(display);
shell.setLayout(new FillLayout());
shell.setText("FillLayout");
Device dev = shell.getDisplay();
try {
    castle = new Image(dev, "redrock.png");
} catch(Exception e) {
    System.out.println("Cannot load image");
    System.out.println(e.getMessage());
    System.exit(1);
}
initUI();
Rectangle rect = castle.getBounds();
shell.setSize(rect.width, rect.height);
shell.setLocation(300, 300);
shell.open();
while (!shell.isDisposed()) {
if (!display.readAndDispatch()) {
display.sleep();
}
}
}
public void initUI() {
Label label = new Label(shell, SWT.IMAGE_PNG);
label.setImage(castle);
label.pack();
}
@Override
public void finalize() {
System.out.println("disposing");
castle.dispose();
}
public static void main(String[] args) {
Display display = new Display();
SWTApp app = new SWTApp(display);
app.finalize();
display.dispose();
}
}
shell.setLayout(new FillLayout());We set the
FillLayout to be the layout class for the shell. try {
castle = new Image(dev, "redrock.png");
} catch(Exception e) {
System.out.println("Cannot load image");
System.out.println(e.getMessage());
System.exit(1);
}
We load an image. Rectangle rect = castle.getBounds();We find out the size of the picture to resize the shell to exactly fit the image size.
shell.setSize(rect.width, rect.height);
Label label = new Label(shell, SWT.IMAGE_PNG);We set the image to the label widget.
label.setImage(castle);
label.pack();
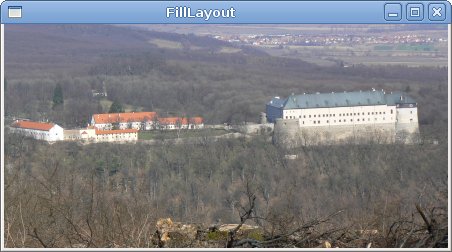
Figure: FillLayout
RowLayout
TheRowLayout manager places all widgets either in one row or in one column. package com.zetcode;In our example, we create a row of three buttons.
import org.eclipse.swt.SWT;
import org.eclipse.swt.layout.RowData;
import org.eclipse.swt.layout.RowLayout;
import org.eclipse.swt.widgets.Button;
import org.eclipse.swt.widgets.Display;
import org.eclipse.swt.widgets.Shell;
/**
* ZetCode Java SWT tutorial
*
* This program demonstrates the RowLayout
* manager
*
* @author jan bodnar
* website zetcode.com
* last modified June 2009
*/
public class SWTApp {
private Shell shell;
public SWTApp(Display display) {
shell = new Shell(display);
shell.setText("RowLayout");
initUI();
shell.pack();
shell.setLocation(300, 300);
shell.open();
while (!shell.isDisposed()) {
if (!display.readAndDispatch()) {
display.sleep();
}
}
}
public void initUI() {
RowLayout rowLayout = new RowLayout(SWT.HORIZONTAL);
rowLayout.marginTop = 10;
rowLayout.marginBottom = 10;
rowLayout.marginLeft = 5;
rowLayout.marginRight = 5;
rowLayout.spacing = 10;
shell.setLayout(rowLayout);
Button button1 = new Button(shell, SWT.PUSH);
button1.setText("Button");
button1.setLayoutData(new RowData(80, 30));
Button button2 = new Button(shell, SWT.PUSH);
button2.setText("Button");
button2.setLayoutData(new RowData(80, 30));
Button button3 = new Button(shell, SWT.PUSH);
button3.setText("Button");
button3.setLayoutData(new RowData(80, 30));
}
public static void main(String[] args) {
Display display = new Display();
new SWTApp(display);
display.dispose();
}
}
RowLayout rowLayout = new RowLayout(SWT.HORIZONTAL);We create a row.
rowLayout.marginTop = 10;We change the margins and the spacing for the row.
rowLayout.marginBottom = 10;
rowLayout.marginLeft = 5;
rowLayout.marginRight = 5;
rowLayout.spacing = 10;
shell.setLayout(rowLayout);We specify the row layout to be the layout for the shell.
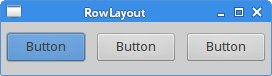
Figure: RowLayout manager
Calculator
In the following example, we use theGridLayout manager to create a skeleton of a calculator. The GridLayout manager puts its child widgets into a grid. package com.zetcode;We create a skeleton of a calculator with the GridLayout manager. We use three types of widgets. A text widget, a label widget and several buttons.
import org.eclipse.swt.SWT;
import org.eclipse.swt.layout.GridData;
import org.eclipse.swt.layout.GridLayout;
import org.eclipse.swt.widgets.Button;
import org.eclipse.swt.widgets.Display;
import org.eclipse.swt.widgets.Label;
import org.eclipse.swt.widgets.Shell;
import org.eclipse.swt.widgets.Text;
/**
* ZetCode Java SWT tutorial
*
* In this program, we use the GridLayout to
* create a calculator skeleton
*
* @author jan bodnar
* website zetcode.com
* last modified June 2009
*/
public class SWTApp {
private Shell shell;
public SWTApp(Display display) {
shell = new Shell(display);
shell.setText("Calculator");
initUI();
shell.pack();
shell.setLocation(300, 300);
shell.open();
while (!shell.isDisposed()) {
if (!display.readAndDispatch()) {
display.sleep();
}
}
}
public void initUI() {
GridLayout gl = new GridLayout(4, true);
gl.horizontalSpacing = 4;
gl.verticalSpacing = 4;
gl.marginBottom = 5;
gl.marginTop = 5;
shell.setLayout(gl);
String[] buttons = {
"Cls", "Bck", "", "Close", "7", "8", "9", "/", "4",
"5", "6", "*", "1", "2", "3", "-", "0", ".", "=", "+"
};
Text display = new Text(shell, SWT.SINGLE);
GridData gridData = new GridData();
gridData.horizontalSpan = 4;
gridData.horizontalAlignment = GridData.FILL;
display.setLayoutData(gridData);
for (int i = 0; i < buttons.length; i++) {
if (i == 2) {
Label lbl = new Label(shell, SWT.CENTER);
GridData gd = new GridData(SWT.FILL, SWT.FILL, false, false);
lbl.setLayoutData(gd);
} else {
Button btn = new Button(shell, SWT.PUSH);
btn.setText(buttons[i]);
GridData gd = new GridData(SWT.FILL, SWT.FILL, false, false);
gd.widthHint = 50;
gd.heightHint = 30;
btn.setLayoutData(gd);
}
}
}
public static void main(String[] args) {
Display display = new Display();
new SWTApp(display);
display.dispose();
}
}
GridLayout gl = new GridLayout(4, true);We create a
gl.horizontalSpacing = 4;
gl.verticalSpacing = 4;
gl.marginBottom = 5;
gl.marginTop = 5;
shell.setLayout(gl);
GridLayout with 4 columns. We provide some spacing and margins. Text display = new Text(shell, SWT.SINGLE);The
GridData gridData = new GridData();
gridData.horizontalSpan = 4;
gridData.horizontalAlignment = GridData.FILL;
display.setLayoutData(gridData);
GridData is the layout data object associated with GridLayout. We make the text widget span all four columns. Button btn = new Button(shell, SWT.PUSH);Inside the for loop, we create buttons and put them into the grid.
btn.setText(buttons[i]);
GridData gd = new GridData(SWT.FILL, SWT.FILL, false, false);
gd.widthHint = 50;
gd.heightHint = 30;
btn.setLayoutData(gd);
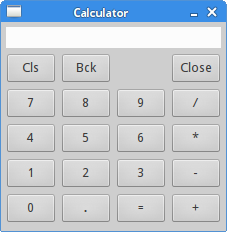
Figure: Calculator skeleton
Buttons
In the last example, we will create an example with theFormLayout manager. This manager controls the position and size of the children using two objects. FormData and FormAttachment. package com.zetcode;In this code example, we position two buttons in the bottom right corner of the window.
import org.eclipse.swt.SWT;
import org.eclipse.swt.layout.FormAttachment;
import org.eclipse.swt.layout.FormData;
import org.eclipse.swt.layout.FormLayout;
import org.eclipse.swt.widgets.Button;
import org.eclipse.swt.widgets.Display;
import org.eclipse.swt.widgets.Shell;
/**
* ZetCode Java SWT tutorial
*
* In this program, we position two buttons
* in the bottom right corner of the window
*
* @author jan bodnar
* website zetcode.com
* last modified June 2009
*/
public class SWTApp {
private Shell shell;
public SWTApp(Display display) {
shell = new Shell(display);
shell.setText("Buttons");
initUI();
shell.setSize(350, 200);
shell.setLocation(300, 300);
shell.open();
while (!shell.isDisposed()) {
if (!display.readAndDispatch()) {
display.sleep();
}
}
}
public void initUI() {
FormLayout layout = new FormLayout();
shell.setLayout(layout);
Button okButton = new Button(shell, SWT.PUSH);
okButton.setText("OK");

Button cancelButton = new Button(shell, SWT.PUSH);
cancelButton.setText("Cancel");
FormData cancelData = new FormData(80, 30);
cancelData.right = new FormAttachment(98);
cancelData.bottom = new FormAttachment(95);
cancelButton.setLayoutData(cancelData);
FormData okData = new FormData(80, 30);
okData.right = new FormAttachment(cancelButton, -5, SWT.LEFT);
okData.bottom = new FormAttachment(cancelButton, 0, SWT.BOTTOM);
okButton.setLayoutData(okData);
}
public static void main(String[] args) {
Display display = new Display();
new SWTApp(display);
display.dispose();
}
}
FormLayout layout = new FormLayout();
shell.setLayout(layout);
FormLayout manager is created. Button okButton = new Button(shell, SWT.PUSH);Two buttons are created.
okButton.setText("OK");
Button cancelButton = new Button(shell, SWT.PUSH);
cancelButton.setText("Cancel");
FormData cancelData = new FormData(80, 30);The cancel button's size is 80x30.
cancelData.right = new FormAttachment(98);The right side of the button is attached at 98% of the width of the window. The bottom side of the button is attached at 95% of the height of the window.
cancelData.bottom = new FormAttachment(95);
okData.right = new FormAttachment(cancelButton, -5, SWT.LEFT);The right side of the ok button goes 5px to the left of the cancel button. The bottom side of the ok button is aligned with the bottom of the cancel button.
okData.bottom = new FormAttachment(cancelButton, 0, SWT.BOTTOM);
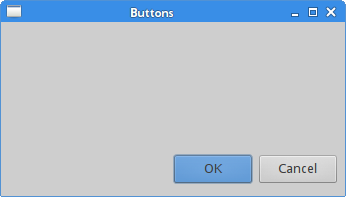
Figure: Buttons
In this part of the Java SWT tutorial, we talked about layout management of widgets. 