The Tetris game
In this chapter, we will create a Tetris game clone in Java Swing. The following example is based on the C++ code example available at doc.trolltech.com. It is modified and simplified.Tetris
The Tetris game is one of the most popular computer games ever created. The original game was designed and programmed by a russian programmer Alexey Pajitnov in 1985. Since then, Tetris is available on almost every computer platform in lots of variations. Even my mobile phone has a modified version of the Tetris game.Tetris is called a falling block puzzle game. In this game, we have seven different shapes called tetrominoes. S-shape, Z-shape, T-shape, L-shape, Line-shape, MirroredL-shape and a Square-shape. Each of these shapes is formed with four squares. The shapes are falling down the board. The object of the Tetris game is to move and rotate the shapes, so that they fit as much as possible. If we manage to form a row, the row is destroyed and we score. We play the tetris game until we top out.
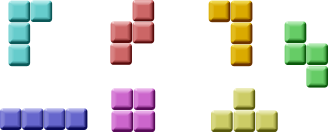
Figure: Tetrominoes
The development
We do not have images for our tetris game, we draw the tetrominoes using Swing drawing API. Behind every computer game, there is a mathematical model. So it is in Tetris.Some ideas behind the game.
- We use a Timer class to create a game cycle
- The tetrominoes are drawn
- The shapes move on a square by square basis (not pixel by pixel)
- Mathematically a board is a simple list of numbers
Tetris.java
package tetris;In the Tetris.java file, we set up the game. We create a board on which we play the game. We create a statusbar.
import java.awt.BorderLayout;
import javax.swing.JFrame;
import javax.swing.JLabel;
public class Tetris extends JFrame {
JLabel statusbar;
public Tetris() {
statusbar = new JLabel(" 0");
add(statusbar, BorderLayout.SOUTH);
Board board = new Board(this);
add(board);
board.start();
setSize(200, 400);
setTitle("Tetris");
setDefaultCloseOperation(EXIT_ON_CLOSE);
}
public JLabel getStatusBar() {
return statusbar;
}
public static void main(String[] args) {
Tetris game = new Tetris();
game.setLocationRelativeTo(null);
game.setVisible(true);
}
}
board.start();The start() method starts the Tetris game. Immediately, after the window appears on the screen.
Shape.java
package tetris;The Shape class provides information about a tetris piece.
import java.util.Random;
import java.lang.Math;
public class Shape {
enum Tetrominoes { NoShape, ZShape, SShape, LineShape,
          TShape, SquareShape, LShape, MirroredLShape };
private Tetrominoes pieceShape;
private int coords[][];
private int[][][] coordsTable;
public Shape() {

    coords = new int[4][2];
    setShape(Tetrominoes.NoShape);

}
public void setShape(Tetrominoes shape) {
coordsTable = new int[][][] {
  { { 0, 0 },   { 0, 0 },   { 0, 0 },   { 0, 0 } },
  { { 0, -1 },  { 0, 0 },   { -1, 0 },  { -1, 1 } },
  { { 0, -1 },  { 0, 0 },   { 1, 0 },   { 1, 1 } },
  { { 0, -1 },  { 0, 0 },   { 0, 1 },   { 0, 2 } },
  { { -1, 0 },  { 0, 0 },   { 1, 0 },   { 0, 1 } },
  { { 0, 0 },   { 1, 0 },   { 0, 1 },   { 1, 1 } },
  { { -1, -1 }, { 0, -1 },  { 0, 0 },   { 0, 1 } },
  { { 1, -1 },  { 0, -1 },  { 0, 0 },   { 0, 1 } }
};
for (int i = 0; i < 4 ; i++) {
    for (int j = 0; j < 2; ++j) {
        coords[i][j] = coordsTable[shape.ordinal()][i][j];
    }
}
pieceShape = shape;
}
private void setX(int index, int x) { coords[index][0] = x; }
private void setY(int index, int y) { coords[index][1] = y; }
public int x(int index) { return coords[index][0]; }
public int y(int index) { return coords[index][1]; }
public Tetrominoes getShape() { return pieceShape; }
public void setRandomShape()
{
Random r = new Random();
int x = Math.abs(r.nextInt()) % 7 + 1;
Tetrominoes[] values = Tetrominoes.values();
setShape(values[x]);
}
public int minX()
{
int m = coords[0][0];
for (int i=0; i < 4; i++) {
m = Math.min(m, coords[i][0]);
}
return m;
}
public int minY()
{
int m = coords[0][1];
for (int i=0; i < 4; i++) {
m = Math.min(m, coords[i][1]);
}
return m;
}
 public Shape rotateLeft()
 {
     if (pieceShape == Tetrominoes.SquareShape)
         return this;

     Shape result = new Shape();
     result.pieceShape = pieceShape;

     for (int i = 0; i < 4; ++i) {
         result.setX(i, y(i));
         result.setY(i, -x(i));
     }
     return result;
  }
public Shape rotateRight()
{
if (pieceShape == Tetrominoes.SquareShape)
return this;
Shape result = new Shape();
result.pieceShape = pieceShape;
for (int i = 0; i < 4; ++i) {
result.setX(i, -y(i));
result.setY(i, x(i));
}
return result;
}
}
enum Tetrominoes { NoShape, ZShape, SShape, LineShape,
TShape, SquareShape, LShape, MirroredLShape };
The Tetrominoes enum holds all seven tetris shapes. Plus the empty shape called here NoShape. public Shape() {
coords = new int[4][2];
setShape(Tetrominoes.NoShape);
}
This is the constructor of the Shape class. The coords array holds the actual coordinates of a tetris piece. coordsTable = new int[][][] {
{ { 0, 0 }, { 0, 0 }, { 0, 0 }, { 0, 0 } },
{ { 0, -1 }, { 0, 0 }, { -1, 0 }, { -1, 1 } },
{ { 0, -1 }, { 0, 0 }, { 1, 0 }, { 1, 1 } },
{ { 0, -1 }, { 0, 0 }, { 0, 1 }, { 0, 2 } },
{ { -1, 0 }, { 0, 0 }, { 1, 0 }, { 0, 1 } },
{ { 0, 0 }, { 1, 0 }, { 0, 1 }, { 1, 1 } },
{ { -1, -1 }, { 0, -1 }, { 0, 0 }, { 0, 1 } },
{ { 1, -1 }, { 0, -1 }, { 0, 0 }, { 0, 1 } }
};
The coordsTable array holds all possible coordinate values of our tetris pieces. This is a template from which all pieces take their coordiate values. for (int i = 0; i < 4 ; i++) {
for (int j = 0; j < 2; ++j) {
coords[i][j] = coordsTable[shape.ordinal()][i][j];
}
}
Here we put one row of the coordiate values from the coordsTable to a coordsarray of a tetris piece. Note the use of the ordinal() method. In C++, an enum type is esencially an integer. Unlike in C++, Java enums are full classes. And the ordinal() method returns the current position of the enum type in the enum object. The following image will help understand the coordinate values a bit more. The coords array saves the coordinates of the tetris piece. For example, numbers { 0, -1 }, { 0, 0 }, { -1, 0 }, { -1, -1 } , represent a rotated S-shape. The following diagram illustrates the shape.
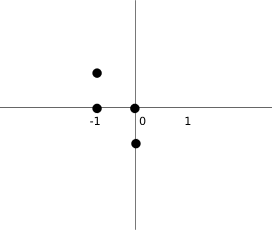
Figure: Tetris
public Shape rotateLeft()This code rotates the piece to the left. The square does not have to be rotated. That's why we simply return the reference to the current object. Looking at the previous image will help to understand the rotation.
{
if (pieceShape == Tetrominoes.SquareShape)
return this;
Shape result = new Shape();
result.pieceShape = pieceShape;
for (int i = 0; i < 4; ++i) {
result.setX(i, y(i));
result.setY(i, -x(i));
}
return result;
}
Board.java
package tetris;Finally, we have the Board.java file. This is where the game logic is located.
import java.awt.Color;
import java.awt.Dimension;
import java.awt.Graphics;
import java.awt.event.ActionEvent;
import java.awt.event.ActionListener;
import java.awt.event.KeyAdapter;
import java.awt.event.KeyEvent;
import javax.swing.JLabel;
import javax.swing.JPanel;
import javax.swing.Timer;
import tetris.Shape.Tetrominoes;
public class Board extends JPanel implements ActionListener {
final int BoardWidth = 10;
final int BoardHeight = 22;
Timer timer;
boolean isFallingFinished = false;
boolean isStarted = false;
boolean isPaused = false;
int numLinesRemoved = 0;
int curX = 0;
int curY = 0;
JLabel statusbar;
Shape curPiece;
Tetrominoes[] board;
public Board(Tetris parent) {
setFocusable(true);
curPiece = new Shape();
timer = new Timer(400, this);
timer.start();
statusbar = parent.getStatusBar();
board = new Tetrominoes[BoardWidth * BoardHeight];
addKeyListener(new TAdapter());
clearBoard();
}
public void actionPerformed(ActionEvent e) {
    if (isFallingFinished) {
        isFallingFinished = false;
        newPiece();
    } else {
        oneLineDown();
    }
}
int squareWidth() { return (int) getSize().getWidth() / BoardWidth; }
int squareHeight() { return (int) getSize().getHeight() / BoardHeight; }
Tetrominoes shapeAt(int x, int y) { return board[(y * BoardWidth) + x]; }
public void start()
{
if (isPaused)
return;
isStarted = true;
isFallingFinished = false;
numLinesRemoved = 0;
clearBoard();
newPiece();
timer.start();
}
private void pause()
{
if (!isStarted)
return;
isPaused = !isPaused;
if (isPaused) {
timer.stop();
statusbar.setText("paused");
} else {
timer.start();
statusbar.setText(String.valueOf(numLinesRemoved));
}
repaint();
}
public void paint(Graphics g)
{
super.paint(g);
Dimension size = getSize();
int boardTop = (int) size.getHeight() - BoardHeight * squareHeight();
for (int i = 0; i < BoardHeight; ++i) {
    for (int j = 0; j < BoardWidth; ++j) {
        Tetrominoes shape = shapeAt(j, BoardHeight - i - 1);
        if (shape != Tetrominoes.NoShape)
            drawSquare(g, 0 + j * squareWidth(),
                      boardTop + i * squareHeight(), shape);
    }
}
if (curPiece.getShape() != Tetrominoes.NoShape) {
    for (int i = 0; i < 4; ++i) {
        int x = curX + curPiece.x(i);
        int y = curY - curPiece.y(i);
        drawSquare(g, 0 + x * squareWidth(),
                  boardTop + (BoardHeight - y - 1) * squareHeight(),
                  curPiece.getShape());
    }
}
}
private void dropDown()
{
    int newY = curY;
    while (newY > 0) {
        if (!tryMove(curPiece, curX, newY - 1))
            break;
        --newY;
    }
    pieceDropped();
}
private void oneLineDown()
{
if (!tryMove(curPiece, curX, curY - 1))
pieceDropped();
}
private void clearBoard()
{
    for (int i = 0; i < BoardHeight * BoardWidth; ++i)
        board[i] = Tetrominoes.NoShape;
}
private void pieceDropped()
{
    for (int i = 0; i < 4; ++i) {
        int x = curX + curPiece.x(i);
        int y = curY - curPiece.y(i);
        board[(y * BoardWidth) + x] = curPiece.getShape();
    }

    removeFullLines();

    if (!isFallingFinished)
        newPiece();
}
private void newPiece()
{
    curPiece.setRandomShape();
    curX = BoardWidth / 2 + 1;
    curY = BoardHeight - 1 + curPiece.minY();

    if (!tryMove(curPiece, curX, curY)) {
        curPiece.setShape(Tetrominoes.NoShape);
        timer.stop();
        isStarted = false;
        statusbar.setText("game over");
    }
}
 private boolean tryMove(Shape newPiece, int newX, int newY)
 {
     for (int i = 0; i < 4; ++i) {
         int x = newX + newPiece.x(i);
         int y = newY - newPiece.y(i);
         if (x < 0 || x >= BoardWidth || y < 0 || y >= BoardHeight)
             return false;
         if (shapeAt(x, y) != Tetrominoes.NoShape)
             return false;
     }

     curPiece = newPiece;
     curX = newX;
     curY = newY;
     repaint();
     return true;
 }
private void removeFullLines()
{
int numFullLines = 0;
 for (int i = BoardHeight - 1; i >= 0; --i) {
     boolean lineIsFull = true;

     for (int j = 0; j < BoardWidth; ++j) {
         if (shapeAt(j, i) == Tetrominoes.NoShape) {
             lineIsFull = false;
             break;
         }
     }

     if (lineIsFull) {
         ++numFullLines;
         for (int k = i; k < BoardHeight - 1; ++k) {
             for (int j = 0; j < BoardWidth; ++j)
                  board[(k * BoardWidth) + j] = shapeAt(j, k + 1);
         }
     }
 }
if (numFullLines > 0) {
numLinesRemoved += numFullLines;
statusbar.setText(String.valueOf(numLinesRemoved));
isFallingFinished = true;
curPiece.setShape(Tetrominoes.NoShape);
repaint();
}
}
private void drawSquare(Graphics g, int x, int y, Tetrominoes shape)
{
Color colors[] = { new Color(0, 0, 0), new Color(204, 102, 102),
new Color(102, 204, 102), new Color(102, 102, 204),
new Color(204, 204, 102), new Color(204, 102, 204),
new Color(102, 204, 204), new Color(218, 170, 0)
};
Color color = colors[shape.ordinal()];
g.setColor(color);
g.fillRect(x + 1, y + 1, squareWidth() - 2, squareHeight() - 2);
g.setColor(color.brighter());
g.drawLine(x, y + squareHeight() - 1, x, y);
g.drawLine(x, y, x + squareWidth() - 1, y);
g.setColor(color.darker());
g.drawLine(x + 1, y + squareHeight() - 1,
x + squareWidth() - 1, y + squareHeight() - 1);
g.drawLine(x + squareWidth() - 1, y + squareHeight() - 1,
x + squareWidth() - 1, y + 1);
}
class TAdapter extends KeyAdapter {
public void keyPressed(KeyEvent e) {
if (!isStarted || curPiece.getShape() == Tetrominoes.NoShape) {
return;
}
int keycode = e.getKeyCode();
if (keycode == 'p' || keycode == 'P') {
pause();
return;
}
if (isPaused)
return;
switch (keycode) {
case KeyEvent.VK_LEFT:
tryMove(curPiece, curX - 1, curY);
break;
case KeyEvent.VK_RIGHT:
    tryMove(curPiece, curX + 1, curY);
    break;
case KeyEvent.VK_DOWN:
tryMove(curPiece.rotateRight(), curX, curY);
break;
case KeyEvent.VK_UP:
tryMove(curPiece.rotateLeft(), curX, curY);
break;
case KeyEvent.VK_SPACE:
dropDown();
break;
case 'd':
oneLineDown();
break;
case 'D':
oneLineDown();
break;
}
}
}
}
...We initialize some important variables. The
isFallingFinished = false;
isStarted = false;
isPaused = false;
numLinesRemoved = 0;
curX = 0;
curY = 0;
...
isFallingFinished variable determines, if the tetris shape has finished falling and we then need to create a new shape. The numLinesRemoved counts the number of lines, we have removed so far. The curX and curY variables determine the actual position of the falling tetris shape. setFocusable(true);We must explicitely call the
setFocusable() method. From now, the board has the keyboard input. timer = new Timer(400, this);
timer.start();
Timer object fires one or more action events after a specified delay. In our case, the timer calls the actionPerformed() method each 400 ms. public void actionPerformed(ActionEvent e) {
if (isFallingFinished) {
isFallingFinished = false;
newPiece();
} else {
oneLineDown();
}
}
The actionPerformed() method checks if the falling has finished. If so, a new piece is created. If not, the falling tetris piece goes one line down. Inside the
paint() method, we draw the all objects on the board. The painting has two steps. for (int i = 0; i < BoardHeight; ++i) {
for (int j = 0; j < BoardWidth; ++j) {
Tetrominoes shape = shapeAt(j, BoardHeight - i - 1);
if (shape != Tetrominoes.NoShape)
drawSquare(g, 0 + j * squareWidth(),
boardTop + i * squareHeight(), shape);
}
}
In the first step we paint all the shapes, or remains of the shapes, that have been dropped to the bottom of the board. All the squares are rememberd in the board array. We access it using the shapeAt() method. if (curPiece.getShape() != Tetrominoes.NoShape) {
for (int i = 0; i < 4; ++i) {
int x = curX + curPiece.x(i);
int y = curY - curPiece.y(i);
drawSquare(g, 0 + x * squareWidth(),
boardTop + (BoardHeight - y - 1) * squareHeight(),
curPiece.getShape());
}
}
In the second step, we paint the actual falling piece. private void dropDown()If we press the space key, the piece is dropped to the bottom. We simply try to drop the piece one line down until it reaches the bottom or the top of another fallen tetris piece.
{
int newY = curY;
while (newY > 0) {
if (!tryMove(curPiece, curX, newY - 1))
break;
--newY;
}
pieceDropped();
}
private void clearBoard()The
{
for (int i = 0; i < BoardHeight * BoardWidth; ++i)
board[i] = Tetrominoes.NoShape;
}
clearBoard() method fills the board with empty NoSpapes. This is later used at collision detection. private void pieceDropped()The
{
for (int i = 0; i < 4; ++i) {
int x = curX + curPiece.x(i);
int y = curY - curPiece.y(i);
board[(y * BoardWidth) + x] = curPiece.getShape();
}
removeFullLines();
if (!isFallingFinished)
newPiece();
}
pieceDropped() method puts the falling piece into the board array. Once again, the board holds all the squares of the pieces and remains of the pieces that has finished falling. When the piece has finished falling, it is time to check, if we can remove some lines off the board. This is the job of the removeFullLines() method. Then we create a new piece. More precisely, we try to create a new piece. private void newPiece()The
{
curPiece.setRandomShape();
curX = BoardWidth / 2 + 1;
curY = BoardHeight - 1 + curPiece.minY();
if (!tryMove(curPiece, curX, curY)) {
curPiece.setShape(Tetrominoes.NoShape);
timer.stop();
isStarted = false;
statusbar.setText("game over");
}
}
newPiece() method creates a new tetris piece. The piece gets a new random shape. Then we compute the initial curX and curY values. If we cannot move to the initial positions, the game is over. We top out. The timer is stopped. We put game over string on the statusbar. private boolean tryMove(Shape newPiece, int newX, int newY)The
{
for (int i = 0; i < 4; ++i) {
int x = newX + newPiece.x(i);
int y = newY - newPiece.y(i);
if (x < 0 || x >= BoardWidth || y < 0 || y >= BoardHeight)
return false;
if (shapeAt(x, y) != Tetrominoes.NoShape)
return false;
}
curPiece = newPiece;
curX = newX;
curY = newY;
repaint();
return true;
}
tryMove() method tries to move the tetris piece. The method returns false, if it has reached the board boundaries or it is adjacent to the already fallen tetris pieces. for (int i = BoardHeight - 1; i >= 0; --i) {
boolean lineIsFull = true;
for (int j = 0; j < BoardWidth; ++j) {
if (shapeAt(j, i) == Tetrominoes.NoShape) {
lineIsFull = false;
break;
}
}
if (lineIsFull) {
++numFullLines;
for (int k = i; k < BoardHeight - 1; ++k) {
for (int j = 0; j < BoardWidth; ++j)
board[(k * BoardWidth) + j] = shapeAt(j, k + 1);
}
}
}
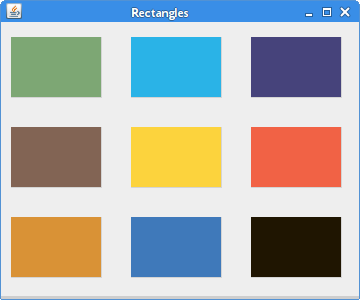
Inside the removeFullLines() method, we check if there is any full row among all rows in the board. If there is at least one full line, it is removed. After finding a full line we increase the counter. We move all the lines above the full row one line down. This way we destroy the full line. Notice, that in our Tetris game, we use so called naive gravity. This means, that the squares may be left floating above empty gaps. Every Tetris piece has four squares. Each of the squares is drawn with the
drawSquare() method. Tetris pieces have different colors. g.setColor(color.brighter());The left and top sides of a square are drawn with a brighter color. Similarly, the bottom and right sides are drawn with darker colors. This is to simulate a 3D edge.
g.drawLine(x, y + squareHeight() - 1, x, y);
g.drawLine(x, y, x + squareWidth() - 1, y);
We control the game with a keyboard. The control mechanism is implemented with a
KeyAdapter. This is an inner class that overrides the keyPressed() method. case KeyEvent.VK_RIGHT:If we pressed the left arrow key, we try to move the falling piece one square to the left.
tryMove(curPiece, curX + 1, curY);
break;
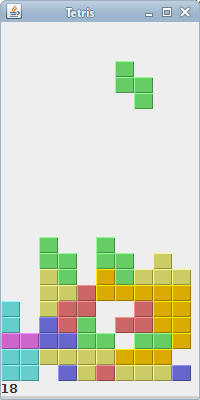
Figure: Tetris
This was a Tetris game. 

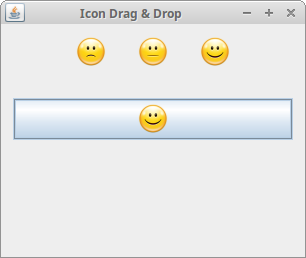
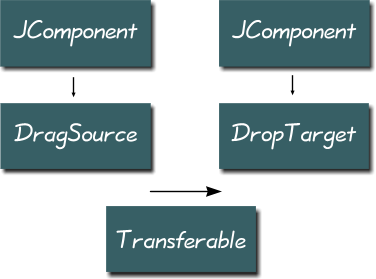 The component, where the drag operation begins must have a DragSource object registered. A DropTarget is an object responsible for accepting drops in an drag and drop operation. A Transferable encapsulates data being transferred. The transferred data can be of various type. A DataFlavor object provides information about the data being transferred.