Showing posts with label JavaScript GTK. Show all posts
Showing posts with label JavaScript GTK. Show all posts
Painting with Cairo Graphics
Painting with Cairo
In this part of the JavaScript GTK tutorial, we will do some painting with the Cairo library. Currently, Seed supports only a small portion of the Cairo library.Cairo is a library for creating 2D vector graphics. We can use it to draw our own widgets, charts or various effects or animations.
Colors
In the first example, we will work with colors. A color is an object representing a combination of Red, Green, and Blue (RGB) intensity values. Cairo valid RGB values are in the range 0 to 1.#!/usr/bin/seedIn our example, we will draw three rectangles and fill them with three different colors.
/*
ZetCode JavaScript GTK tutorial
In this program, we will draw three
colored rectangles on the drawing area
using Cairo
author: Jan Bodnar
website: www.zetcode.com
last modified: July 2011
*/
Gtk = imports.gi.Gtk;
cairo = imports.cairo;
Gtk.init(null, null);
Example = new GType({
parent: Gtk.Window.type,
name: "Example",
init: function ()
{
init_ui(this);
function init_ui(w) {
w.signal.hide.connect(Gtk.main_quit);
w.set_default_size(360, 100);
w.set_title("Colors");
w.set_position(Gtk.WindowPosition.CENTER);
var darea = new Gtk.DrawingArea();
darea.signal.expose_event.connect(on_expose);
w.add(darea);
w.show_all();
}
function on_expose(darea) {
print(darea);
var cr = new cairo.Context.from_drawable(darea.window);
draw_colors(cr);
}
function draw_colors(cr) {
cr.set_source_rgb(0.2, 0.23, 0.9);
cr.rectangle(10, 15, 90, 60);
cr.fill();
cr.set_source_rgb(0.9, 0.1, 0.1);
cr.rectangle(130, 15, 90, 60);
cr.fill();
cr.set_source_rgb(0.4, 0.9, 0.4);
cr.rectangle(250, 15, 90, 60);
cr.fill();
}
}
});
var window = new Example();
Gtk.main();
var darea = new Gtk.DrawingArea();We will be doing our drawing operations on the DrawingArea widget.
darea.signal.expose_event.connect(on_expose);When the window needs to be redrawn, the the expose_event is triggered. In response to this event, we call the on_expose() method.
var cr = new cairo.Context.from_drawable(darea.window);We create the cairo context object from the GdkWindow of the drawing area. The context is an object onto which we do all our drawings.
draw_colors(cr);The actual drawing is delegated to the draw_colors() method.
cr.set_source_rgb(0.2, 0.23, 0.9);The set_source_rgb() method sets a color for the cairo context. The three parameters of the method are the color intensity values.
cr.rectangle(10, 15, 90, 60);We draw a rectangle. The first two parameters are the x, y coordinates of the top left corner of the rectangle. The last two parameters are the width and height of the rectangle.
cr.fill();We fill the inside of the rectangle with the current color.
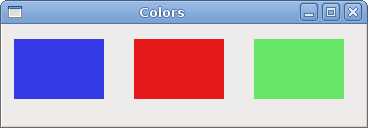
Figure: Colors
Basic shapes
The next example draws some basic shapes onto the window.#!/usr/bin/seedIn this example, we will create a rectangle, a square, a circle, an arc and an ellipse. We draw outlines in blue color, insides in white.
/*
ZetCode JavaScript GTK tutorial
This code example draws basic shapes
with the Cairo library
author: Jan Bodnar
website: www.zetcode.com
last modified: July 2011
*/
Gtk = imports.gi.Gtk;
cairo = imports.cairo;
Gtk.init(null, null);
Example = new GType({
parent: Gtk.Window.type,
name: "Example",
init: function ()
{
init_ui(this);
function init_ui(w) {
w.signal.hide.connect(Gtk.main_quit);
w.set_default_size(390, 240);
w.set_title("Basic shapes");
w.set_position(Gtk.WindowPosition.CENTER);
var darea = new Gtk.DrawingArea();
darea.signal.expose_event.connect(on_expose);
w.add(darea);
w.show_all();
}
function on_expose(darea) {
var cr = new cairo.Context.from_drawable(darea.window);
draw_colors(cr);
}
function draw_colors(cr) {
cr.set_source_rgb(0.6, 0.6, 0.6);
cr.rectangle(20, 20, 120, 80);
cr.rectangle(180, 20, 80, 80);
cr.fill();
cr.arc(330, 60, 40, 0, 2*Math.PI);
cr.fill();
cr.arc(90, 160, 40, Math.PI/4, Math.PI);
cr.fill();
cr.translate(220, 180);
cr.scale(1, 0.7);
cr.arc(0, 0, 50, 0, 2*Math.PI);
cr.fill();
}
}
});
var window = new Example();
Gtk.main();
cr.rectangle(20, 20, 120, 80);These lines draw a rectangle and a square.
cr.rectangle(180, 20, 80, 80);
cr.fill();
cr.arc(330, 60, 40, 0, 2*Math.PI);Here the arc() method draws a full circle.
cr.fill();
cr.translate(220, 180);The translate() method moves the object to a specific point. If we want to draw an oval, we do some scaling first. Here the scale() method shrinks the y axis.
cr.scale(1, 0.7);
cr.arc(0, 0, 50, 0, 2*Math.PI);
cr.fill();
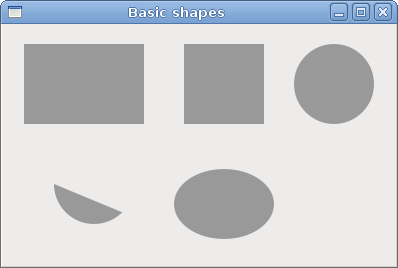
Figure: Basic shapes
Transparent rectangles
Transparency is the quality of being able to see through a material. The easiest way to understand transparency is to imagine a piece of glass or water. Technically, the rays of light can go through the glass and this way we can see objects behind the glass.In computer graphics, we can achieve transparency effects using alpha compositing. Alpha compositing is the process of combining an image with a background to create the appearance of partial transparency. The composition process uses an alpha channel. (wikipedia.org, answers.com)
#!/usr/bin/seedIn the example we will draw ten rectangles with different levels of transparency.
/*
ZetCode JavaScript GTK tutorial
This program shows transparent
rectangles using Cairo
author: Jan Bodnar
website: www.zetcode.com
last modified: July 2011
*/
Gtk = imports.gi.Gtk;
cairo = imports.cairo;
Gtk.init(null, null);
Example = new GType({
parent: Gtk.Window.type,
name: "Example",
init: function ()
{
init_ui(this);
function init_ui(w) {
w.signal.hide.connect(Gtk.main_quit);
w.set_default_size(590, 90);
w.set_title("Transparent rectangles");
w.set_position(Gtk.WindowPosition.CENTER);
var darea = new Gtk.DrawingArea();
darea.signal.expose_event.connect(on_expose);
w.add(darea);
w.show_all();
}
function on_expose(darea) {
var cr = new cairo.Context.from_drawable(darea.window);
draw_rectangles(cr);
}
function draw_rectangles(cr) {
for (var i=1; i<=10; i++) {
cr.set_source_rgba(0, 0, 1, i*0.1);
cr.rectangle(50*i, 20, 40, 40);
cr.fill();
}
}
}
});
var window = new Example();
Gtk.main();
cr.set_source_rgba(0, 0, 1, i*0.1);The last parameter of the set_source_rgba() method is the alpha transparency.

Figure: Transparent rectangles
In this chapter of the JavaScript GTK tutorial, we were painting with Cairo library. Introducing dialogs in JavaScript GTK
Dialogs
In this part of the JavaScript GTK programming tutorial, we will introduce dialogs.Dialog windows or dialogs are an indispensable part of most modern GUI applications. A dialog is defined as a conversation between two or more persons. In a computer application a dialog is a window which is used to "talk" to the application. A dialog is used to input data, modify data, change the application settings etc. Dialogs are important means of communication between a user and a computer program.
Message boxes
Message dialogs are convenient dialogs that provide messages to the user of the application. The message consists of textual and image data.#!/usr/bin/seedWe show a button on the window. When we click on the button, an information message is displayed.
/*
ZetCode JavaScript GTK tutorial
This example demonstrates a
Message dialog
author: Jan Bodnar
website: www.zetcode.com
last modified: July 2011
*/
Gtk = imports.gi.Gtk;
Gtk.init(null, null);
Example = new GType({
parent: Gtk.Window.type,
name: "Example",
init: function ()
{
init_ui(this);
function init_ui(w) {
w.signal.hide.connect(Gtk.main_quit);
w.set_default_size(250, 200);
w.set_title("Message dialog");
w.set_position(Gtk.WindowPosition.CENTER);
var fixed = new Gtk.Fixed();
var infoButton = new Gtk.Button.with_label("Information");
fixed.put(infoButton, 30, 20);
infoButton.signal.clicked.connect(on_info);
w.add(fixed);
w.show_all();
}
function on_info() {

    var md = new Gtk.MessageDialog({modal:true, title:"Information",
        message_type:Gtk.MessageType.INFO,
        buttons:Gtk.ButtonsType.OK, text:"Download completed."});

    md.run();
    md.destroy();
}
}
});
var window = new Example();
Gtk.main();
var infoButton = new Gtk.Button.with_label("Information");
This is a button, which will show a dialog, when we click on it. function on_info() {
var md = new Gtk.MessageDialog({modal:true, title:"Information",
message_type:Gtk.MessageType.INFO,
buttons:Gtk.ButtonsType.OK, text:"Download completed."});
md.run();
md.destroy();
}
If we click on the info button, the Information dialog is displayed. The Gtk.MessageType.INFO specifies the type of the dialog. The Gtk.ButtonsType.OK specifies what buttons will be in the dialog. The last parameter is the message displayed. The dialog is displayed with the run() method. The programmer must also call either the destroy() or the hide() method. 
Figure: Message dialog
AboutDialog
The AboutDialog displays information about the application. It can display a logo, the name of the application, version, copyright, website or license information. It is also possible to give credits to the authors, documenters, translators and artists.#!/usr/bin/seedThe code example uses a AboutDialog with some of its features.
/*
ZetCode JavaScript GTK tutorial
This example demonstrates the
AboutDialog dialog.
author: Jan Bodnar
website: www.zetcode.com
last modified: July 2011
*/
Gtk = imports.gi.Gtk;
GdkPixbuf = imports.gi.GdkPixbuf;
Gtk.init(null, null);
Example = new GType({
parent: Gtk.Window.type,
name: "Example",
init: function ()
{
init_ui(this);
function init_ui(w) {
w.signal.hide.connect(Gtk.main_quit);
w.set_default_size(250, 200);
w.set_title("About dialog");
w.set_position(Gtk.WindowPosition.CENTER);
var button = new Gtk.Button.with_label("About");
button.set_size_request(80, 30);
button.signal.clicked.connect(on_clicked);
var fix = new Gtk.Fixed();
fix.put(button, 20, 20);
w.add(fix);
w.show_all();
}
function on_clicked() {
var about = new Gtk.AboutDialog();
about.set_program_name("Battery");
about.set_version("0.1");
about.set_copyright("(c) Jan Bodnar");
about.set_comments("Battery is a simple tool for battery checking");
about.set_website("http://www.zetcode.com");
about.set_logo(new GdkPixbuf.Pixbuf.from_file("battery.png"));
about.run();
about.destroy();
}
}
});
var window = new Example();
Gtk.main();
var about = new Gtk.AboutDialog();We create an instance of the AboutDialog.
about.set_program_name("Battery");
about.set_version("0.1");
about.set_copyright("(c) Jan Bodnar");
Here we specify the name, the version and the copyright of the program. about.set_logo(new GdkPixbuf.Pixbuf.from_file("battery.png"));
This line creates a logo. FontSelectionDialog
The FontSelectionDialog is a dialog for selecting fonts. It is typically used in applications, that do some text editing or formatting.#!/usr/bin/seedIn the code example, we have a button and a label. We show the FontSelectionDialog by clicking on the button.
/*
ZetCode JavaScript GTK tutorial
This example works with the
FontSelectionDialog.
author: Jan Bodnar
website: www.zetcode.com
last modified: July 2011
*/
Gtk = imports.gi.Gtk;
Pango = imports.gi.Pango;
Gtk.init(null, null);
Example = new GType({
parent: Gtk.Window.type,
name: "Example",
init: function ()
{
init_ui(this);
var label;
function init_ui(w) {
w.signal.hide.connect(Gtk.main_quit);
w.set_default_size(350, 150);
w.set_title("Font selection");
w.set_position(Gtk.WindowPosition.CENTER);
w.set_border_width(10);
var text = "The only victory over love is flight."
label = new Gtk.Label.c_new(text);
var button = new Gtk.Button.with_label("Select font");
button.signal.clicked.connect(on_clicked);
var fix = new Gtk.Fixed();
fix.put(button, 100, 30);
fix.put(label, 30, 90);
w.add(fix);
w.show_all();
}
function on_clicked() {
var fdia = new Gtk.FontSelectionDialog.c_new("Select font");
var response = fdia.run();
if (response == Gtk.ResponseType.OK) {
    var fname = fdia.get_font_name();
    var font_desc = Pango.Font.description_from_string(fname);
    if (font_desc)
        label.modify_font(font_desc);
}
fdia.destroy();
}
}
});
var window = new Example();
Gtk.main();
var fdia = new Gtk.FontSelectionDialog.c_new("Select font");
We create the FontSelectionDialog. if (response == Gtk.ResponseType.OK) {
var fname = fdia.get_font_name();
var font_desc = Pango.Font.description_from_string(fname);
if (font_desc)
label.modify_font(font_desc);
}
If we click on the OK button, the font of the label widget changes to the one, that we selected in the dialog. 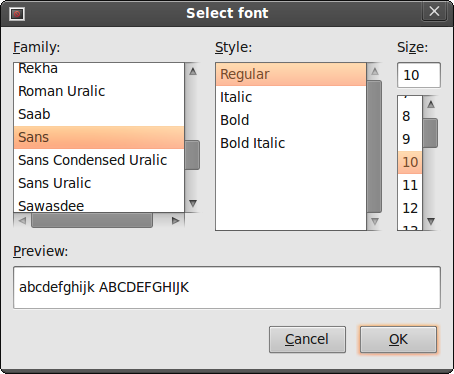
Figure: FontSelectionDialog
In this part of the JavaScript GTK tutorial, we presented dialogs. Menus And toolbars in JavaScript GTK
Menus And toolbars
In this part of the JavaScript GTK programming tutorial, we will work with menus & toolbars.A menubar is one of the most common parts of the GUI application. It is a group of commands located in various menus. While in console applications you have to remember all those arcane commands, here we have most of the commands grouped into logical parts. These are accepted standards that further reduce the amount of time spending to learn a new application.
Simple menu
In our first example, we will create a menubar with one file menu. The menu will have only one menu item. By selecting the item the application quits.#!/usr/bin/seedThis is a small example with minimal menubar functionality.
/*
ZetCode JavaScript GTK tutorial
This example shows a simple menu.
author: Jan Bodnar
website: www.zetcode.com
last modified: July 2011
*/
Gtk = imports.gi.Gtk;
Gdk = imports.gi.Gdk;
Gtk.init(null, null);
Example = new GType({
parent: Gtk.Window.type,
name: "Example",
init: function ()
{
init_ui(this);
function init_ui(w) {
w.signal.hide.connect(Gtk.main_quit);
w.set_default_size(250, 200);
w.set_title("Simple menu");
w.set_position(Gtk.WindowPosition.CENTER);
w.modify_bg(Gtk.StateType.NORMAL,
new Gdk.Color({red:6400, green:6400, blue:6440}));
var mb = new Gtk.MenuBar();
var filemenu = new Gtk.Menu();
var filem = new Gtk.MenuItem.with_label("File");
filem.set_submenu(filemenu);
var exitmu = new Gtk.MenuItem.with_label("Exit");
exitmu.signal.activate.connect(Gtk.main_quit);
filemenu.append(exitmu);
mb.append(filem);
vbox = new Gtk.VBox.c_new(false, 2);
vbox.pack_start(mb, false, false, 0);
w.add(vbox);
w.show_all();
}
}
});
var window = new Example();
Gtk.main();
var mb = new Gtk.MenuBar();MenuBar widget is created. This is a container for the menus.
var filemenu = new Gtk.Menu();Toplevel MenuItem is created.
var filem = new Gtk.MenuItem.with_label("File");
filem.set_submenu(filemenu);
var exitmu = new Gtk.MenuItem.with_label("Exit");
exitmu.signal.activate.connect(Gtk.main_quit);
filemenu.append(exitmu);
Exit MenuItem is created and appended to the File MenuItem. mb.append(filem);Toplevel MenuItem is appended to the MenuBarwidget.
vbox = new Gtk.VBox.c_new(false, 2);Unlike in other toolkits, we have to take care of the layout management of the menubar ourselves. We put the menubar into the vertical box.
vbox.pack_start(mb, false, false, 0);
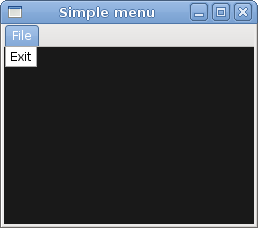
Figure: Simple menu
Submenu
Our final example demonstrates how to create a submenu. A submenu is a menu inside another menu.#!/usr/bin/seedSubmenu creation.
/*
ZetCode JavaScript GTK tutorial
This example shows a submenu.
author: Jan Bodnar
website: www.zetcode.com
last modified: July 2011
*/
Gtk = imports.gi.Gtk;
Gdk = imports.gi.Gdk;
Gtk.init(null, null);
Example = new GType({
parent: Gtk.Window.type,
name: "Example",
init: function ()
{
init_ui(this);
function init_ui(w) {
w.signal.hide.connect(Gtk.main_quit);
w.set_default_size(250, 200);
w.set_title("Submenu");
w.set_position(Gtk.WindowPosition.CENTER);
w.modify_bg(Gtk.StateType.NORMAL,
new Gdk.Color({red:6400, green:6400, blue:6440}));
var mb = new Gtk.MenuBar();
var filemenu = new Gtk.Menu();
var filem = new Gtk.MenuItem.with_label("File");
filem.set_submenu(filemenu);
mb.append(filem);
var imenu = new Gtk.Menu();
var importm = new Gtk.MenuItem.with_label("Import");
importm.set_submenu(imenu);
var inews = new Gtk.MenuItem.with_label("Import news feed...");
var ibookmarks = new Gtk.MenuItem.with_label("Import bookmarks...");
var imail = new Gtk.MenuItem.with_label("Import mail...");

imenu.append(inews);
imenu.append(ibookmarks);
imenu.append(imail);
filemenu.append(importm);
var emi = new Gtk.MenuItem.with_label("Exit");
emi.signal.activate.connect(Gtk.main_quit);
filemenu.append(emi);
var vbox = new Gtk.VBox.c_new(false, 2);
vbox.pack_start(mb, false, false, 0);
w.add(vbox);
w.show_all();
}
}
});
var window = new Example();
Gtk.main();
var imenu = new Gtk.Menu();A submenu is a Menu.
var importm = new Gtk.MenuItem.with_label("Import");
importm.set_submenu(imenu);
It is a submenu of a menu item, which belogs to toplevel file menu. var inews = new Gtk.MenuItem.with_label("Import news feed...");
var ibookmarks = new Gtk.MenuItem.with_label("Import bookmarks...");
var imail = new Gtk.MenuItem.with_label("Import mail...");
imenu.append(inews);
imenu.append(ibookmarks);
imenu.append(imail);
Submenus have their own menu items. 
Figure: Submenu
Image menu
In the next example, we will further explore the menus. We will add images and accelerators to our menu items. Accelerators are keyboard shortcuts for activating menu items.#!/usr/bin/seedOur example shows a toplevel menu item with three sublevel menu items. Each of the menu items has an image and an accelerator. The accelerator for the quit menu item quits the application. The accelerator for the new menu item prints 'new' to the console.
/*
ZetCode JavaScript GTK tutorial
In this example, we explore image menu
items, a separator, accelerators.
author: Jan Bodnar
website: www.zetcode.com
last modified: July 2011
*/
Gtk = imports.gi.Gtk;
Gdk = imports.gi.Gdk;
Gtk.init(null, null);
Example = new GType({
parent: Gtk.Window.type,
name: "Example",
init: function ()
{
init_ui(this);
function init_ui(w) {
w.signal.hide.connect(Gtk.main_quit);
w.set_default_size(250, 200);
w.set_title("Image menu");
w.set_position(Gtk.WindowPosition.CENTER);
w.modify_bg(Gtk.StateType.NORMAL,
new Gdk.Color({red:6400, green:6400, blue:6440}));
var mb = new Gtk.MenuBar();
var filemenu = new Gtk.Menu();
var filem = new Gtk.MenuItem.with_label("File");
filem.set_submenu(filemenu);
var agr = new Gtk.AccelGroup();
w.add_accel_group(agr);
var newi = new Gtk.ImageMenuItem.from_stock(Gtk.STOCK_NEW, agr);
newi.signal.activate.connect(function() {print("new")});
filemenu.append(newi);
var openm = new Gtk.ImageMenuItem.from_stock(Gtk.STOCK_OPEN, agr);
filemenu.append(openm);
var sep = new Gtk.SeparatorMenuItem();
filemenu.append(sep);
var exitmu = new Gtk.ImageMenuItem.from_stock(Gtk.STOCK_QUIT, agr);
exitmu.signal.activate.connect(Gtk.main_quit);
filemenu.append(exitmu);
mb.append(filem);
var vbox = new Gtk.VBox.c_new(false, 2);
vbox.pack_start(mb, false, false, 0);
w.add(vbox);
w.show_all();
}
}
});
var window = new Example();
Gtk.main();
var agr = new Gtk.AccelGroup();To work with accelerators, we create a global AccelGroupobject. It will be used later.
w.add_accel_group(agr);
var newi = new Gtk.ImageMenuItem.from_stock(Gtk.STOCK_NEW, agr);ImageMenuItem is created. The image comes from the stock of images. The Ctrl+N accelerator is automatically created. We plug an anonymous method to the menu item. It will print a message to the console.
newi.signal.activate.connect(function() {print("new")});
filemenu.append(newi);
var sep = new Gtk.SeparatorMenuItem();These lines create a separator. It is used to put menu items into logical groups.
filemenu.append(sep);

Figure: Image menu
Menus group commands that we can use in application. Toolbars provide a quick access to the most frequently used commands. Simple toolbar
Next we create a simple toolbar. A toolbar provides a quick access to the most frequently used functionality of an application.#!/usr/bin/seedThe example shows a toolbar and four tool buttons.
/*
ZetCode JavaScript GTK tutorial
In this example, we create a simple
toolbar.
author: Jan Bodnar
website: www.zetcode.com
last modified: July 2011
*/
Gtk = imports.gi.Gtk;
Gtk.init(null, null);
Example = new GType({
parent: Gtk.Window.type,
name: "Example",
init: function ()
{
init_ui(this);
function init_ui(w) {
w.signal.hide.connect(Gtk.main_quit);
w.set_default_size(250, 200);
w.set_title("Toolbar");
w.set_position(Gtk.WindowPosition.CENTER);
var toolbar = new Gtk.Toolbar();
toolbar.set_style(Gtk.ToolbarStyle.ICONS);
var newtb = new Gtk.ToolButton.from_stock(Gtk.STOCK_NEW);
var opentb = new Gtk.ToolButton.from_stock(Gtk.STOCK_OPEN);
var savetb = new Gtk.ToolButton.from_stock(Gtk.STOCK_SAVE);
var sep = new Gtk.SeparatorToolItem();
var quittb = new Gtk.ToolButton.from_stock(Gtk.STOCK_QUIT);
toolbar.insert(newtb, 0);
toolbar.insert(opentb, 1);
toolbar.insert(savetb, 2);
toolbar.insert(sep, 3);
toolbar.insert(quittb, 4);
quittb.signal.clicked.connect(Gtk.main_quit);
var vbox = new Gtk.VBox.c_new(false, 2);
vbox.pack_start(toolbar, false, false, 0);
w.add(vbox);
w.show_all();
}
}
});
var window = new Example();
Gtk.main();
var toolbar = new Gtk.Toolbar();A Toolbar widget is created.
toolbar.set_style(Gtk.ToolbarStyle.ICONS);On toolbar, we show only icons. No text.
var newtb = new Gtk.ToolButton.from_stock(Gtk.STOCK_NEW);A ToolButton with an image from stock is created. The image comes from the built-in stock of images.
var sep = new Gtk.SeparatorToolItem();This is a separator. It can be used to put toolbar buttons into logical groups.
toolbar.insert(newtb, 0);Toolbar buttons are inserted into the toolbar widget. The first parameter of the insert() method is the tool button. The second is the position on the toolbar.
toolbar.insert(opentb, 1);
...
Figure: Toolbar
In this chapter of the JavaScript GTK tutorial, we showed, how to work with menus & toolbars. Introduce widgets for JavaScript GTK
Widgets
In this part of the JavaScript GTK programming tutorial, we will introduce some widgets.Widgets are basic building blocks of a GUI application. Over the years, several widgets became a standard in all toolkits on all OS platforms. For example a button, a check box or a scroll bar. The GTK toolkit's philosophy is to keep the number of widgets at a minimum level. More specialized widgets are created as custom GTK widgets.
CheckButton
CheckButton is a widget, that has two states. On and Off. The On state is visualized by a check mark. It is used to denote some boolean property.#!/usr/bin/seedWe will display a title in the titlebar of the window, depending on the state of the CheckButton.
/*
ZetCode JavaScript GTK tutorial
This program toggles the title of the
window with the CheckButton widget.
author: Jan Bodnar
website: www.zetcode.com
last modified: August 2011
*/
Gtk = imports.gi.Gtk;
Gtk.init(null, null);
Example = new GType({
parent: Gtk.Window.type,
name: "Example",
init: function ()
{
init_ui(this);
function init_ui(w) {
w.signal.hide.connect(Gtk.main_quit);
w.set_default_size(250, 200);
w.set_title("Check button");
w.set_position(Gtk.WindowPosition.CENTER);
var fix = new Gtk.Fixed();
var cb = new Gtk.CheckButton.with_label("Show title");
cb.set_active(true);
cb.set_can_focus(false);
cb.signal.clicked.connect(on_clicked);
fix.put(cb, 50, 50);
w.add(fix);
w.show_all();
function on_clicked(w) {
if (w.get_active()) {
    window.set_title("Check Button");
} else {
    window.set_title("");
}
}
}
}
});
var window = new Example();
Gtk.main();
var cb = new Gtk.CheckButton.with_label("Show title");
CheckButton widget is created. The constructor of the widget takes one parameter, a label. The label is shown next to the check box. cb.set_active(true);The title is visible by default, so we check the check button by default.
cb.signal.clicked.connect(on_clicked);If we click on the check box widget a clicked signal is emitted. We hook the on_clicked() method to the signal.
if (w.get_active()) {
window.set_title("Check Button");
} else {
window.set_title("");
}
We show the title, if the button is checked. The get_active() method is used to determine the state of the check button. The set_title() method is used to set the title of the window. To clear the title of the window, we use an empty string. 
Figure: CheckButton
Label
The Label widget shows text. No user interaction is available with this widget.#!/usr/bin/seedThe code example shows some lyrics on the window.
/*
ZetCode JavaScript GTK tutorial
This example demonstrates the Label widget
author: Jan Bodnar
website: www.zetcode.com
last modified: August 2011
*/
Gtk = imports.gi.Gtk;
Gtk.init(null, null);
var lyrics = "Meet you downstairs in the bar and heard\n\
your rolled up sleeves and your skull t-shirt\n\
You say why did you do it with him today?\n\
and sniff me out like I was Tanqueray\n\
\n\
cause you're my fella, my guy\n\
hand me your stella and fly\n\
by the time I'm out the door\n\
you tear men down like Roger Moore\n\
\n\
I cheated myself\n\
like I knew I would\n\
I told ya, I was trouble\n\
you know that I'm no good";
Example = new GType({
parent: Gtk.Window.type,
name: "Example",
init: function()
{
init_ui(this);
function init_ui(w) {
w.signal.hide.connect(Gtk.main_quit);
w.set_default_size(250, 200);
w.set_title("You know I'm no Good");
w.set_position(Gtk.WindowPosition.CENTER);
w.set_border_width(10);
var label = new Gtk.Label.c_new(lyrics);
w.add(label);
w.show_all();
}
}
});
var window = new Example();
Gtk.main();
var lyrics = "Meet you downstairs in the bar and heard\n\We create a multi-line text. In JavaScript, a multi-line text consists of lines of text ended with a newline character and a backslash. The backslash enables a string in JavaScript to span multiple source code lines. The newline character displays the string in more lines.
your rolled up sleeves and your skull t-shirt\n\
w.set_border_width(10);The Label is surrounded by some empty space.
var label = new Gtk.Label.c_new(lyrics);The Label widget is created and added to the window.
w.add(label);
Figure: Label Widget
Entry
The Entry is a single line text entry field. This widget is used to enter textual data.#!/usr/bin/seedThis example shows an entry widget and a label. The text that we key in the entry is displayed immediately in the label widget.
/*
ZetCode JavaScript GTK tutorial
This example demonstrates the Entry widget.
author: Jan Bodnar
website: www.zetcode.com
last modified: August 2011
*/
Gtk = imports.gi.Gtk;
Gtk.init(null, null);
Example = new GType({
parent: Gtk.Window.type,
name: "Example",
init: function()
{
init_ui(this);
function init_ui(w) {
w.signal.hide.connect(Gtk.main_quit);
w.set_default_size(250, 200);
w.set_title("Entry");
w.set_position(Gtk.WindowPosition.CENTER);
var fixed = new Gtk.Fixed();
var label = new Gtk.Label.c_new("...");
fixed.put(label, 60, 40);
var entry = new Gtk.Entry();
fixed.put(entry, 60, 100);
entry.signal.key_release_event.connect(function(sender) {
    label.set_text(sender.text);
});
w.add(fixed);
w.show_all();
}
}
});
var window = new Example();
Gtk.main();
var entry = new Gtk.Entry();Entry widget is created.
entry.signal.key_release_event.connect(function(sender) {
label.set_text(sender.text);
});
We plug the an anonymous method to the key_release_event of the Entry widget. We get the text from the Entry widget via the text property and set it to the label. 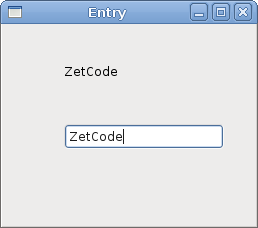
Figure: Entry Widget
Image
The Image widget shows an image.#!/usr/bin/seedIn our example, we show an image on the window.
/*
ZetCode JavaScript GTK tutorial
This example demonstrates the Image widget.
author: Jan Bodnar
website: www.zetcode.com
last modified: August 2011
*/
Gtk = imports.gi.Gtk;
Gtk.init(null, null);
Example = new GType({
parent: Gtk.Window.type,
name: "Example",
init: function()
{
init_ui(this);
function init_ui(w) {
w.signal.hide.connect(Gtk.main_quit);
w.set_default_size(250, 200);
w.set_title("You know I'm no Good");
w.set_position(Gtk.WindowPosition.CENTER);
w.set_border_width(2);
try {

    var image = new Gtk.Image.from_file("redrock.png");
} catch(e) {

    print("Cannot load image.");
}
w.add(image);
w.show_all();
}
}
});
var window = new Example();
Gtk.main();
w.set_border_width(2);We put some empty border around the image.
try {
var image = new Gtk.Image.from_file("redrock.png");
} catch(e) {
print("Cannot load image.");
}
The Image widget is created. IO operations are error prone, so we handle the possible exceptions. w.add(image);Widget is added to the container.
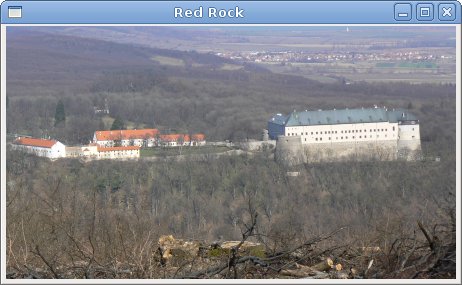
Figure: Image widget
In this chapter of the JavaScript GTK tutorial, we showed some basic widgets. Layout management in JavaScript GTK
Layout management
In this chapter we will show how to lay out our widgets in windows or dialogs.When we design the GUI of our application, we decide what widgets we will use and how we will organize those widgets in the application. To organize our widgets, we use specialized non visible widgets called layout containers. In this chapter, we will mention Alignment, Fixed, VBox and Table.
Fixed
The Fixed container places child widgets at fixed positions and with fixed sizes. This container performs no automatic layout management. In most applications, we don't use this container. There are some specialized areas, where we use it. For example games, specialized applications that work with diagrams, resizable components that can be moved (like a chart in a spreadsheet application), small educational examples.#!/usr/bin/seedIn our example, we show three small images on the window. We explicitly specify the x, y coordinates, where we place these images.
/*
ZetCode JavaScript GTK tutorial
In this program, we lay out widgets
using absolute positioning
author: Jan Bodnar
website: www.zetcode.com
last modified: July 2011
*/
Gtk = imports.gi.Gtk;
Gdk = imports.gi.Gdk;
Gtk.init(null, null);
Example = new GType({
parent: Gtk.Window.type,
name: "Example",
init: function ()
{
init_ui(this);
function init_ui(w) {
w.signal.hide.connect(Gtk.main_quit);
w.set_default_size(300, 280);
w.set_title("Fixed");
w.set_position(Gtk.WindowPosition.CENTER);
w.modify_bg(Gtk.StateType.NORMAL,
    new Gdk.Color({red:6400, green:6400, blue:6440}));
var image1 = new Gtk.Image.from_file("bardejov.jpg");
var image2 = new Gtk.Image.from_file("rotunda.jpg");
var image3 = new Gtk.Image.from_file("mincol.jpg");
var fixed = new Gtk.Fixed();
fixed.put(image1, 20, 20);
fixed.put(image2, 40, 160);
fixed.put(image3, 170, 50);
w.add(fixed);
w.show_all();
}
}
});
var window = new Example();
Gtk.main();
w.modify_bg(Gtk.StateType.NORMAL,For better visual experience, we change the background color to dark gray.
new Gdk.Color({red:6400, green:6400, blue:6440}));
var image1 = new Gtk.Image.from_file("bardejov.jpg");
The Image is a widget, that is used to display images. The picture is loaded from the file on the disk. var fixed = new Gtk.Fixed();We create the Fixed container.
fixed.put(image1, 20, 20);We place the first image at x=20, y=20 coordinates.
w.add(fixed);Finally, we add the Fixed container to the Window.
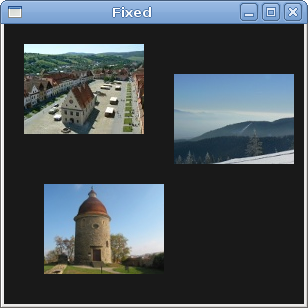
Figure: Fixed
Buttons
In this code example, we will use a vertical box, a horizontal box and an alignment widget. A horizontal box arranges widgets in a single row. Similarly, a vertical box places its widgets in one column. The Alignment container controls the alignment and the size of its child widget.#!/usr/bin/seedIn the code example, we place two buttons into the right bottom corner of the window. To accomplish this, we use one horizontal box and one vertical box and one alignment container.
/*
ZetCode JavaScript GTK tutorial
In this program, we position two buttons
in the bottom right corner of the window.
We use horizontal and vertical boxes.
author: Jan Bodnar
website: www.zetcode.com
last modified: July 2011
*/
Gtk = imports.gi.Gtk;
Gtk.init(null, null);
Example = new GType({
parent: Gtk.Window.type,
name: "Example",
init: function ()
{
init_ui(this);
function init_ui(w) {
w.signal.hide.connect(Gtk.main_quit);
w.set_default_size(260, 150);
w.set_title("Buttons");
w.set_position(Gtk.WindowPosition.CENTER);
var vbox = new Gtk.VBox({homogeneous: false, spacing:5});
var hbox = new Gtk.HBox({homogeneous: true, spacing:3});
var space = new Gtk.Frame();
vbox.pack_start(space, true, true, 0);
var okButton = new Gtk.Button({label:"OK"});
okButton.set_size_request(70, 30);
var closeButton = new Gtk.Button({label:"Close"});

hbox.add(okButton);
hbox.add(closeButton);
var halign = new Gtk.Alignment({xalign: 1.0, yalign: 0.0,
                                xscale: 0.0, yscale: 0.0});
halign.add(hbox);
vbox.pack_start(halign, false, false, 3);
w.add(vbox);
w.show_all();
}
}
});
var window = new Example();
Gtk.main();
var vbox = new Gtk.VBox({homogeneous: false, spacing:5});
A vertical box container is created. We set the homogeneous member to false. This means that widgets put into the vertical box will hot have the same size. The vertical spacing between widgets is set to 5 pixels. var space = new Gtk.Frame();Here we create a Frame widget. The purpose of this widget is to take up space above the two buttons.
vbox.pack_start(space, true, true, 0);Here we place the frame widget into the vertical box. The first parameter of the method is the widget, which is being placed into the box. The following three parameters are expand, fill and padding. The expand parameter is set to true, which means that free space will be allocated around the widget. When the fill parameter is set to true, the widget actually takes up all the free space around it. There is no padding around the child widget.
var hbox = new Gtk.HBox({homogeneous: true, spacing:3});
This code line creates a horizontal box. All widgets inside the box will have the same size. There will be 3px space between the widgets horizontally. var okButton = new Gtk.Button({label:"OK"});
okButton.set_size_request(70, 30);
var closeButton = new Gtk.Button({label:"Close"});
hbox.add(okButton);
hbox.add(closeButton);
We create two buttons and put them inside the horizontal box. var halign = new Gtk.Alignment({xalign: 1.0, yalign: 0.0,
xscale: 0.0, yscale: 0.0});
halign.add(hbox);
vbox.pack_start(halign, false, false, 3);
This will create an alignment container that will place its child widget to the right. The xalign member set to 1.0 will put all free space to the left of the horizontal box. This will push the two buttons to the right. We add the horizontal box into the alignment container and pack the alignment container into the vertical box. We must keep in mind that the alignment container takes only one child widget. That's why we must use the horizontal box. 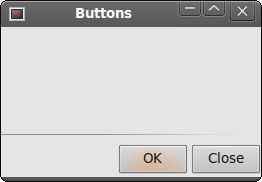
Figure: Buttons
Calculator skeleton
The Table widget arranges widgets in rows and columns.#!/usr/bin/seedWe use the Table widget to create a calculator skeleton.
/*
ZetCode JavaScript GTK tutorial
In this program we create a skeleton of
a calculator. We use the Table widget.
author: Jan Bodnar
website: www.zetcode.com
last modified: July 2011
*/
Gtk = imports.gi.Gtk;
Gdk = imports.gi.Gdk;
Gtk.init(null, null);
Example = new GType({
parent: Gtk.Window.type,
name: "Example",
init: function ()
{
init_ui(this);
function init_ui(w) {
w.signal.hide.connect(Gtk.main_quit);
w.set_default_size(300, 250);
w.set_title("Calculator");
w.set_position(Gtk.WindowPosition.CENTER);
var vbox = new Gtk.VBox({homogeneous: false, spacing:2});
var mb = new Gtk.MenuBar();
var filemenu = new Gtk.Menu();
var file = new Gtk.MenuItem({label:"File"});
file.set_submenu(filemenu);
mb.append(file);
vbox.pack_start(mb, false, false, 0);
var table = new Gtk.Table.c_new(5, 4, true);
table.attach_defaults(new Gtk.Button.with_label("Cls"), 0, 1, 0, 1);
table.attach_defaults(new Gtk.Button.with_label("Bck"), 1, 2, 0, 1);
table.attach_defaults(new Gtk.Label(), 2, 3, 0, 1);
table.attach_defaults(new Gtk.Button.with_label("Close"), 3, 4, 0, 1);
table.attach_defaults(new Gtk.Button.with_label("7"), 0, 1, 1, 2);
table.attach_defaults(new Gtk.Button.with_label("8"), 1, 2, 1, 2);
table.attach_defaults(new Gtk.Button.with_label("9"), 2, 3, 1, 2);
table.attach_defaults(new Gtk.Button.with_label("/"), 3, 4, 1, 2);
table.attach_defaults(new Gtk.Button.with_label("4"), 0, 1, 2, 3);
table.attach_defaults(new Gtk.Button.with_label("5"), 1, 2, 2, 3);
table.attach_defaults(new Gtk.Button.with_label("6"), 2, 3, 2, 3);
table.attach_defaults(new Gtk.Button.with_label("*"), 3, 4, 2, 3);
table.attach_defaults(new Gtk.Button.with_label("1"), 0, 1, 3, 4);
table.attach_defaults(new Gtk.Button.with_label("2"), 1, 2, 3, 4);
table.attach_defaults(new Gtk.Button.with_label("3"), 2, 3, 3, 4);
table.attach_defaults(new Gtk.Button.with_label("-"), 3, 4, 3, 4);
table.attach_defaults(new Gtk.Button.with_label("0"), 0, 1, 4, 5);
table.attach_defaults(new Gtk.Button.with_label("."), 1, 2, 4, 5);
table.attach_defaults(new Gtk.Button.with_label("="), 2, 3, 4, 5);
table.attach_defaults(new Gtk.Button.with_label("+"), 3, 4, 4, 5);
vbox.pack_start(new Gtk.Entry(), false, false, 0);
vbox.pack_end(table, true, true, 0);
w.add(vbox);
w.show_all();
}
}
});
var window = new Example();
Gtk.main();
var table = new Gtk.Table.c_new(5, 4, true);We create a table widget with 5 rows and 4 columns. The third parameter is the homogenous parameter. If set to true, all the widgets in the table are of the same size. The size of all widgets is equal to the largest widget in the table container.
table.attach_defaults(new Gtk.Button.with_label("Cls"), 0, 1, 0, 1);
We attach a button to the table container. To the top-left cell of the table. The first two parameters are the left and right sides of the cell, the last two parameters are the top and left sides of the cell. vbox.pack_end(table, true, true, 0);We pack the table widget into the vertical box.
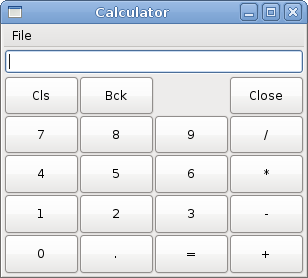
Figure: Calculator skeleton
Windows
Next we will create a more advanced example. We show a window, that can be found in the JDeveloper IDE.#!/usr/bin/seedThe code example shows, how we can create a similar window in JavaScript GTK.
/*
ZetCode JavaScript GTK tutorial
This is a more complicated layout example.
We use Alignment and Table widgets.
author: Jan Bodnar
website: www.zetcode.com
last modified: July 2011
*/
Gtk = imports.gi.Gtk;
Gdk = imports.gi.Gdk;
Gtk.init(null, null);
Example = new GType({
parent: Gtk.Window.type,
name: "Example",
init: function ()
{
init_ui(this);
function init_ui(w) {
w.signal.hide.connect(Gtk.main_quit);
w.set_default_size(300, 280);
w.set_title("Windows");
w.set_position(Gtk.WindowPosition.CENTER);
w.set_border_width(15);
var table = new Gtk.Table.c_new(8, 4, false);
table.set_col_spacings(3);
var title = new Gtk.Label.c_new("Windows");

var halign = new Gtk.Alignment.c_new(0.0, 0.0, 0.0, 0.0);
halign.add(title);

table.attach(halign, 0, 1, 0, 1, Gtk.AttachOptions.FILL,
    Gtk.AttachOptions.FILL, 0, 0);
var frame = new Gtk.Frame();
table.attach(frame, 0, 2, 1, 3, Gtk.AttachOptions.FILL | Gtk.AttachOptions.EXPAND,
    Gtk.AttachOptions.FILL | Gtk.AttachOptions.EXPAND, 1, 1);
var activate = new Gtk.Button.with_label("Activate");
activate.set_size_request(50, 30);
table.attach(activate, 3, 4, 1, 2, Gtk.AttachOptions.FILL,
Gtk.AttachOptions.SHRINK, 1, 1)
var valign = new Gtk.Alignment.c_new(0.0, 0.0, 0.0, 0.0);
var closeButton = new Gtk.Button.with_label("Close");
closeButton.set_size_request(70, 30);
valign.add(closeButton);
table.set_row_spacing(1, 3);
table.attach(valign, 3, 4, 2, 3, Gtk.AttachOptions.FILL,
    Gtk.AttachOptions.FILL | Gtk.AttachOptions.EXPAND, 1, 1)
halign2 = new Gtk.Alignment.c_new(0.0, 1.0, 0.0, 0.0);
help = new Gtk.Button.with_label("Help");
help.set_size_request(70, 30);
halign2.add(help);
table.set_row_spacing(3, 6);
table.attach(halign2, 0, 1, 4, 5, Gtk.AttachOptions.FILL,
    Gtk.AttachOptions.FILL, 0, 0);
var okButton = new Gtk.Button.with_label("OK");
okButton.set_size_request(70, 30);
table.attach(okButton, 3, 4, 4, 5, Gtk.AttachOptions.FILL,
    Gtk.AttachOptions.FILL, 0, 0);
w.add(table);
w.show_all();
}
}
});
var window = new Example();
Gtk.main();
var table = new Gtk.Table.c_new(8, 4, false);The example is based on the Table container. There will be 3px space between columns.
table.set_col_spacings(3);
var title = new Gtk.Label.c_new("Windows");
var halign = new Gtk.Alignment.c_new(0.0, 0.0, 0.0, 0.0);
halign.add(title);
table.attach(halign, 0, 1, 0, 1, Gtk.AttachOptions.FILL,
Gtk.AttachOptions.FILL, 0, 0);
This code creates a label, that is aligned to the left. The label is placed in the first row of the first column of the Table container. var frame = new Gtk.Frame();The frame widget spans two rows and two columns. It will consume all free space around it. Thus, taking the bulk of the area of the window.
table.attach(frame, 0, 2, 1, 3, Gtk.AttachOptions.FILL | Gtk.AttachOptions.EXPAND,
Gtk.AttachOptions.FILL | Gtk.AttachOptions.EXPAND, 1, 1);
var valign = new Gtk.Alignment.c_new(0.0, 0.0, 0.0, 0.0);We put the close button next to the frame widget into the fourth column. (we count from zero) We add the button into the alignment widget, so that we can align it to the top.
var closeButton = new Gtk.Button.with_label("Close");
closeButton.set_size_request(70, 30);
valign.add(closeButton);
table.set_row_spacing(1, 3);
table.attach(valign, 3, 4, 2, 3, Gtk.AttachOptions.FILL,
Gtk.AttachOptions.FILL | Gtk.AttachOptions.EXPAND, 1, 1)
halign2 = new Gtk.Alignment.c_new(0.0, 1.0, 0.0, 0.0);The help button is placed into the alignment widget, so that it can be left aligned in its table cell. It is placed at the first column, fifth row.
help = new Gtk.Button.with_label("Help");
help.set_size_request(70, 30);
halign2.add(help);
table.set_row_spacing(3, 6);
table.attach(halign2, 0, 1, 4, 5, Gtk.AttachOptions.FILL,
Gtk.AttachOptions.FILL, 0, 0);
var okButton = new Gtk.Button.with_label("OK");
okButton.set_size_request(70, 30);
table.attach(okButton, 3, 4, 4, 5, Gtk.AttachOptions.FILL,
Gtk.AttachOptions.FILL, 0, 0);
Finally the ok button. It is placed at the fourth column, fifth row. 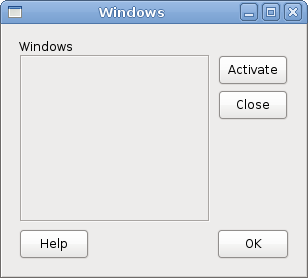
Figure: Windows
In this part of the JavaScript GTK tutorial, we mentioned layout management of widgets. Introduction to JavaScript GTK
Introduction to JavaScript GTK
In this part of the JavaScript GTK programming tutorial, we will introduce the GTK library and create our first programs using the JavaScript programming language.The purpose of this tutorial is to get you started with the GTK and JavaScript. GTK is one of the leading toolkits for creating graphical user interfaces. JavaScript is a popular scripting language used mainly in browsers. In the recent years, JavaScript has made its way to other areas including user interface programming on desktops.
Seed
Seed is a JavaScript interpreter and a library of the GNOME project to create standalone applications in JavaScript. It uses the JavaScript engine JavaScriptCore of the WebKit project. (Wikipedia)Seed uses GObject introspection to access Gnome libraries. GTK is one of the Gnome libraries.
Simple example
In the first example, we create a simple window. The window is centered on the screen. The code is written in a procedural style.#!/usr/bin/seedThis example shows a 250x200 px window in the center of the screen.
/*
ZetCode JavaScript GTK tutorial
This program centers a window on
the screen.
author: Jan Bodnar
website: www.zetcode.com
last modified: August 2011
*/
Gtk = imports.gi.Gtk;
Gtk.init(null, null);
window = new Gtk.Window({ type: Gtk.WindowType.TOPLEVEL });
window.signal.hide.connect(Gtk.main_quit);
window.set_default_size(250, 200);
window.set_title("Center");
window.set_position(Gtk.WindowPosition.CENTER);
window.show();
Gtk.main();
Gtk = imports.gi.Gtk;We import the Gtk library.
Gtk.init(null, null);This line initializes the GTK library for use.
window = new Gtk.Window({ type: Gtk.WindowType.TOPLEVEL });
This line creates a toplevel Window. The Window is a container. The main application window is in most cases (but not always) a toplevel window. window.signal.hide.connect(Gtk.main_quit);Here we connect the hide signal to a callback. The main_quit() method quits the application for good. The hide signal is emitted, when we click on the close button in the titlebar. Or press Alt + F4.
window.set_default_size(250, 200);We set a default size for the application window.
window.set_title("Center");
We set a title for the window using the set_title() method. window.set_position(Gtk.WindowPosition.CENTER);This line centers the window on the screen.
window.show();When everything is ready, we show the window on the screen.
Gtk.main();We set up the application. An infinite loop is created. From this point the application sits and waits for external events from the user or the system. The loop runs until it is terminated.
We have the same code example written in object-oriented style. JavaScript supports object-oriented programming to some extent.
#!/usr/bin/seedCode example.
/*
ZetCode JavaScript GTK tutorial
This program centers a window on
the screen.
author: Jan Bodnar
website: www.zetcode.com
last modified: August 2011
*/
Gtk = imports.gi.Gtk;
Gtk.init(null, null);
Example = new GType({
    parent: Gtk.Window.type,
    name: "Example",
    init: function()
    {
init_ui(this);
function init_ui(w) {
w.signal.hide.connect(Gtk.main_quit);
w.set_default_size(250, 200);
w.set_title("Center");
w.set_position(Gtk.WindowPosition.CENTER);
w.show();
}
}
});
var window = new Example();
Gtk.main();
Example = new GType({
parent: Gtk.Window.type,
name: "Example",
init: function()
{
We create a new type. It inherits from the GTK Window widget. We put the code into the init method of the type. Creating a Tooltip
The second example will show a tooltip. A tooltip is a small rectangular window, which gives a brief information about an object. It is usually a GUI component. It is part of the help system of the application.#!/usr/bin/seedThe example creates a window. If we hover a mouse pointer over the area of the window, a tooltip pops up.
/*
ZetCode JavaScript GTK tutorial
This code shows a tooltip on
a window and a button.
author: Jan Bodnar
website: www.zetcode.com
last modified: August 2011
*/
Gtk = imports.gi.Gtk;
Gtk.init(null, null);
Example = new GType({
parent: Gtk.Window.type,
name: "Example",
init: function()
{
init_ui(this);
function init_ui(w) {
w.signal.hide.connect(Gtk.main_quit);
w.set_default_size(250, 200);
w.set_title("Center");
w.set_position(Gtk.WindowPosition.CENTER);
var fix = new Gtk.Fixed();
var button = new Gtk.Button({ label: "Button" });
button.set_size_request(80, 35);
button.set_tooltip_text("Button widget");
fix.put(button, 50, 50);
win.set_tooltip_text("Window widget");
w.show_all();
}
}
});
var window = new Example();
Gtk.main();
button.set_tooltip_text("Button widget");
We set a tooltip with the set_tooltip_text() method. 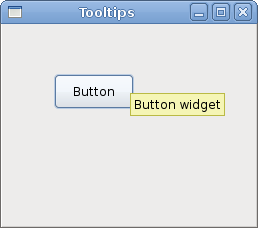
Figure: Tooltip
Quit button
In the last example of this section, we will create a quit button. When we press this button, the application terminates.#!/usr/bin/seedWe use a Button widget. This is a very common widget. It shows a text label, image or both.
/*
ZetCode JavaScript GTK tutorial
This program creates a quit
button. When we press the button,
the application terminates.
author: Jan Bodnar
website: www.zetcode.com
last modified: August 2011
*/
Gtk = imports.gi.Gtk;
Gtk.init(null, null);
Example = new GType({
parent: Gtk.Window.type,
name: "Example",
init: function()
{
init_ui(this);
function init_ui(w) {
var fix = new Gtk.Fixed();
var btn = new Gtk.Button({ label: "Quit" });
btn.signal.clicked.connect(Gtk.main_quit);
btn.set_size_request(80, 35);
fix.put(btn, 50, 50);
w.add(fix);
w.signal.hide.connect(Gtk.main_quit);
w.set_default_size(250, 200);
w.set_title("Quit button");
w.set_position(Gtk.WindowPosition.CENTER);
w.show_all();
}
}
});
var window = new Example();
Gtk.main();
init_ui(this);We delegate the creation of the user interface to the init_ui() method.
var btn = new Gtk.Button({ label: "Quit" });
Here we create a button widget. btn.signal.clicked.connect(Gtk.main_quit);We plug the main_quit() method to the button clicked signal.
btn.set_size_request(80, 35);We set a size for a button.
fix.put(btn, 50, 50);We put the quit button into the fixed container at x=50, y=50.
w.show_all();We have two options. Either to call show() on all widgets, or to call show_all(), which shows the container and all its children.
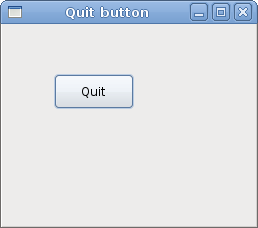
Figure: Quit button
This section was an introduction to the GTK library with the JavaScript language. 