Showing posts with label PyCairo. Show all posts

Step By Step PyCairo Tutorials for Beginners

PyCairo tutorial

This is PyCairo tutorial. In this tutorial, we are going to learn 2D graphics programming in Python and the Cairo library.

Table of Contents

PyCairo

PyCairo is a Python module for working with the Cairo library. It is a set of Python bindings to the Cairo C library. It closely matches the C API with the exception of cases, where more Pythonic way is desirable.
Continue Reading

Root window in PyCairo

Root window

In this part of the PyCairo tutorial, we will work with the root window. The root window is the desktop window where we usually have icon shortcuts.
It is possible to manipulate with the root window. From the programmer's perspective, it is just a special kind of a window.

Transparent window

Our first example will create a transparent window. We will see, what it beneath of the window object.
#!/usr/bin/python

'''
Dukeo PyCairo tutorial

This code example shows how to
create a transparent window.

author: Tanvir redwan
website: http://dukeo.blogspot.com
last edited: March 2013
'''

from gi.repository import Gtk
import cairo


class Example(Gtk.Window):

def __init__(self):
super(Example, self).__init__()

self.tran_setup()
self.init_ui()


def init_ui(self):

self.connect("draw", self.on_draw)

self.set_title("Transparent window")
self.resize(300, 250)
self.set_position(Gtk.WindowPosition.CENTER)
self.connect("delete-event", Gtk.main_quit)
self.show_all()


def tran_setup(self):

self.set_app_paintable(True)
screen = self.get_screen()

visual = screen.get_rgba_visual()
if visual != None and screen.is_composited():
self.set_visual(visual)


def on_draw(self, wid, cr):

cr.set_source_rgba(0.2, 0.2, 0.2, 0.4)
cr.set_operator(cairo.OPERATOR_SOURCE)
cr.paint()


def main():

app = Example()
Gtk.main()


if __name__ == "__main__":
main()
To create a transparent window, we get the visual of the screen object and set it for our window. In the on_draw() method, we draw over the screen's visual object. This createas an illusion of partial transparency.
self.set_app_paintable(True)  
We must set the application to be painted on.
screen = self.get_screen()
The get_screen() method returns the screen object.
visual = screen.get_rgba_visual()
From the screen window, we get its visual. The visual contains the low level display information.
if visual != None and screen.is_composited():
self.set_visual(visual)
Not all displays support this operation. Therefore, we check if our screen supports composition and the returned visual is not None. We set the screen's visual to be the visual of our window.
def on_draw(self, wid, cr):

cr.set_source_rgba(0.2, 0.2, 0.2, 0.4)
cr.set_operator(cairo.OPERATOR_SOURCE)
cr.paint()
We use a partially transparent source to draw over the screen window. The cairo.OPERATOR_SOURCE creates a composition operation where we draw over the source. Which is the screen window. To get full transparency, we set the alpha value to 0 or use the cairo.OPERATOR_CLEAR operator.
Transparent window
Figure: Transparent window

Taking a screenshot

The root window is also essential in taking a screenshot.
#!/usr/bin/python

'''
Dukeo PyCairo tutorial

This code example takes a screenshot.

author: Tanvir redwan
website: http://dukeo.blogspot.com
last edited: August 2012
'''

from gi.repository import Gdk
import cairo


def main():

root_win = Gdk.get_default_root_window()

width = root_win.get_width()
height = root_win.get_height()

ims = cairo.ImageSurface(cairo.FORMAT_ARGB32, width, height)
pb = Gdk.pixbuf_get_from_window(root_win, 0, 0, width, height)

cr = cairo.Context(ims)
Gdk.cairo_set_source_pixbuf(cr, pb, 0, 0)
cr.paint()

ims.write_to_png("screenshot.png")


if __name__ == "__main__":
main()
The example captures a snapshot of the entire screen.
root_win = Gdk.get_default_root_window()
We get the root window with the Gdk.get_default_root_window()method call.
width = root_win.get_width()
height = root_win.get_height()
We determine the width and the height of the root window.
ims = cairo.ImageSurface(cairo.FORMAT_ARGB32, width, height)
An empty image surface is created. It has the size of the root window.
pb = Gdk.pixbuf_get_from_window(root_win, 0, 0, width, height)
We get a pixbuf from the root window using the Gdk.pixbuf_get_from_window()method call. A pixbuf is an object that describes an image in memory. It is used by the GTK library.
cr = cairo.Context(ims)    
Gdk.cairo_set_source_pixbuf(cr, pb, 0, 0)
cr.paint()
In the above code lines, we create a Cairo drawing context on the image surface that we have created earlier. We place the pixbuf on the drawing context and paint it on the surface.
ims.write_to_png("screenshot.png")
The image surface is written to a PNG image using the write_to_png() method.

Showing message

In the third example, we will show a message on the desktop window.
#!/usr/bin/python

'''
Dukeo PyCairo tutorial

This code example shows a message on the desktop
window.

author: Tanvir redwan
website: http://dukeo.blogspot.com
last edited: August 2012
'''


from gi.repository import Gtk, Gdk, Pango
import cairo


class Example(Gtk.Window):

def __init__(self):
super(Example, self).__init__()

self.setup()
self.init_ui()


def setup(self):

self.set_app_paintable(True)
self.set_type_hint(Gdk.WindowTypeHint.DOCK)
self.set_keep_below(True)

screen = self.get_screen()
visual = screen.get_rgba_visual()
if visual != None and screen.is_composited():
self.set_visual(visual)


def init_ui(self):

self.connect("draw", self.on_draw)

lbl = Gtk.Label()
text = "Dukeo, tutorials for programmers."
lbl.set_text(text)

fd = Pango.FontDescription("Serif 20")
lbl.modify_font(fd)
lbl.modify_fg(Gtk.StateFlags.NORMAL,Gdk.color_parse("white"))

self.add(lbl)

self.resize(300, 250)
self.set_position(Gtk.WindowPosition.CENTER)
self.connect("delete-event", Gtk.main_quit)
self.show_all()


def on_draw(self, wid, cr):

cr.set_operator(cairo.OPERATOR_CLEAR)
cr.paint()
cr.set_operator(cairo.OPERATOR_OVER)


def main():

app = Example()
Gtk.main()


if __name__ == "__main__":
import signal
signal.signal(signal.SIGINT, signal.SIG_DFL)
main()
The code displays a message label on the root window.
self.set_app_paintable(True) 
We will be manipulating the application window, so we make it paintable.
self.set_type_hint(Gdk.WindowTypeHint.DOCK)
Implementing this window hint removes window borders and decoration.
self.set_keep_below(True) 
We keep the application always at the bottom, just over the root window.
screen = self.get_screen()
visual = screen.get_rgba_visual()
if visual != None and screen.is_composited():
self.set_visual(visual)
We set the visual of the screen to be the visual of our application.
lbl = Gtk.Label()
text = "Dukeo, tutorials for programmers."
lbl.set_text(text)
We put a message label on the application window.
fd = Pango.FontDescription("Serif 20")
lbl.modify_font(fd)
lbl.modify_fg(Gtk.StateFlags.NORMAL,Gdk.color_parse("white"))
With the help of the Pango module, we change the appearance of the text.
def on_draw(self, wid, cr):

cr.set_operator(cairo.OPERATOR_CLEAR)
cr.paint()
cr.set_operator(cairo.OPERATOR_OVER)
We use the cairo.OPERATOR_CLEAR operator to clear the background of the window. Then we set the cairo.OPERATOR_CLEARto let the label widget be drawn.
if __name__ == "__main__":    
import signal
signal.signal(signal.SIGINT, signal.SIG_DFL)
main()
There is an older bugthat does not allow us to terminate the application launched from the terminal with the Ctrl+C shortcut. Adding the two lines is a workaround for this.
In this chapter we have worked with the desktop window in PyCairo.
Continue Reading

Images in PyCairo

Images in PyCairo

In this part of the PyCairo tutorial, we will talk about images. We will show how to display a PNG and JPEG image on the GTK window. We will also draw some text on an image.

Displaying a PNG image

In the first example, we will display a PNG image.
#!/usr/bin/python

'''
ZetCode PyCairo tutorial

This program shows how to draw
an image on a GTK window in PyCairo.

author: Jan Bodnar
website: zetcode.com
last edited: August 2012
'''

from gi.repository import Gtk
import cairo


class Example(Gtk.Window):

def __init__(self):
super(Example, self).__init__()

self.init_ui()
self.load_image()


def init_ui(self):

darea = Gtk.DrawingArea()
darea.connect("draw", self.on_draw)
self.add(darea)

self.set_title("Image")
self.resize(300, 170)
self.set_position(Gtk.WindowPosition.CENTER)
self.connect("delete-event", Gtk.main_quit)
self.show_all()


def load_image(self):

self.ims = cairo.ImageSurface.create_from_png("stmichaelschurch.png")


def on_draw(self, wid, cr):

cr.set_source_surface(self.ims, 10, 10)
cr.paint()


def main():

app = Example()
Gtk.main()


if __name__ == "__main__":
main()
The example displays an image.
self.ims = cairo.ImageSurface.create_from_png("stmichaelschurch.png")
We create an image surface from a PNG image.
cr.set_source_surface(self.ims, 10, 10)
We set a source for painting from the previously created image surface.
cr.paint()
We paint the source on the window.
Showing an image
Figure: Showing an image

Displaying a JPEG image

PyCairo has built-in support only for PNG images. Other images can be displayed via the GdkPixbuf.Pixbuf object. It is a GTK object for manipulating images.
#!/usr/bin/python

'''
ZetCode PyCairo tutorial

This program shows how to draw
an image on a GTK window in PyCairo.

author: Jan Bodnar
website: zetcode.com
last edited: August 2012
'''


from gi.repository import Gtk, Gdk, GdkPixbuf
import cairo


class Example(Gtk.Window):

def __init__(self):
super(Example, self).__init__()

self.init_ui()
self.load_image()


def init_ui(self):

darea = Gtk.DrawingArea()
darea.connect("draw", self.on_draw)
self.add(darea)

self.set_title("Image")
self.resize(300, 170)
self.set_position(Gtk.WindowPosition.CENTER)
self.connect("delete-event", Gtk.main_quit)
self.show_all()


def load_image(self):

self.pb = GdkPixbuf.Pixbuf.new_from_file("stmichaelschurch.jpg")


def on_draw(self, wid, cr):

Gdk.cairo_set_source_pixbuf(cr, self.pb, 5, 5)
cr.paint()


def main():

app = Example()
Gtk.main()


if __name__ == "__main__":
main()
In this example, we display a JPEG image on the window.
from gi.repository import Gtk, Gdk, GdkPixbuf 
In addition to Gtk we will also need Gdk and GdkPixbuf modules.
self.pb = GdkPixbuf.Pixbuf.new_from_file("stmichaelschurch.jpg") 
We create a GdkPixbuf.Pixbuf from a JPEG file.
Gdk.cairo_set_source_pixbuf(cr, self.pb, 5, 5)
cr.paint()
The Gdk.cairo_set_source_pixbuf() method sets the pixbuf as a source for painting.

Watermark

It is common to draw information on images. The text written on an image is called a watermark. Watermarks are used to identify images. They could be copyright notices or image creation times.
#!/usr/bin/python

'''
ZetCode PyCairo tutorial

This program draws a watermark
on an image.

author: Jan Bodnar
website: zetcode.com
last edited: August 2012
'''

from gi.repository import Gtk
import cairo


class Example(Gtk.Window):

def __init__(self):
super(Example, self).__init__()

self.init_ui()
self.load_image()
self.draw_mark()


def init_ui(self):

darea = Gtk.DrawingArea()
darea.connect("draw", self.on_draw)
self.add(darea)

self.set_title("Watermark")
self.resize(350, 250)
self.set_position(Gtk.WindowPosition.CENTER)
self.connect("delete-event", Gtk.main_quit)
self.show_all()


def load_image(self):

self.ims = cairo.ImageSurface.create_from_png("beckov.png")


def draw_mark(self):

cr = cairo.Context(self.ims)
cr.set_font_size(11)
cr.set_source_rgb(0.9 , 0.9 , 0.9)
cr.move_to(20 , 30)
cr.show_text(" Beckov 2012 , (c) Jan Bodnar ")
cr.stroke()


def on_draw(self, wid, cr):

cr.set_source_surface(self.ims, 10, 10)
cr.paint()


def main():

app = Example()
Gtk.main()


if __name__ == "__main__":
main()
We draw copyright information on an image.
def load_image(self):

self.ims = cairo.ImageSurface.create_from_png("beckov.png")
In the load_image() method, we create an image surface from a PNG image.
def draw_mark(self):

cr = cairo.Context(self.ims)
...
In the draw_mark() method, we draw the copyright message on the image. First we create a drawing context from the image surface.
cr.set_font_size(11)
cr.set_source_rgb(0.9 , 0.9 , 0.9)
cr.move_to(20 , 30)
cr.show_text(" Beckov 2012 , (c) Jan Bodnar ")
cr.stroke()
Then we draw a small text in white colour.
def on_draw(self, wid, cr):

cr.set_source_surface(self.ims, 10, 10)
cr.paint()
Finally, the image surface is drawn on the window.
This chapter covered images in PyCairo.
Continue Reading

Text in PyCairo

Text in PyCairo

In this part of the PyCairo tutorial, we will work with text.

Soulmate

In the first example, we will display some lyrics on a window.
def on_draw(self, wid, cr):

cr.set_source_rgb(0.1, 0.1, 0.1)

cr.select_font_face("Purisa", cairo.FONT_SLANT_NORMAL,
cairo.FONT_WEIGHT_NORMAL)
cr.set_font_size(13)

cr.move_to(20, 30)
cr.show_text("Most relationships seem so transitory")
cr.move_to(20, 60)
cr.show_text("They're all good but not the permanent one")
cr.move_to(20, 120)
cr.show_text("Who doesn't long for someone to hold")
cr.move_to(20, 150)
cr.show_text("Who knows how to love without being told")
cr.move_to(20, 180)
cr.show_text("Somebody tell me why I'm on my own")
cr.move_to(20, 210)
cr.show_text("If there's a soulmate for everyone")
In this code, we display part of the lyrics from the Natasha Bedingfields Soulmate song.
cr.select_font_face("Purisa", cairo.FONT_SLANT_NORMAL, 
cairo.FONT_WEIGHT_NORMAL)
Here we select the font face. The method takes three parameters, the font family, font slant and the font weight.
cr.set_font_size(13)
Here we specify the font size.
cr.move_to(20, 30)
cr.show_text("Most relationships seem so transitory")
We display the text on the window by specifying the position of the text and calling the show_text() method.
Soulmate
Figure: Soulmate

Centered text

Next we will show, how to center text on the window.
def on_draw(self, wid, cr):

w, h = self.get_size()

cr.select_font_face("Courier", cairo.FONT_SLANT_NORMAL,
cairo.FONT_WEIGHT_BOLD)
cr.set_font_size(60)

(x, y, width, height, dx, dy) = cr.text_extents("ZetCode")

cr.move_to(w/2 - width/2, h/2)
cr.show_text("ZetCode")
The code will center a text on the window. It remains centered, even if we resize the window.
w, h = self.get_size() 
To center a text on the window, it is necessary to get the size of the client area of the window.
cr.select_font_face("Courier", cairo.FONT_SLANT_NORMAL, 
cairo.FONT_WEIGHT_BOLD)
cr.set_font_size(60)
We select a font and its size to be displayed.
(x, y, width, height, dx, dy) = cr.text_extents("ZetCode") 
We get the text extents. These are some numbers that describe the text. We need the width of the text for our example.
cr.move_to(w/2 - width/2, h/2)    
cr.show_text("ZetCode")
We position the text into the middle of the window and show it using the show_text() method.

Shaded text

Now we will create a shaded text on the window.
def on_draw(self, wid, cr):

cr.select_font_face("Serif", cairo.FONT_SLANT_NORMAL,
cairo.FONT_WEIGHT_BOLD)
cr.set_font_size(50)

cr.set_source_rgb(0, 0, 0)
cr.move_to(40, 60)
cr.show_text("ZetCode")

cr.set_source_rgb(0.5, 0.5, 0.5)
cr.move_to(43, 63)
cr.show_text("ZetCode")
To create a shade, we draw the text twice. In different colours. The second text is moved a bit to the right and bottom.
cr.set_source_rgb(0, 0, 0)
cr.move_to(40, 60)
cr.show_text("ZetCode")
The first text is drawn in black ink. It serves as a shade.
cr.set_source_rgb(0.5, 0.5, 0.5)
cr.move_to(43, 63)
cr.show_text("ZetCode")
The second text is drawn in some gray ink. It is moved by 3px to the right and to the bottom.

Text filled with gradient

The following example will create a nice effect. We will fill a text with some linear gradient.
def on_draw(self, wid, cr):

cr.set_source_rgb(0.2, 0.2, 0.2)
cr.paint()

h = 90

cr.select_font_face("Serif", cairo.FONT_SLANT_ITALIC,
cairo.FONT_WEIGHT_BOLD)
cr.set_font_size(h)

lg = cairo.LinearGradient(0, 15, 0, h*0.8)
lg.set_extend(cairo.EXTEND_REPEAT)
lg.add_color_stop_rgb(0.0, 1, 0.6, 0)
lg.add_color_stop_rgb(0.5, 1, 0.3, 0)

cr.move_to(15, 80)
cr.text_path("ZetCode")
cr.set_source(lg)
cr.fill()
We draw a text on the window filled with a linear gradient. The colours are some orange colours.
cr.set_source_rgb(0.2, 0.2, 0.2)
cr.paint()
To make it more visually appealing, we paint the background in dark gray colour.
lg = cairo.LinearGradient(0, 15, 0, h*0.8)
lg.set_extend(cairo.EXTEND_REPEAT)
lg.add_color_stop_rgb(0.0, 1, 0.6, 0)
lg.add_color_stop_rgb(0.5, 1, 0.3, 0)
The linear gradient is created.
cr.move_to(15, 80)
cr.text_path("ZetCode")
cr.set_source(lg)
cr.fill()
The text is displayed on the window. We use the gradient as a source for painting.

Letter by letter

In this effect, we will display a text letter by letter. The letters will be drawn with some delay.
#!/usr/bin/python

'''
ZetCode PyCairo tutorial

This program shows text letter by
letter.

author: Jan Bodnar
website: zetcode.com
last edited: August 2012
'''

from gi.repository import Gtk, GLib
import cairo


class cv(object):

SPEED = 800
TEXT_SIZE = 35
COUNT_MAX = 8


class Example(Gtk.Window):

def __init__(self):
super(Example, self).__init__()

self.init_ui()
self.init_vars()


def init_ui(self):

self.darea = Gtk.DrawingArea()
self.darea.connect("draw", self.on_draw)
self.add(self.darea)


GLib.timeout_add(cv.SPEED, self.on_timer)

self.set_title("Letter by letter")
self.resize(350, 200)
self.set_position(Gtk.WindowPosition.CENTER)
self.connect("delete-event", Gtk.main_quit)
self.show_all()


def init_vars(self):

self.timer = True
self.count = 0
self.text = [ "Z", "e", "t", "C", "o", "d", "e" ]


def on_timer(self):

if not self.timer: return False

self.darea.queue_draw()
return True


def on_draw(self, wid, cr):

cr.select_font_face("Courier", cairo.FONT_SLANT_NORMAL,
cairo.FONT_WEIGHT_BOLD)

cr.set_font_size(cv.TEXT_SIZE)

dis = 0

for i in range(self.count):

(x, y, width, height, dx, dy) = cr.text_extents(self.text[i])

dis += width + 2
cr.move_to(dis + 30, 50)
cr.show_text(self.text[i])


self.count += 1

if self.count == cv.COUNT_MAX:
self.timer = False
self.count = 0


def main():

app = Example()
Gtk.main()


if __name__ == "__main__":
main()
In our example, we will draw the "ZetCode" string on the GTK window letter by letter with some delay.
self.text = [ "Z", "e", "t", "C", "o", "d", "e" ]
This is a list of letters to be displayed on the window.
cr.select_font_face("Courier", cairo.FONT_SLANT_NORMAL,
cairo.FONT_WEIGHT_BOLD)
We select a Courier font face in bold weight.
for i in range(self.count):

(x, y, width, height, dx, dy) = cr.text_extents(self.text[i])

dis += width + 2
cr.move_to(dis + 30, 50)
cr.show_text(self.text[i])
Here we draw the text letter by letter. We get the width of each of the letters and compute the disptance on the x axis.

Glyphs

The show_text() method is only suitable for simple text rendering. Cairo developers call it a toy method. More professional text rendering is done with glyphs. A glyph is a graphic symbol which provides a form for a character. A character provides a meaning. It can have multiple glyphs. A character has no intrinsic appearance. A glyph has no intrinsic meaning.
Note that many common programming requirements conserning text are addressed by the Pango library.
def on_draw(self, wid, cr):

cr.select_font_face("Serif", cairo.FONT_SLANT_NORMAL,
cairo.FONT_WEIGHT_NORMAL)

cr.set_font_size(13)

glyphs = []
index = 0

for y in range(20):
for x in range(35):
glyphs.append((index, x*15 + 20, y*18 + 20))
index += 1

cr.show_glyphs(glyphs)
This code shows 700 glyphs of a chosen font.
glyphs = [] 
The glyphs list will store three integer values. The first value is the index of the glyph to the chosen font type. The second and the third values are x, y positions of a glyph.
cr.show_glyphs(glyphs) 
The show_glyphs() method shows the glyphs on the window.
Glyphs
Figure: Glyphs
This chapter covered text in PyCairo.
Continue Reading

Transformations in PyCairo

Transformations

In this part of the PyCairo graphics programming tutorial, we will talk about transformations.
An affine transform is composed of zero or more linear transformations (rotation, scaling or shear) and translation (shift). Several linear transformations can be combined into a single matrix. A rotation is a transformation that moves a rigid body around a fixed point. A scaling is a transformation that enlarges or diminishes objects. The scale factor is the same in all directions. A translation is a transformation that moves every point a constant distance in a specified direction. A shear is a transformation that moves an object perpendicular to a given axis, with greater value on one side of the axis than the other.
sources: (wikipedia.org, freedictionary.com)

Translation

The following example describes a simple translation.
def on_draw(self, wid, cr):

cr.set_source_rgb(0.2, 0.3, 0.8)
cr.rectangle(10, 10, 30, 30)
cr.fill()

cr.translate(20, 20)
cr.set_source_rgb(0.8, 0.3, 0.2)
cr.rectangle(0, 0, 30, 30)
cr.fill()

cr.translate(30, 30)
cr.set_source_rgb(0.8, 0.8, 0.2)
cr.rectangle(0, 0, 30, 30)
cr.fill()

cr.translate(40, 40)
cr.set_source_rgb(0.3, 0.8, 0.8)
cr.rectangle(0, 0, 30, 30)
cr.fill()
The example draws a rectangle. Then we do a translation and draw the same rectangle again a few times.
cr.translate(20, 20)
The translate() function modifies the current transformation matrix by translating the user space origin. In our case we shift the origin by 20 units in both directions.
Translation operation
Figure: Translation operation

Shearing

In the following example, we perform a shearing operation. A shearing is an object distortion along a particular axis. There is no shear method for this operation. We need to create our own transformation matrix. Note that each affine transformation can be performed by creating a transformation matrix.
def on_draw(self, wid, cr):

cr.set_source_rgb(0.6, 0.6, 0.6)
cr.rectangle(20, 30, 80, 50)
cr.fill()

mtx = cairo.Matrix(1.0, 0.5,
0.0, 1.0,
0.0, 0.0)

cr.transform(mtx)
cr.rectangle(130, 30, 80, 50)
cr.fill()
In this code example, we perform a simple shearing operation.
mtx = cairo.Matrix(1.0, 0.5,
0.0, 1.0,
0.0, 0.0)
This transformation shears y values by 0.5 of the x values.
cr.transform(mtx)
We perform the transformation with the transform()method.
Shearing operation
Figure: Shearing operation

Scaling

The next example demonstrates a scaling operation. Scaling is a transformation operation where the object is enlarged or shrinken.
def on_draw(self, wid, cr):

cr.set_source_rgb(0.2, 0.3, 0.8)
cr.rectangle(10, 10, 90, 90)
cr.fill()

cr.scale(0.6, 0.6)
cr.set_source_rgb(0.8, 0.3, 0.2)
cr.rectangle(30, 30, 90, 90)
cr.fill()

cr.scale(0.8, 0.8)
cr.set_source_rgb(0.8, 0.8, 0.2)
cr.rectangle(50, 50, 90, 90)
cr.fill()
We draw three rectangles of 90x90px size. On two of them, we perform a scaling operation.
cr.scale(0.6, 0.6)
cr.set_source_rgb(0.8, 0.3, 0.2)
cr.rectangle(30, 30, 90, 90)
cr.fill()
We uniformly scale a rectangle by a factor of 0.6.
cr.scale(0.8, 0.8)
cr.set_source_rgb(0.8, 0.8, 0.2)
cr.rectangle(50, 50, 90, 90)
cr.fill()
Here we perform another scaling operation by a factor of 0.8. If we look at the picture, we see, that the third yellow rectangle is the smallest one. Even if we have used a smaller scaling factor. This is because transformation operations are additive. In fact, the third rectangle was scaled by a factor of 0.528 (0.6x0.8).
Scaling operation
Figure: Scaling operation

Isolating transformations

Transformation operations are additive. To isolate one operation from the other one, we can use the save() and restore()methods. The save() method makes a copy of the current state of the drawing context and saves it on an internal stack of saved states. The restore() method will re-establish the context to the saved state.
def on_draw(self, wid, cr):

cr.set_source_rgb(0.2, 0.3, 0.8)
cr.rectangle(10, 10, 90, 90)
cr.fill()

cr.save()
cr.scale(0.6, 0.6)
cr.set_source_rgb(0.8, 0.3, 0.2)
cr.rectangle(30, 30, 90, 90)
cr.fill()
cr.restore()

cr.save()
cr.scale(0.8, 0.8)
cr.set_source_rgb(0.8, 0.8, 0.2)
cr.rectangle(50, 50, 90, 90)
cr.fill()
cr.restore()
In the example we scale two rectangles. This time we isolate the scaling operations from each other.
cr.save()
cr.scale(0.6, 0.6)
cr.set_source_rgb(0.8, 0.3, 0.2)
cr.rectangle(30, 30, 90, 90)
cr.fill()
cr.restore()
We isolate the scaling operation by putting the scale()method between the save() and restore() methods.
Isolating transformations
Figure: Isolating transformations
Now the third yellow rectangle is bigger than the second red one.

Donut

In the following example we create a complex shape by rotating a bunch of ellipses.
#!/usr/bin/python

'''
ZetCode PyCairo tutorial

This program creates a 'donut' shape
in PyCairo.

author: Jan Bodnar
website: zetcode.com
last edited: August 2012
'''


from gi.repository import Gtk
import cairo
import math


class Example(Gtk.Window):

def __init__(self):
super(Example, self).__init__()

self.init_ui()


def init_ui(self):

darea = Gtk.DrawingArea()
darea.connect("draw", self.on_draw)
self.add(darea)

self.set_title("Donut")
self.resize(350, 250)
self.set_position(Gtk.WindowPosition.CENTER)
self.connect("delete-event", Gtk.main_quit)
self.show_all()


def on_draw(self, wid, cr):

cr.set_line_width(0.5)

w, h = self.get_size()

cr.translate(w/2, h/2)
cr.arc(0, 0, 120, 0, 2*math.pi)
cr.stroke()

for i in range(36):
cr.save()
cr.rotate(i*math.pi/36)
cr.scale(0.3, 1)
cr.arc(0, 0, 120, 0, 2*math.pi)
cr.restore()
cr.stroke()


def main():

app = Example()
Gtk.main()


if __name__ == "__main__":
main()
We will do rotation and scaling operations. We will also save and restore PyCairo contexts.
cr.translate(w/2, h/2)
cr.arc(0, 0, 120, 0, 2*math.pi)
cr.stroke()
In the middle of the GTK window, we create a circle. This will be a bounding circle for our ellipses.
for i in range(36):
cr.save()
cr.rotate(i*math.pi/36)
cr.scale(0.3, 1)
cr.arc(0, 0, 120, 0, 2*math.pi)
cr.restore()
cr.stroke()
We create 36 ellipses along the path of our bounding circle. We insulate each rotate and scale operation from one another with the save() and restore() methods.
Donut
Figure: Donut

Star

The next example shows a rotating and scaling star.
#!/usr/bin/python

'''
ZetCode PyCairo tutorial

This is a star example which
demonstrates scaling, translating and
rotating operations in PyCairo.

author: Jan Bodnar
website: zetcode.com
last edited: August 2012
'''


from gi.repository import Gtk, GLib
import cairo


class cv(object):

points = (
( 0, 85 ),
( 75, 75 ),
( 100, 10 ),
( 125, 75 ),
( 200, 85 ),
( 150, 125 ),
( 160, 190 ),
( 100, 150 ),
( 40, 190 ),
( 50, 125 ),
( 0, 85 )
)

SPEED = 20
TIMER_ID = 1


class Example(Gtk.Window):

def __init__(self):
super(Example, self).__init__()

self.init_ui()
self.init_vars()


def init_ui(self):

self.darea = Gtk.DrawingArea()
self.darea.connect("draw", self.on_draw)
self.add(self.darea)

self.set_title("Star")
self.resize(400, 300)
self.set_position(Gtk.WindowPosition.CENTER)
self.connect("delete-event", Gtk.main_quit)
self.show_all()


def init_vars(self):

self.angle = 0
self.scale = 1
self.delta = 0.01

GLib.timeout_add(cv.SPEED, self.on_timer)


def on_timer(self):

if self.scale < 0.01:
self.delta = -self.delta

elif self.scale > 0.99:
self.delta = -self.delta

self.scale += self.delta
self.angle += 0.01

self.darea.queue_draw()

return True


def on_draw(self, wid, cr):

w, h = self.get_size()

cr.set_source_rgb(0, 0.44, 0.7)
cr.set_line_width(1)

cr.translate(w/2, h/2)
cr.rotate(self.angle)
cr.scale(self.scale, self.scale)

for i in range(10):
cr.line_to(cv.points[i][0], cv.points[i][1])

cr.fill()


def main():

app = Example()
Gtk.main()


if __name__ == "__main__":
main()
In this example, we create a star object. We will translate it, rotate it and scale it.
points = ( 
( 0, 85 ),
( 75, 75 ),
( 100, 10 ),
( 125, 75 ),
( 200, 85 ),
...
The star object will be constructed from these points.
def init_vars(self):   

self.angle = 0
self.scale = 1
self.delta = 0.01
...
In the init_vars() method, we initialize three variables. The self.angle is used in the rotation, the self.scale in scaling the star object. The self.delta variable controls when the star is growing and when it is shrinking.
glib.timeout_add(cv.SPEED, self.on_timer) 
Each cv.SPEED ms the on_timer() method is called.
if self.scale < 0.01:
self.delta = -self.delta

elif self.scale > 0.99:
self.delta = -self.delta
These lines control whether the star is going to grow or shrink.
cr.translate(w/2, h/2)
cr.rotate(self.angle)
cr.scale(self.scale, self.scale)
We shift the star into the middle of the window. Rotate it and scale it.
for i in range(10):
cr.line_to(cv.points[i][0], cv.points[i][1])

cr.fill()
Here we draw the star object.
In this part of the PyCairo tutorial, we talked about transformations.
Continue Reading

Transparency in PyCairo

Transparency

In this part of the PyCairo tutorial, we will talk about transparency. We will provide some basic definitions and three interesting transparency examples.
Transparency is the quality of being able to see through a material. The easiest way to understand transparency is to imagine a piece of glass or water. Technically, the rays of light can go through the glass and this way we can see objects behind the glass.
In computer graphics, we can achieve transparency effects using alpha compositing. Alpha compositing is the process of combining an image with a background to create the appearance of partial transparency. The composition process uses an alpha channel. Alpha channel is an 8-bit layer in a graphics file format that is used for expressing translucency (transparency). The extra eight bits per pixel serves as a mask and represents 256 levels of translucency.
(answers.com, wikipedia.org)

Transparent rectangles

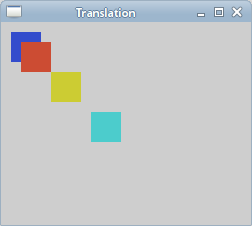
The first example will draw ten rectangles with different levels of transparency.
def on_draw(self, wid, cr):

for i in range(1, 11):

cr.set_source_rgba(0, 0, 1, i*0.1)
cr.rectangle(50*i, 20, 40, 40)
cr.fill()
The set_source_rgba() method has an alpha parameter to provide transparency.
for i in range(1, 11):

cr.set_source_rgba(0, 0, 1, i*0.1)
cr.rectangle(50*i, 20, 40, 40)
cr.fill()
This code creates ten rectangles with alpha values from 0.1 ... 1.
Transparent rectangles
Figure: Transparent rectangles

Puff effect

In the following example, we create a puff effect. The example will display a growing centered text that will gradually fade out from some point. This is a very common effect which we can often see in flash animations. The paint_with_alpha() method is crucial to create the effect.
#!/usr/bin/python

'''
ZetCode PyCairo tutorial

This program creates a 'puff'
effect.

author: Jan Bodnar
website: zetcode.com
last edited: August 2012
'''


from gi.repository import Gtk, GLib
import cairo


class cv(object):

SPEED = 14
TEXT_SIZE_MAX = 20
ALPHA_DECREASE = 0.01
SIZE_INCREASE = 0.8


class Example(Gtk.Window):

def __init__(self):
super(Example, self).__init__()

self.init_ui()


def init_ui(self):

self.darea = Gtk.DrawingArea()
self.darea.connect("draw", self.on_draw)
self.add(self.darea)

self.timer = True
self.alpha = 1.0
self.size = 1.0

GLib.timeout_add(cv.SPEED, self.on_timer)

self.set_title("Puff")
self.resize(350, 200)
self.set_position(Gtk.WindowPosition.CENTER)
self.connect("delete-event", Gtk.main_quit)
self.show_all()


def on_timer(self):

if not self.timer: return False

self.darea.queue_draw()
return True


def on_draw(self, wid, cr):

w, h = self.get_size()

cr.set_source_rgb(0.5, 0, 0)
cr.paint()

cr.select_font_face("Courier", cairo.FONT_SLANT_NORMAL,
cairo.FONT_WEIGHT_BOLD)

self.size = self.size + cv.SIZE_INCREASE

if self.size > cv.TEXT_SIZE_MAX:
self.alpha = self.alpha - cv.ALPHA_DECREASE

cr.set_font_size(self.size)
cr.set_source_rgb(1, 1, 1)

(x, y, width, height, dx, dy) = cr.text_extents("ZetCode")

cr.move_to(w/2 - width/2, h/2)
cr.text_path("ZetCode")
cr.clip()
cr.paint_with_alpha(self.alpha)

if self.alpha <= 0:
self.timer = False


def main():

app = Example()
Gtk.main()


if __name__ == "__main__":
main()
The example creates a growing and fading text on the window.
class cv(object):

SPEED = 14
TEXT_SIZE_MAX = 20
ALPHA_DECREASE = 0.01
SIZE_INCREASE = 0.8
Here we define some constants used in the example.
self.alpha = 1.0
self.size = 1.0
These two variables store the current alpha value and the text size.
GLib.timeout_add(cv.SPEED, self.on_timer)
Each 14 ms the on_timer() method is called.
def on_timer(self):

if not self.timer: return False

self.darea.queue_draw()
return True
In the on_timer() method, we redraw the drawing area widget with the queue_draw() method.
def on_draw(self, wid, cr):

w, h = self.get_size()

cr.set_source_rgb(0.5, 0, 0)
cr.paint()

cr.select_font_face("Courier", cairo.FONT_SLANT_NORMAL,
cairo.FONT_WEIGHT_BOLD)
...
In the on_draw() method, we get the width and height of the client area of the window. These values are used to center the text. We fill the background of the window in some dark red colour. We select a Courier font for the text.
(x, y, width, height, dx, dy) = cr.text_extents("ZetCode")
We get the text metrics. We will use only the text width.
cr.move_to(w/2 - width/2, h/2)
We move to a position where the text will be centered on the window.
cr.text_path("ZetCode")
cr.clip()
cr.paint_with_alpha(self.alpha)
We get the path of the text with the text_path() method. We restrict the painting to the current path using the clip() method. The paint_with_alpha() method paints the current source everywhere within the current clip region using a mask of the alpha value.
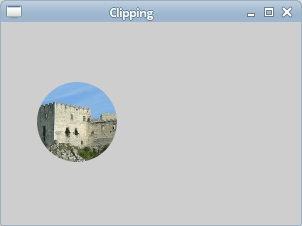
Reflected image

In the next example, we show a reflected image. This effect makes an illusion as if the image was reflected in water.
#!/usr/bin/python

'''
ZetCode PyCairo tutorial

This program creates an image reflection.

author: Jan Bodnar
website: zetcode.com
last edited: August 2012
'''


from gi.repository import Gtk
import cairo
import sys


class Example(Gtk.Window):

def __init__(self):
super(Example, self).__init__()

self.init_ui()
self.load_image()
self.init_vars()


def init_ui(self):

darea = Gtk.DrawingArea()
darea.connect("draw", self.on_draw)
self.add(darea)

self.set_title("Reflection")
self.resize(300, 350)
self.set_position(Gtk.WindowPosition.CENTER)
self.connect("delete-event", Gtk.main_quit)
self.show_all()


def load_image(self):

try:
self.s = cairo.ImageSurface.create_from_png("slanec.png")
except Exception, e:
print e.message
sys.exit(1)


def init_vars(self):

self.imageWidth = self.s.get_width()
self.imageHeight = self.s.get_height()
self.gap = 40
self.border = 20


def on_draw(self, wid, cr):

w, h = self.get_size()

lg = cairo.LinearGradient(w/2, 0, w/2, h*3)
lg.add_color_stop_rgba(0, 0, 0, 0, 1)
lg.add_color_stop_rgba(h, 0.2, 0.2, 0.2, 1)

cr.set_source(lg)
cr.paint()

cr.set_source_surface(self.s, self.border, self.border)
cr.paint()

alpha = 0.7
step = 1.0 / self.imageHeight

cr.translate(0, 2 * self.imageHeight + self.gap)
cr.scale(1, -1)

i = 0

while(i < self.imageHeight):

cr.rectangle(self.border, self.imageHeight-i,
self.imageWidth, 1)

i = i + 1

cr.save()
cr.clip()
cr.set_source_surface(self.s, self.border,
self.border)

alpha = alpha - step

cr.paint_with_alpha(alpha)
cr.restore()

def main():

app = Example()
Gtk.main()


if __name__ == "__main__":
main()
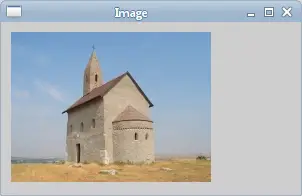
A reflected ruin of a castle is shown on the window.
def load_image(self):          

try:
self.s = cairo.ImageSurface.create_from_png("slanec.png")
except Exception, e:
print e.message
sys.exit(1)
In the load_image() method an image surface is created from a PNG image.
def init_vars(self):

self.imageWidth = self.s.get_width()
self.imageHeight = self.s.get_height()
self.gap = 40
self.border = 20
Inside the init_vars() method, we get the width and height of the image. We also define two variables.
lg = cairo.LinearGradient(w/2, 0, w/2, h*3)
lg.add_color_stop_rgba(0, 0, 0, 0, 1)
lg.add_color_stop_rgba(h, 0.2, 0.2, 0.2, 1)

cr.set_source(lg)
cr.paint()
The background of the window is filled with a gradient paint. The paint is a smooth blending from black to dark gray.
cr.translate(0, 2 * self.imageHeight + self.gap)
cr.scale(1, -1)
This code flips the image and translates it below the original image. The translation operation is necessary, because the scaling operation makes the image upside down and translates the image up. To understand what happens, simply take a photograph and place it on the table. And flip it.
i = 0

while(i < self.imageHeight):

cr.rectangle(self.border, self.imageHeight-i,
self.imageWidth, 1)

i = i + 1

cr.save()
cr.clip()
cr.set_source_surface(self.s, self.border,
self.border)

alpha = alpha - step

cr.paint_with_alpha(alpha)
cr.restore()
This is the final part. We make the second image transparent. But the transparency is not constant. The image gradually fades out. The reflected image is draw line by line. The clip() method restricts the drawing to the rectangle of height 1. The paint_with_alpha() takes the transparency into account when painting the current clip of the image surface.
Reflected image
Figure: Reflected image

Waiting demo

In this examle, we use transparency effect to create a waiting demo. We will draw 8 lines that will gradually fade out creating an illusion, that a line is moving. Such effects are often used to inform users, that a lengthy task is going on behind the scenes. An example is streaming video over the Internet.
#!/usr/bin/python

'''
ZetCode PyCairo tutorial

This program creates a 'waiting' effect.

author: Jan Bodnar
website: zetcode.com
last edited: August 2012
'''

from gi.repository import Gtk, GLib
import cairo
import math


class cv(object):

trs = (
( 0.0, 0.15, 0.30, 0.5, 0.65, 0.80, 0.9, 1.0 ),
( 1.0, 0.0, 0.15, 0.30, 0.5, 0.65, 0.8, 0.9 ),
( 0.9, 1.0, 0.0, 0.15, 0.3, 0.5, 0.65, 0.8 ),
( 0.8, 0.9, 1.0, 0.0, 0.15, 0.3, 0.5, 0.65 ),
( 0.65, 0.8, 0.9, 1.0, 0.0, 0.15, 0.3, 0.5 ),
( 0.5, 0.65, 0.8, 0.9, 1.0, 0.0, 0.15, 0.3 ),
( 0.3, 0.5, 0.65, 0.8, 0.9, 1.0, 0.0, 0.15 ),
( 0.15, 0.3, 0.5, 0.65, 0.8, 0.9, 1.0, 0.0, )
)

SPEED = 100
CLIMIT = 1000
NLINES = 8


class Example(Gtk.Window):

def __init__(self):
super(Example, self).__init__()

self.init_ui()


def init_ui(self):

self.darea = Gtk.DrawingArea()
self.darea.connect("draw", self.on_draw)
self.add(self.darea)

self.count = 0

GLib.timeout_add(cv.SPEED, self.on_timer)

self.set_title("Waiting")
self.resize(250, 150)
self.set_position(Gtk.WindowPosition.CENTER)
self.connect("delete-event", Gtk.main_quit)
self.show_all()


def on_timer(self):

self.count = self.count + 1

if self.count >= cv.CLIMIT:
self.count = 0

self.darea.queue_draw()

return True


def on_draw(self, wid, cr):

cr.set_line_width(3)
cr.set_line_cap(cairo.LINE_CAP_ROUND)

w, h = self.get_size()

cr.translate(w/2, h/2)

for i in range(cv.NLINES):

cr.set_source_rgba(0, 0, 0, cv.trs[self.count%8][i])
cr.move_to(0.0, -10.0)
cr.line_to(0.0, -40.0)
cr.rotate(math.pi/4)
cr.stroke()


def main():

app = Example()
Gtk.main()


if __name__ == "__main__":
main()
We draw eight lines with eight different alpha values.
class cv(object):

trs = (
( 0.0, 0.15, 0.30, 0.5, 0.65, 0.80, 0.9, 1.0 ),
( 1.0, 0.0, 0.15, 0.30, 0.5, 0.65, 0.8, 0.9 ),
( 0.9, 1.0, 0.0, 0.15, 0.3, 0.5, 0.65, 0.8 ),
( 0.8, 0.9, 1.0, 0.0, 0.15, 0.3, 0.5, 0.65 ),
( 0.65, 0.8, 0.9, 1.0, 0.0, 0.15, 0.3, 0.5 ),
( 0.5, 0.65, 0.8, 0.9, 1.0, 0.0, 0.15, 0.3 ),
( 0.3, 0.5, 0.65, 0.8, 0.9, 1.0, 0.0, 0.15 ),
( 0.15, 0.3, 0.5, 0.65, 0.8, 0.9, 1.0, 0.0, )
)
...
This is a two dimensional tuple of transparency values used in this demo. There are 8 rows, each for one state. Each of the 8 lines will continuously use these values.
SPEED = 100
CLIMIT = 1000
NLINES = 8
The SPEED constant controls the speed of the animation. The CLIMIT is the maximum number for the self.count variable. After reaching this limit, the variable is reset to 0. The NLINES is the number of lines drawn in the example.
GLib.timeout_add(cv.SPEED, self.on_timer)
We use a timer function to create animation. Each cv.SPEED ms the on_timer() method is called.
def on_timer(self):    

self.count = self.count + 1

if self.count >= cv.CLIMIT:
self.count = 0

self.darea.queue_draw()

return True
In the on_timer() method, we increase the self.count variable. If the variable reaches the cv.CLIMIT constant, it is set to 0. We guard against overflowing and we do not work with large numbers.
def on_draw(self, wid, cr):

cr.set_line_width(3)
cr.set_line_cap(cairo.LINE_CAP_ROUND)
...
We make the lines a bit thicker, so that they are better visible. We draw the lines with rouded caps.
w, h = self.get_size()

cr.translate(w/2, h/2)
We position our drawing in the center of the window.
for i in range(cv.NLINES):

cr.set_source_rgba(0, 0, 0, cv.trs[self.count%8][i])
cr.move_to(0.0, -10.0)
cr.line_to(0.0, -40.0)
cr.rotate(math.pi/4)
cr.stroke()
In the for loop, we draw eight rotated lines with different transparency values. The lines are separated by an angle of 45 degrees.
Waiting demo
Figure: Waiting demo
In this part of the PyCairo tutorial, we have covered transparency.
Continue Reading

Clipping And masking in PyCairo

Clipping And masking

In this part of the PyCairo tutorial, we will talk about clipping and masking operations.

Clipping

Clipping is restricting of drawing to a certain area. This is done for effeciency reasons and to create interesting effects. PyCairo has a clip() method to set the clipping.
#!/usr/bin/python

'''
ZetCode PyCairo tutorial

This program shows how to perform
clipping in PyCairo.

author: Jan Bodnar
website: zetcode.com
last edited: August 2012
'''


from gi.repository import Gtk, GLib
import cairo
import math
import random


class Example(Gtk.Window):

def __init__(self):
super(Example, self).__init__()

self.init_ui()
self.load_image()
self.init_vars()


def init_ui(self):

self.darea = Gtk.DrawingArea()
self.darea.connect("draw", self.on_draw)
self.add(self.darea)

GLib.timeout_add(100, self.on_timer)

self.set_title("Clipping")
self.resize(300, 200)
self.set_position(Gtk.WindowPosition.CENTER)
self.connect("delete-event", Gtk.main_quit)
self.show_all()


def load_image(self):

self.image = cairo.ImageSurface.create_from_png("beckov.png")


def init_vars(self):

self.pos_x = 128
self.pos_y = 128
self.radius = 40

self.delta = [3, 3]


def on_timer(self):

self.pos_x += self.delta[0]
self.pos_y += self.delta[1]

self.darea.queue_draw()
return True


def on_draw(self, wid, cr):

w, h = self.get_size()

if (self.pos_x < 0 + self.radius):
self.delta[0] = random.randint(5, 9)
elif (self.pos_x > w - self.radius):
self.delta[0] = -random.randint(5, 9)

if (self.pos_y < 0 + self.radius):
self.delta[1] = random.randint(5, 9)
elif (self.pos_y > h - self.radius):
self.delta[1] = -random.randint(5, 9)

cr.set_source_surface(self.image, 1, 1)
cr.arc(self.pos_x, self.pos_y, self.radius, 0, 2*math.pi)
cr.clip()
cr.paint()


def main():

app = Example()
Gtk.main()


if __name__ == "__main__":
main()
In this example, we will clip an image. A circle is moving on the window area and showing a part of the underlying image. This is as if we looked through a hole.
def load_image(self):

self.image = cairo.ImageSurface.create_from_png("beckov.png")
This is the underlying image. Each timer cycle, we will see a portion of this image.
if (self.pos_x < 0 + self.radius):
self.delta[0] = random.randint(5, 9)
elif (self.pos_x > w - self.radius):
self.delta[0]= -random.randint(5, 9)
If the circle hits the left or the right side of the window, the direction of the circle movement changes randomly. Same applies for the top and bottom sides.
cr.arc(self.pos_x, self.pos_y, self.radius, 0, 2*math.pi)
This line adds a circular path to the Cairo context.
cr.clip()
The clip() sets a clipping region. The clipping region is the current path used. The current path was created by the arc() method call.
cr.paint()
The paint() paints the current source everywhere within the current clip region.
Clipping
Figure: Clipping

Masking

Before the source is applied to the surface, it is filtered first. The mask is used as a filter. The mask determines where the sourse is applied and where not. Opaque parts of the mask allow to copy the source. Transparent parts do not let to copy the source to the surface.
#!/usr/bin/python

'''
ZetCode PyCairo tutorial

This program demonstrates masking.

author: Jan Bodnar
website: zetcode.com
last edited: August 2012
'''


from gi.repository import Gtk
import cairo


class Example(Gtk.Window):

def __init__(self):
super(Example, self).__init__()

self.init_ui()
self.load_image()


def init_ui(self):

darea = Gtk.DrawingArea()
darea.connect("draw", self.on_draw)
self.add(darea)

self.set_title("Masking")
self.resize(310, 100)
self.set_position(Gtk.WindowPosition.CENTER)
self.connect("delete-event", Gtk.main_quit)
self.show_all()


def load_image(self):

self.ims = cairo.ImageSurface.create_from_png("omen.png")


def on_draw(self, wid, cr):

cr.mask_surface(self.ims, 0, 0);
cr.fill()


def main():

app = Example()
Gtk.main()


if __name__ == "__main__":
main()
In the example, the mask determines where to paint and where not to paint.
cr.mask_surface(self.ims, 0, 0);
cr.fill()
We use an image as a mask, thus displaying it on the window.
Masking
Figure: Masking

Blind down effect

In this code example, we will blind down our image. This is similar to what we do with a roller-blind.
#!/usr/bin/python

'''
ZetCode PyCairo tutorial

This program creates a blind down
effect using masking operation.

author: Jan Bodnar
website: zetcode.com
last edited: August 2012
'''


from gi.repository import Gtk, GLib
import cairo
import math


class Example(Gtk.Window):

def __init__(self):
super(Example, self).__init__()

self.init_ui()
self.load_image()
self.init_vars()


def init_ui(self):

self.darea = Gtk.DrawingArea()
self.darea.connect("draw", self.on_draw)
self.add(self.darea)

GLib.timeout_add(35, self.on_timer)

self.set_title("Blind down")
self.resize(325, 250)
self.set_position(Gtk.WindowPosition.CENTER)
self.connect("delete-event", Gtk.main_quit)
self.show_all()


def load_image(self):

self.image = cairo.ImageSurface.create_from_png("beckov.png")


def init_vars(self):

self.timer = True
self.h = 0
self.iw = self.image.get_width()
self.ih = self.image.get_height()

self.ims = cairo.ImageSurface(cairo.FORMAT_ARGB32,
self.iw, self.ih)


def on_timer(self):

if (not self.timer):
return False

self.darea.queue_draw()
return True


def on_draw(self, wid, cr):

ic = cairo.Context(self.ims)

ic.rectangle(0, 0, self.iw, self.h)
ic.fill()

self.h += 1

if (self.h == self.ih):
self.timer = False

cr.set_source_surface(self.image, 10, 10)
cr.mask_surface(self.ims, 10, 10)


def main():

app = Example()
Gtk.main()


if __name__ == "__main__":
main()
The idea behind the blind down effect is quite simple. The image is h pixels high. We draw 0, 1, 2 ... lines of 1px height. Each cycle the portion of the image is 1px higher, until the whole image is visible.
def load_image(self):

self.image = cairo.ImageSurface.create_from_png("beckov.png")
In the load_image() method, we create an image surface from a PNG image.
def init_vars(self):        

self.timer = True
self.h = 0
self.iw = self.image.get_width()
self.ih = self.image.get_height()

self.ims = cairo.ImageSurface(cairo.FORMAT_ARGB32,
self.iw, self.ih)
In the init_vars() method, we initiate some variables. We initiate the self.timer and the self.h variables. We get the width and height of the loaded image. And we create an empty image surface. It is going to be filled with lines of pixels from the image surface, that we have created earlier.
ic = cairo.Context(self.ims)
We create a cairo context from the empty image source.
ic.rectangle(0, 0, self.iw, self.h)
ic.fill()
We draw a rectangle into the initially empty image. The rectangle will be 1px higher each cycle. The image created this way will serve as a mask later.
self.h += 1
The height of the image to show is increased by one unit.
if (self.h == self.ih): 
self.timer = False
We stop the timer method when we draw the whole image on the GTK window.
cr.set_source_surface(self.image, 10, 10)
cr.mask_surface(self.ims, 10, 10)
The image of a castle is set as a source for painting. The mask_surface() paints the current source using the alpha channel of surface as a mask.
This chapter covered clipping and masking in PyCairo.
Continue Reading

PyCairo gradients

PyCairo gradients

In this part of the PyCairo tutorial, we will cover gradients. We will mention linear and radial gradients.
In computer graphics, gradient is a smooth blending of shades from light to dark or from one color to another. In 2D drawing programs and paint programs, gradients are used to create colorful backgrounds and special effects as well as to simulate lights and shadows. (answers.com)

Linear gradients

Linear gradients are blendings of colours or shades of colours along a line. They are represented by a cairo.LinearGradient class in PyCairo.
#!/usr/bin/python

'''
ZetCode PyCairo tutorial

This program works with linear
gradients in PyCairo.

author: Jan Bodnar
website: zetcode.com
last edited: August 2012
'''


from gi.repository import Gtk
import cairo


class Example(Gtk.Window):

def __init__(self):
super(Example, self).__init__()

self.init_ui()


def init_ui(self):

darea = Gtk.DrawingArea()
darea.connect("draw", self.on_draw)
self.add(darea)

self.set_title("Linear gradients")
self.resize(340, 390)
self.set_position(Gtk.WindowPosition.CENTER)
self.connect("delete-event", Gtk.main_quit)
self.show_all()


def on_draw(self, wid, cr):

self.draw_gradient1(cr)
self.draw_gradient2(cr)
self.draw_gradient3(cr)


def draw_gradient1(self, cr):

lg1 = cairo.LinearGradient(0.0, 0.0, 350.0, 350.0)

count = 1

i = 0.1
while i < 1.0:
if count % 2:
lg1.add_color_stop_rgba(i, 0, 0, 0, 1)
else:
lg1.add_color_stop_rgba(i, 1, 0, 0, 1)
i = i + 0.1
count = count + 1


cr.rectangle(20, 20, 300, 100)
cr.set_source(lg1)
cr.fill()


def draw_gradient2(self, cr):

lg2 = cairo.LinearGradient(0.0, 0.0, 350.0, 0)

count = 1

i = 0.05
while i < 0.95:
if count % 2:
lg2.add_color_stop_rgba(i, 0, 0, 0, 1)
else:
lg2.add_color_stop_rgba(i, 0, 0, 1, 1)
i = i + 0.025
count = count + 1

cr.rectangle(20, 140, 300, 100)
cr.set_source(lg2)
cr.fill()


def draw_gradient3(self, cr):

lg3 = cairo.LinearGradient(20.0, 260.0, 20.0, 360.0)
lg3.add_color_stop_rgba(0.1, 0, 0, 0, 1)
lg3.add_color_stop_rgba(0.5, 1, 1, 0, 1)
lg3.add_color_stop_rgba(0.9, 0, 0, 0, 1)

cr.rectangle(20, 260, 300, 100)
cr.set_source(lg3)
cr.fill()


def main():

app = Example()
Gtk.main()


if __name__ == "__main__":
main()
The example draws three rectangles filled with linear gradients.
lg3 = cairo.LinearGradient(20.0, 260.0,  20.0, 360.0)
Here we create a linear gradient. The parameters specify the line, along which we draw the gradient. Here it is a horizontal line.
lg3.add_color_stop_rgba(0.1, 0, 0, 0, 1) 
lg3.add_color_stop_rgba(0.5, 1, 1, 0, 1)
lg3.add_color_stop_rgba(0.9, 0, 0, 0, 1)
We define colour stops to produce our gradient pattern. In this case, the gradient is a blending of black and yellow colours. By adding two black and one yellow stops, we create a horizontal gradient pattern. What do these stops actually mean? In our case, we begin with black colour which will stop at 1/10 of the size. Then we begin to gradually paint in yellow, which will culminate at the center of the shape. The yellow colour stops at 9/10 of the size, where we begin painting in black again, until the end.
Linear gradients
Figure: Linear gradients

Radial gradients

Radial gradients are blendings of colours or shades of colours between two circles. The cairo.RadialGradient class is used to create radial gradients in PyCairo.
#!/usr/bin/python

'''
ZetCode PyCairo tutorial

This program works with radial
gradients in PyCairo.

author: Jan Bodnar
website: zetcode.com
last edited: August 2012
'''


from gi.repository import Gtk
import cairo
import math


class Example(Gtk.Window):

def __init__(self):
super(Example, self).__init__()

self.init_ui()


def init_ui(self):

darea = Gtk.DrawingArea()
darea.connect("draw", self.on_draw)
self.add(darea)

self.set_title("Radial gradients")
self.resize(300, 200)
self.set_position(Gtk.WindowPosition.CENTER)
self.connect("delete-event", Gtk.main_quit)
self.show_all()


def on_draw(self, wid, cr):

self.draw_gradient1(cr)
self.draw_gradient2(cr)


def draw_gradient1(self, cr):

cr.set_source_rgba(0, 0, 0, 1)
cr.set_line_width(12)

cr.translate(60, 60)

r1 = cairo.RadialGradient(30, 30, 10, 30, 30, 90)
r1.add_color_stop_rgba(0, 1, 1, 1, 1)
r1.add_color_stop_rgba(1, 0.6, 0.6, 0.6, 1)
cr.set_source(r1)
cr.arc(0, 0, 40, 0, math.pi * 2)
cr.fill()

cr.translate(120, 0)


def draw_gradient2(self, cr):

r2 = cairo.RadialGradient(0, 0, 10, 0, 0, 40)
r2.add_color_stop_rgb(0, 1, 1, 0)
r2.add_color_stop_rgb(0.8, 0, 0, 0)
cr.set_source(r2)
cr.arc(0, 0, 40, 0, math.pi * 2)
cr.fill()


def main():

app = Example()
Gtk.main()


if __name__ == "__main__":
main()
In the example, we draw two radial gradients.
r1 = cairo.RadialGradient(30, 30, 10, 30, 30, 90)
r1.add_color_stop_rgba(0, 1, 1, 1, 1)
r1.add_color_stop_rgba(1, 0.6, 0.6, 0.6, 1)
cr.set_source(r1)
cr.arc(0, 0, 40, 0, math.pi * 2)
cr.fill()
We draw a circle and fill its inside with a radial gradient. The radial gradient is defined by two circles. The add_color_stop_rgba()method defines the colours. We can experiment with the position of the circles or the length of their radius. In the first gradient example, we have created an object which resembles a 3D shape.
r2 = cairo.RadialGradient(0, 0, 10, 0, 0, 40)
r2.add_color_stop_rgb(0, 1, 1, 0)
r2.add_color_stop_rgb(0.8, 0, 0, 0)
cr.set_source(r2)
cr.arc(0, 0, 40, 0, math.pi * 2)
cr.fill()
In this example, the circles that define the radial gradient and the custom drawn circle have a common center point.
Radial gradients
Figure: Radial gradients
In this chapter we have covered PyCairo gradients.
Continue Reading

Shapes and fills in PyCairo

Shapes and fills in PyCairo

In this part of the PyCairo tutorial, we will create some basic and more advanced shapes. We will fill them with solid colors, patterns and gradients. Gradients will be covered in a separate chapter.

Basic shapes

PyCairo has some basic methods to create simple shapes.
def on_draw(self, wid, cr):

cr.set_source_rgb(0.6, 0.6, 0.6)

cr.rectangle(20, 20, 120, 80)
cr.rectangle(180, 20, 80, 80)
cr.fill()

cr.arc(330, 60, 40, 0, 2*math.pi)
cr.fill()

cr.arc(90, 160, 40, math.pi/4, math.pi)
cr.fill()

cr.translate(220, 180)
cr.scale(1, 0.7)
cr.arc(0, 0, 50, 0, 2*math.pi)
cr.fill()
In this example, we will create a rectangle, a square, a circle, an arc and an ellipse.
cr.rectangle(20, 20, 120, 80)
cr.rectangle(180, 20, 80, 80)
The rectangle() method is used to create both squares and rectangles. A square is just a specific type of a rectangle.
cr.arc(330, 60, 40, 0, 2*math.pi)
This line creates a circle.
cr.arc(90, 160, 40, math.pi/4, math.pi)
Here we draw an arc, a portion of a circle.
cr.scale(1, 0.7)
cr.arc(0, 0, 50, 0, 2*math.pi)
We use the scale() and the arc() methods to create an ellipse.
Basic Shapes
Figure: Basic Shapes
Other shapes can be created using a combination of basic primitives.
#!/usr/bin/python

'''
ZetCode PyCairo tutorial

This code example draws another
three shapes in PyCairo.

author: Jan Bodnar
website: zetcode.com
last edited: August 2012
'''

from gi.repository import Gtk
import cairo


class cv(object):

points = (
( 0, 85 ),
( 75, 75 ),
( 100, 10 ),
( 125, 75 ),
( 200, 85 ),
( 150, 125 ),
( 160, 190 ),
( 100, 150 ),
( 40, 190 ),
( 50, 125 ),
( 0, 85 )
)


class Example(Gtk.Window):

def __init__(self):
super(Example, self).__init__()

self.init_ui()


def init_ui(self):

darea = Gtk.DrawingArea()
darea.connect("draw", self.on_draw)
self.add(darea)

self.set_title("Complex shapes")
self.resize(460, 240)
self.set_position(Gtk.WindowPosition.CENTER)
self.connect("delete-event", Gtk.main_quit)
self.show_all()


def on_draw(self, wid, cr):

cr.set_source_rgb(0.6, 0.6, 0.6)
cr.set_line_width(1)

for i in range(10):
cr.line_to(cv.points[i][0], cv.points[i][1])

cr.fill()

cr.move_to(240, 40)
cr.line_to(240, 160)
cr.line_to(350, 160)
cr.fill()

cr.move_to(380, 40)
cr.line_to(380, 160)
cr.line_to(450, 160)
cr.curve_to(440, 155, 380, 145, 380, 40)
cr.fill()


def main():

app = Example()
Gtk.main()


if __name__ == "__main__":
main()
In this example, we create a star object, a triangle and a modified triangle. These objects are created using lines and one curve.
for i in range(10):
cr.line_to(cv.points[i][0], cv.points[i][1])

cr.fill()
The star is drawn by joining all the points that are in the points tuple. The fill() method fills the star object with the current colour.
cr.move_to(240, 40)
cr.line_to(240, 160)
cr.line_to(350, 160)
cr.fill()
These lines create a triangle. The last two points are automatically joined by PyCairo.
cr.move_to(380, 40)
cr.line_to(380, 160)
cr.line_to(450, 160)
cr.curve_to(440, 155, 380, 145, 380, 40)
cr.fill()
The modified triangle is a simple combination of two lines and one curve.
Comlex shapes
Figure: Complex shapes

Fills

Fills fill the interiors of shapes. Fills can be solid colors, patters or gradients.

Solid colours

A colour is an object representing a combination of Red, Green, and Blue (RGB) intensity values. PyCairo valid RGB values are in the range 0 to 1.
def on_draw(self, wid, cr):

cr.set_source_rgb(0.2, 0.23, 0.9)
cr.rectangle(10, 15, 90, 60)
cr.fill()

cr.set_source_rgb(0.9, 0.1, 0.1)
cr.rectangle(130, 15, 90, 60)
cr.fill()

cr.set_source_rgb(0.4, 0.9, 0.4)
cr.rectangle(250, 15, 90, 60)
cr.fill()
In the example we draw four coloured rectangles
cr.set_source_rgb(0.2, 0.23, 0.9)
cr.rectangle(10, 15, 90, 60)
cr.fill()
The set_source_rgb() method sets the source to an opaque color. The parameters are the Red, Green, Blue intensity values. The source is used to fill the interior of a rectangle by calling the fill() method.
Solid colors
Figure: Solid colors

Patterns

Patterns are complex graphical objects that can be used to fill shapes.
#!/usr/bin/python

'''
ZetCode PyCairo tutorial

This program shows how to work
with patterns in PyCairo.

author: Jan Bodnar
website: zetcode.com
last edited: August 2012
'''


from gi.repository import Gtk
import cairo


class Example(Gtk.Window):

def __init__(self):
super(Example, self).__init__()

self.init_ui()
self.create_surpat()


def init_ui(self):

darea = Gtk.DrawingArea()
darea.connect("draw", self.on_draw)
self.add(darea)

self.set_title("Patterns")
self.resize(300, 290)
self.set_position(Gtk.WindowPosition.CENTER)
self.connect("delete-event", Gtk.main_quit)
self.show_all()


def create_surpat(self):

sr1 = cairo.ImageSurface.create_from_png("blueweb.png")
sr2 = cairo.ImageSurface.create_from_png("maple.png")
sr3 = cairo.ImageSurface.create_from_png("crack.png")
sr4 = cairo.ImageSurface.create_from_png("chocolate.png")

self.pt1 = cairo.SurfacePattern(sr1)
self.pt1.set_extend(cairo.EXTEND_REPEAT)
self.pt2 = cairo.SurfacePattern(sr2)
self.pt2.set_extend(cairo.EXTEND_REPEAT)
self.pt3 = cairo.SurfacePattern(sr3)
self.pt3.set_extend(cairo.EXTEND_REPEAT)
self.pt4 = cairo.SurfacePattern(sr4)
self.pt4.set_extend(cairo.EXTEND_REPEAT)


def on_draw(self, wid, cr):

cr.set_source(self.pt1)
cr.rectangle(20, 20, 100, 100)
cr.fill()

cr.set_source(self.pt2)
cr.rectangle(150, 20, 100, 100)
cr.fill()

cr.set_source(self.pt3)
cr.rectangle(20, 140, 100, 100)
cr.fill()

cr.set_source(self.pt4)
cr.rectangle(150, 140, 100, 100)
cr.fill()


def main():

app = Example()
Gtk.main()


if __name__ == "__main__":
main()
In this example we draw four rectangles. This time we fill them with some patterns. We use four pattern images from the Gimp image manipulation program. We must retain the original size of those patterns because we are going to tile them.
We create image surfaces outside the draw() method. It would not be efficient to read from harddisk each time the window needs to be redrawn.
sr1 = cairo.ImageSurface.create_from_png("blueweb.png")
An image surface is created from a PNG image.
self.pt1 = cairo.SurfacePattern(sr1)
self.pt1.set_extend(cairo.EXTEND_REPEAT)
A pattern is created from the surface. We set the mode to cairo.EXTEND_REPEAT which causes the pattern to be tiled by repeating.
cr.set_source(self.pt1)
cr.rectangle(20, 20, 100, 100)
cr.fill()
Here we draw our first rectangle. The set_source() method tells the Cairo context to use a pattern as a source for drawing. The image patterns may not fit exactly the shape. The rectangle() creates a rectangular path. Finally, the fill() method fills the path with the source.
This chapter covered PyCairo shapes and fills.
Continue Reading

Basic drawing in PyCairo

Basic drawing in PyCairo

In this part of the PyCairo tutorial, we will draw some basic primitives. We will draw simple lines, use fill and stroke operations, we will talk about dashes, line caps and line joins.

Lines

Lines are very basic vector objects. To draw a line, we use two method calls. The starting point is specified with the move_to() call. The ending point of a line is specified with the line_to() call.
#!/usr/bin/python

'''
ZetCode PyCairo tutorial

In this program, we connect all mouse
clicks with a line.

author: Jan Bodnar
website: zetcode.com
last edited: August 2012
'''


from gi.repository import Gtk, Gdk
import cairo


class MouseButtons:

LEFT_BUTTON = 1
RIGHT_BUTTON = 3


class Example(Gtk.Window):

def __init__(self):
super(Example, self).__init__()

self.init_ui()


def init_ui(self):

self.darea = Gtk.DrawingArea()
self.darea.connect("draw", self.on_draw)
self.darea.set_events(Gdk.EventMask.BUTTON_PRESS_MASK)
self.add(self.darea)

self.coords = []

self.darea.connect("button-press-event", self.on_button_press)

self.set_title("Lines")
self.resize(300, 200)
self.set_position(Gtk.WindowPosition.CENTER)
self.connect("delete-event", Gtk.main_quit)
self.show_all()


def on_draw(self, wid, cr):

cr.set_source_rgb(0, 0, 0)
cr.set_line_width(0.5)

for i in self.coords:
for j in self.coords:

cr.move_to(i[0], i[1])
cr.line_to(j[0], j[1])
cr.stroke()

del self.coords[:]


def on_button_press(self, w, e):

if e.type == Gdk.EventType.BUTTON_PRESS \
and e.button == MouseButtons.LEFT_BUTTON:

self.coords.append([e.x, e.y])

if e.type == Gdk.EventType.BUTTON_PRESS \
and e.button == MouseButtons.RIGHT_BUTTON:

self.darea.queue_draw()


def main():

app = Example()
Gtk.main()


if __name__ == "__main__":
main()
In our example, we click randomly on the window with a left mouse button. Each click is stored in a list. When we right click on the window, all points are connected with every other point in the list. This way we can create some interesting objects. Additional right click clears the window and we can create another object.
class MouseButtons:

LEFT_BUTTON = 1
RIGHT_BUTTON = 3
The GTK documentation simply states, that the left mouse button has number 1, right mouse button number 3. We create a custom class to have some indentifiers for the mouse buttons.
self.darea.set_events(Gdk.EventMask.BUTTON_PRESS_MASK)   
Some events are not enabled by default. Mouse press events are among them. Therefore, we need to enable mouse press events.
self.darea.connect("button-press-event", self.on_button_press)
In this code example, we will react to mouse press events.
cr.set_source_rgb(0, 0, 0)
cr.set_line_width(0.5)
The lines will be drawn in black ink and will be 0.5 points wide.
for i in self.coords:
for j in self.coords:

cr.move_to(i[0], i[1])
cr.line_to(j[0], j[1])
cr.stroke()
We connect every point from the list to every other point. The stroke() call draws the lines.
del self.coords[:]    
In the end, all the coordinates are deleted. We can now create another object.
def on_button_press(self, w, e):

if e.type == Gdk.EventType.BUTTON_PRESS \
and e.button == MouseButtons.LEFT_BUTTON:

self.coords.append([e.x, e.y])
...
If we press a left mouse button, we add its x, y coordinates to the self.coords list.
if e.type == Gdk.EventType.BUTTON_PRESS \
and e.button == MouseButtons.RIGHT_BUTTON:

self.darea.queue_draw()
In case of a right mouse button press, we call the queue_draw()method which redraws the drawing area. All the points are connected with lines.
Lines
Figure: Lines

Fill and stroke

The stroke operation draws the outlines of shapes and the fill operation fills the insides of shapes.
#!/usr/bin/python

'''
ZetCode PyCairo tutorial

This code example draws a circle
using the PyCairo library.

author: Jan Bodnar
website: zetcode.com
last edited: August 2012
'''


from gi.repository import Gtk
import cairo
import math


class Example(Gtk.Window):

def __init__(self):
super(Example, self).__init__()

self.init_ui()


def init_ui(self):

darea = Gtk.DrawingArea()
darea.connect("draw", self.on_draw)
self.add(darea)

self.set_title("Fill & stroke")
self.resize(230, 150)
self.set_position(Gtk.WindowPosition.CENTER)
self.connect("delete-event", Gtk.main_quit)
self.show_all()


def on_draw(self, wid, cr):

cr.set_line_width(9)
cr.set_source_rgb(0.7, 0.2, 0.0)

w, h = self.get_size()

cr.translate(w/2, h/2)
cr.arc(0, 0, 50, 0, 2*math.pi)
cr.stroke_preserve()

cr.set_source_rgb(0.3, 0.4, 0.6)
cr.fill()


def main():

app = Example()
Gtk.main()


if __name__ == "__main__":
main()
In our example, we will draw a circle and fill it with a solid color.
import math
This module is needed for the pi constant which is used to draw a circle.
cr.set_line_width(9)
cr.set_source_rgb(0.7, 0.2, 0.0)
We set a line width with the set_line_width() method. We set the source to some dark red colour using the set_source_rgb()method.
w, h = self.get_size()     
Here we get the width and height of the window. We will need these values to center the circle on the window.
cr.translate(w/2, h/2)
cr.arc(0, 0, 50, 0, 2*math.pi)
cr.stroke_preserve()
With the translate() method, we move the drawing origin to the center of the window. We want our circle to be centered. The arc() method adds a new circular path to the cairo drawing context. Finally, the stroke_preserve() method draws the outline of the circle. Unlike the stroke() method, it also preserves the shape for later drawing.
cr.set_source_rgb(0.3, 0.4, 0.6)
cr.fill()
We change a colour for drawing and fill the circle with a new colour using the fill() method.
Fill & stroke
Figure: Fill & stroke

Pen dashes

Each line can be drawn with a different pen dash. A pen dash defines the style of the line. The dash pattern is specifed by the set_dash()method. The pattern is set by the dash list which is a list of floating values. They set the on and off parts of the dash pattern. The dash is used by the stroke() method to create a line. If the number of dashes is 0, dashing is disabled. If the number of dashes is 1, a symmetric pattern is assumed with alternating on and off portions of the size specified by the single value in dashes.
def on_draw(self, wid, cr):

cr.set_source_rgba(0, 0, 0, 1)
cr.set_line_width(2)

cr.set_dash([4.0, 21.0, 2.0])

cr.move_to(40, 30)
cr.line_to(250, 30)
cr.stroke()

cr.set_dash([14.0, 6.0])

cr.move_to(40, 50)
cr.line_to(250, 50)
cr.stroke()

cr.set_dash([1.0])

cr.move_to(40, 70)
cr.line_to(250, 70)
cr.stroke()
We draw three lines in three different pen dashes.
cr.set_dash([4.0, 21.0, 2.0])
We have a pattern of three numbers. We have 4 points drawn, 21 not drawn and 2 drawn. Then 4 points not drawn, 21 points drawn and 2 not drawn. This pattern takes turns until the end of the line.
cr.set_dash([14.0, 6.0])
In this pattern, we have always 14 points drawn, 6 not drawn.
cr.set_dash([1.0])
Here we create a pen dash of a symmetric pattern of alternating single on and off points.
Pen dashes
Figure: Pen dashes

Line caps

The line caps are endpoints of lines.
  • cairo.LINE_CAP_BUTT
  • cairo.LINE_CAP_ROUND
  • cairo.LINE_CAP_SQUARE
There are three different line cap styles in Cairo.
Line caps
Figure: Square, round and butt caps
A line with a cairo.LINE_CAP_SQUARE cap will have a different size than a line with a cairo.LINE_CAP_BUTT cap. If a line is x units wide, the line with a cairo.LINE_CAP_SQUARE cap will be exactly x units greater in size. x/2 units at the beginning and x/2 units at the end.
def on_draw(self, wid, cr):

cr.set_source_rgba(0, 0, 0, 1)
cr.set_line_width(12)

cr.set_line_cap(cairo.LINE_CAP_BUTT)
cr.move_to(30, 50)
cr.line_to(150, 50)
cr.stroke()

cr.set_line_cap(cairo.LINE_CAP_ROUND)
cr.move_to(30, 90)
cr.line_to(150, 90)
cr.stroke()

cr.set_line_cap(cairo.LINE_CAP_SQUARE)
cr.move_to(30, 130)
cr.line_to(150, 130)
cr.stroke()

cr.set_line_width(1.5)

cr.move_to(30, 35)
cr.line_to(30, 145)
cr.stroke()

cr.move_to(150, 35)
cr.line_to(150, 145)
cr.stroke()

cr.move_to(155, 35)
cr.line_to(155, 145)
cr.stroke()
The example draws three lines with three different line caps. It will also graphically demonstrate the differences in size of the lines by drawing three additional thin vertical lines.
cr.set_line_width(12)
Our lines will be 12 units wide. The default line width is 2.
cr.set_line_cap(cairo.LINE_CAP_ROUND)
cr.move_to(30, 90)
cr.line_to(150, 90)
cr.stroke()
Here we draw a horizontal line with a cairo.LINE_CAP_ROUND cap.
cr.set_line_width(1.5)

cr.move_to(30, 35)
cr.line_to(30, 145)
cr.stroke()
This is one of the three vertical lines used to demostrate the differences in size.

Line caps
Figure: Line caps

Line joins

The lines can be joined using three different join styles.
  • cairo.LINE_JOIN_MITER
  • cairo.LINE_JOIN_BEVEL
  • cairo.LINE_JOIN_ROUND
Bevel, Round, Miter line joins
Figure: Bevel, Round, Miter line joins

def on_draw(self, wid, cr):

cr.set_line_width(14)

cr.rectangle(30, 30, 100, 100)
cr.set_line_join(cairo.LINE_JOIN_MITER)
cr.stroke()

cr.rectangle(160, 30, 100, 100)
cr.set_line_join(cairo.LINE_JOIN_BEVEL)
cr.stroke()

cr.rectangle(100, 160, 100, 100)
cr.set_line_join(cairo.LINE_JOIN_ROUND)
cr.stroke()
In this example, we draw three thick rectangles with various line joins.
cr.set_line_width(14)
The lines are 14 units wide.
cr.rectangle(30, 30, 100, 100)        
cr.set_line_join(cairo.LINE_JOIN_MITER)
cr.stroke()
Here we draw a rectangle with cairo.LINE_JOIN_MITER join style.
Line joins
Figure: Line joins
In this chapter of the PyCairo tutorial, we did some basic drawing.
Continue Reading