Showing posts with label gaming. Show all posts

Setup Multiple Network Interface in Windows 7

Setup Multiple Network Interface in Windows 7

Multiple Network connection means more than one connection in your operating system. This means connect to internet + Local Area Connection at the same time. I think this connection is easy in Windows Xp operating system. Here i discussed how it is possible in Windows 7.

For Broadband connection:

If you are using broadband connection then one internet IP and connection must be given by the client server Pc. Setup this in your Windows 7 operating system. Then your internet network connection is available.

For Edge Modem or Wireless Router connection:
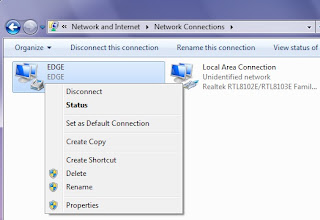
  • If you use Edge Modem or Wireless Router then first install the software with most recent version. After installing your Modem software connect to internet by click on connect. Now setup Local Area Connection. When you open your Pc it will automatically connect to Local Area Connection as Unidentified Network. Now dial your Internet connection. Right click on the network computer icon and open network and sharing center. Those two procedure shows in below.


  • Now click Change Adapter Settings then you see your two connection Edge + Local Area Connection. Your can desable or enable your connection from here. Shows below...


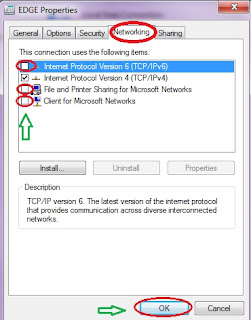
  • If you see there is some delay when you click network then go to your internet connection properties. Click networking and unchecked - shows below in picture...


  • Now you click network and see how fast your WorkGroup computer loads. When you need to browes your WorkGroup Pc click Network and it will loads fast.
Please feel free to comment on this article whether or not this article can help you.
Continue Reading

Setup Local Area Connection in Windows 7

Setup Local Area Connection in Windows 7

As you know Windows 7 is the newer version of windows and contains remarkable effect on every sector of operation. It works very smoothly. Now peoples are converting from Window Xp to Windows 7 or Vista to Windows 7. That's why they need to setup all the features they used in their older version of operating system. From this features Local Area Connection is one important setup. This article will help you to find how to setup Local Area Connection in Windows 7.

What is Local Area Connection:
LAN (Local Area Network) card will automatically install when you setup windows 7. LAN connection is required when you want to share your pc with others in your HomeGroup. Supposes you have two Laptop/Pc and you want to connect them for some purpose say playing multiplayer games (Cod 1,Cod 2,Cod4,Cod5 etc) or to access another Pc ,just setup Local Area Connection. You can also connect your Pc to your friends Pc no meter how far the distance ,connect them with cable connection.
Procedure of setup Local Area Connection:
  • Crete WorkGroup:
  1. Go to my computer properties.
  2. Click change settings.
  3. See
  4. Type your Computer name and WorkGroup
  5. This message will appear
  6. Restart your computer then your WorkGroup will be created.
  • Give your IP Address:
  1. Go to control panel
  2. Click Network And Internet
  3. Click Network And Sharing Center
  4. Click HomeGroup
  5. Click Advance Sharing Setting
  6. There are two types: Home to work, Public
  7. From Home to work select >Turn on Network Discovery >Turn on file and printer sharing >Turn on public folder sharing..... >Enable file sharing for device........ >Allow windows to manage.....
  8. From Public select >Turn on Network Discovery >Turn on file and printer sharing >Turn on public folder sharing..... >Enable file sharing for device........ >Turn off password protected sharing.
  9. Click change Adapter Setting (Top left side of the window)
  10. You will find this
  11. Plug your cable and then find this
  12. Now setup your IP. Right click on Local Area Connection go to properties.
  13. Double click Internet protocol version 4 (TCP/IPv4) Or click properties
  14. Click Use the following IP address
  15. IP address:Give your IP address
  16. Subnet mask: Just press tab it will automatically generate (Default-255.255.255.0)
  17. Click use the following DNS server address.
  18. Click ok.
Finally all setting comes to an end. Now you can easily connect or disconnect your Local Area Connection. Remember follow the same procedure otherwise you will repeat a circular loop and can't move forward. Just follow this procedure i think you can setup Local Area Connection within a minute.

Please feel free to comment on this article whether or not this article can help you. See Multiple Network connection Edge Modem + Local Area Connection how these two act at the same time in Windows 7.
Continue Reading

Set up Home or LAN network cable connection

Set up Home or LAN network cable connection

Generally LAN cables are called Unshielded Twisted Pair. There are two cable systems.
  1. Straight cable.
  2. Crossed cable.
The straight and crossed cable systems are shown below:


Colour coding for straight cable:
Straight colour systems are used to connect PC to Hub or Hub to PC. Insert the wire into the connector. Hold both connectors face same. See below.


You have to follow a colour coding system to connect the wire into each port of the connector. There are eight ports in the connector. Colour coding is shown below.
Both End:


Colour coding for crossed cable system:
Crossed cable systems are used to connect PC to PC or Hub to Hub. You have to follow a colour coding system to connect the wire into each port of the connector.
The system is shown below.
One End:
Other End:

By using this method you can successfully connect your LAN connection. Don’t forget straight and crossed cable system. Connect your PC and Laptop by using straight cable system. Laptop’s motherboard usually consists of LAN slot, just buy a LAN card for your desktop. Buy a cable and two connectors; join them through straight cable system. When you need to connect more than two PC, buy a hub or switch or any other equipment and some cables and connectors and combine them as discussed.
After all the connection was set, it is required to configure LAN and Internet connection. How to configure LAN and internet connection will be discussed in my next article.
Continue Reading

Wireless Router configuration for Home users

Wireless Router configuration for Home users

Hello evryone, many of you get stuck up configuring your router to work with your wired internet. A Wireless router is an amazing thing you hold an Ipad, Ipod, A cellphone with wifi capabilities and of course the good old laptop, as it let us surf web, downloads music and vids or even stream them wireless on upto 27 devices simultaneously , depending upon your internet speed and router type.

So lets begin to configure a wifi router with a most common type of internet connection that is a dialup or pppOe type. First of all i recommend you to note down a few things in a notepad or a piece paper. The router which i will be configuring is a DLINK DIR-300. Don't worry most of these settings are common except for some similar English terms.


Things which need to be listed:

1.> MAC id of the current networking device such as wired ethernet card by typing in command "get mac" or "ipconfig /all".

2.> Your username and password which you use to connect to the internet.
also some need a "service name" too to be mentioned.

3.> Your ip address if given statically, leave this if you dont have an ip address provided by your service provider. To find ip address use "ipconfig /all" command.

4.> Some patience :)


a.> First of all connect your internet cable on to the internet port at the back of the router, some router name it as DSL or WEB port.

b.> Now switch ON your router and wait till the the wireless transmission begins and also it it is discoverable on your pc/laptop.


c.> It should display your brand name in the network, such as belkin, dlink , netgear etc. which is a unsecured network ofcourse.

d.> Connect to this network (DO NOT SAVE THIS NETWORK IN YOUR COMPUTER) and open a browser to type : "192.168.0.1" (w/o quotes)
and hit "Enter". Some routers use 192.168.1.1 or 192.168.2.1 (check manual).

e.> This ip address is of your router and is not accessible through internet.This should open up a page like this.


f.> A router may show a login screen to enter username and password. Check them in your manual for default values.

g.> The above steps are very much same for all brands of routers.

h.> Now choose "Manual internet connection" button to see configuration window.


i.> Enter the username and password and ip adresses and dns adress if provided and save this.

j.> Now under "wireless setup" You should configure your SSId and security as follows:


and save the settings.

k.> Right after saving the settings, you will notice that you are not able to view the same page again, or you will not be able to access the router. thats because your network name(ssid) has changed and also has security added to it.

l.> All you have to do this is now wait for your new network name to come and connect to it by giving the key which you have set to secure this w/l network.

m.> Congratulations!! you are now online with wireless network. No need to have any kind of dialer or application in windows to connect to internet. The router itself connects to the internet when it see's demand for it.

n.> If you are still facing problems with connection let me know them please :).
Continue Reading

Step By Step Guide To Create Home Network

Step By Step Guide To Create Home Network


These days it is becoming very common that in a household there are more than one computer. Instead of using them individually you can connect them together and create a Local Area Network (LAN). There are many advantages of LAN network. Here is a tutorial on LAN and steps to create a network.
To create a LAN you may need to spend some money and spend a few hours working on it. But if you do it once then you can enjoy the benefits of LAN for the rest of your life.
Benefits and advantages of LAN
  1. You can share files and information between computers. You can share the documents, audio, video and image files with other computer users in the network and similarly access their files from their computers.
  2. You can share hardware devices such as laser printer, DVD writer between computers. So you do not have to buy these hardware for every computer. If one of the computer has, then the other computers can use this.
  3. You can share the single internet connection. You can just pay for one internet connection while all your computers can share the same internet connection through the LAN.

Types of Networks
  • There are four types of network namely Wired network, wireless network, hybrid network and powerline network. Let us discuss each of them very briefly
  • Wired – As the name suggests, the computers in wired network are connected using wires. For this, coaxial cables and UTP cables are used. 10/100 ethernet cards can be used. Network card or network adapter (NIC: Network Interface Card) has to be installed on all computers in the network. 10/100 implies 10MBPS or 100 MBPS speed. Gigabit cards are also available in the market.
  • The advantage of Wired network is it is fast, cheap and easy to create. You need a hub, switch or router. The disadvantage of wired network is that the wires have to be laid from these switches to each individual computer in the network.

  • Wireless network does not need any cables. It is easy to install. However it is quite expensive. There are limitations in the distance and there are security problems in wi-fi.
  • Considering the pros and cons of wired and wireless networks, connecting some computers through wires and some computers wirelessly is called hybrid network.
  • It is possible to send data through electrical wires. Powerline network was invented based on the concept that there is no need for a separate cable to carry data. It is not so popular in many countries.

Steps to create a LAN (Wired network)
  1. First install the network card’s driver software in all the computers. You can refer to the manual of the network card.
  2. Shutdown the computer and unplug the power connection.
  3. Open the computer’s cabinet.
  4. Touch an object such as metal pipe and release the static current from your body.
  5. Look for a free PCI slot in your motherboard. Remover the slot cover from the cabinet near the free PCI slot and insert the network card into the PCI slot firm and tight and secure it with screws.
  6. Close the cabinet, insert the power cable and start your computer. Windows will detect the network card. Now it will prompt for the driver. Use the network card’s CD and install the driver.
  7. Now connect the network Switch to the power cable and switch on.
  8. Use the UTP (Network cable) to connect your computer’s network card and the switch.
  9. Similarly connect the second computer to the switch.
  10. Now in Windows, star the Network setup wizard. In Windows XP, click Start->my network places and then select ‘Setup a home or small office network‘ link. This will open the wizard. Just follow the instructions in the wizard and complete the steps in the wizard

Congratulations. Your home network is ready to use.
Continue Reading

Play multiplayer games via LAN and WLAN

Play multiplayer games via LAN and WLAN

you can play games with LAN and WLAN. This tutorial will Guide you How to play using LAN/WAN and if you do not have any knowledge about connections refer these two tutorials.

* Build your own network via Wireless LAN
* Build your own network at home


Build your own network via Wireless LAN
WLAN technology


wireless Local area network.
The complete networking here is done with no wires involved. These are basically computers which covers a wider or a broader area. It is helpline where people or users from one organization want to access the computers of other organization. These are few steps by which you will learn to network via WAN.

1. If you have a laptop then no problem as in desktops there is no Wi-Fi service.(recommended laptop)
2. Switch on the Wireless LAN of the laptops you want to connect.
3. In this you will have to create a server to which the other laptops will connect.
4. for creating a server go to control panel>Wireless Network Setup Wizard.
5. Give the desired network name and for security you can either manually assign or an automatic facility is also provided.


In case of manual assigning the key should be exactly 5 or 13 char long. Ones done with this, insert a pen drive and copy the file which you have generated through the wizard.


Your server is created.


Ip Address Assigning

1. After this process the next part is of assigning of ip addresses.
2. Go to Start>Control panel>Network Connections>right click on Wireless Area Connection>properties> (TCP/IP)>properties.
3. click on Use the following IP address: the next step is to put IP addresses.
4. Remember you have to put IP addresses ranging from 1 to 254 only.
5. For instance you can put


IP address: 192.168.1.1
subnet mask:255.255.255.0 (will appear by default)
Default gateway: put same as IP address
.

(Done for the 1st pc)


Follow the same steps for the second PC but here you Just have to change the IP address, for instance you can keep it 192.168.1.2 and the other two kept same.Save the settings for both the computer. To test whether the network is working fine you can go to cmd and type in “ping ip” without quotes. If you get a reply, then your network is setup successfully.


pinging a computer

The entire game play here is done with the help of routers, switches etc


  Build your own network at home

Now Tutorial on How to built a network via LAN

* LAN Cable with rj45 connectors
* Computers between the networking is to be done.

RJ45 is basically called as Register Jacket. It is a piece of plastic bound with different types of wires in a particular and sequential range for the purpose of running of different applications. This jack helps to enable you to to ping with the other node


Entire networking is based on the TCP/IP ports explained in my previous posts. Each computers should be provided with its individual IP address. IP address are basically classified in 3 types A, B, C

ranging from 1 to 255. This range is as follows.

Class A- 0 to 127

Class B- 128 to 191

Class C- 192 to 223


A local area network gives networking features to the computers in close distance with each other in an office,school, building etc.However a LAN can be connected to many LANs based on a varied distance using telephone lines, radio waves.Here are some steps which can help you to built a network at your home on your own.

* The first and the basic step before setting up a network is to check whether LAN drivers are successfully installed on both the computers.
* Then you have to insert both the connectors on the respective computers rj45 ports.
* Ones you are done with it, the next part is of assigning IP addresses.
* Go to Start>Control panel>Network Connections>right click on Local Area Connection>properties> (TCP/IP)>properties.
* click on Use the following IP address: the next step is to put IP addresses.
* Remember you have to put IP addresses ranging from 1 to 254 only.
* For instance you can put:

IP address: 192.168.1.1
subnet mask:255.255.255.0 (will appear by default)
Default gateway: put same as IP address.


(done for the 1st pc)


Follow the same steps for the second PC bt here you Just have to change the IP address, for instance you can keep it 192.168.1.2 and the other two kept same.Save the settings for both the computer. To test whether the network is working fine you can go to cmd and type in “ping ip” without quotes. If you get a reply, then your network is setup successfully.


Pinging a Computer in my network

ipconfig command is used to get your ip address and other connection details.

Sharing is very important, for a successful usage of documents between two computers. This process is very simple.

Just right click on the folder you want to share, go to sharing and security, and just allow the folder to be shared. Finish it, now you can access the folder on other computer from My Network Places else you also have a another trick to do it, as you have to go to StartMenu> Run and type there \\ip of the computer on the network you want to access. When you type this command, it will eventually show you the shared files on the network. After this process you can access all the files shared on the network just as shown in below pic.


Continue Reading

Play LAN Games Using Hamachi

Play LAN Games Using Hamachi

I will show you how to play LAN games with your friends using the Hamachi software.


First download Hamachi from hamachi.en.softonic.com and install it.


How to create new network using Hamachi?


There are three icons that show up along the bottom of the rectangular menu. Clicking on the triangular icon opens up the networking menu, where you can join a network if you have the proper information or set one up.
Click on triangular icon -> create new network


Type name of server and password


Click Create

How to join to hamachi network ?

Click on triangular icon – > join existing network


Enter the name and pasword of network that you want to join


How to play counter strike through Hamachi ?

To host a Counter Strike game:

  • Turn off or disable your firewall when you play using hamachi. If you are using the Windows firewall, remember to turn it off from the Control Panel.
  • Run Hamachi. Click the last button and choose Preferences. Then click Window and check the Show “Advanced…” peer menu item checkbox and click OK.


  • You must open ports go to control panel then to windows firewall and exceptions and select hlds then click on add port.


  • In name type CS in port number type port 28010, select UDP , click OK 


  • Run hdls Launcher ( C:\Program Files\Counter-Strike 1.6) , type information as shown below, just use your server name and password, click Start server


For every new player who joins your networks you have to do the following steps:

  • Right click the player’s entry in Hamachi, click Advanced. In the Peer VPN alias box enter the first three parts of your Hamachi IP address (example: 5.109.111) and add the last part of the player’s IP address ( example: .59) so that it makes a new IP address.Click OK and then exit Hamachi. Launch Hamachi again.


  • When you finish that call your friend to join your hamachi network and do not give them ip addres of server (192.168.x.x) give them your hamachi ip then when they want to connect to your server in ther CS console( to run console press ~) type connect 5.101.x.x : your port :28010 and hit enter 


To join a Counter Strike game:

  • Turn off your firewall (or disable it). Remember to turn it back on after you finish playing.Run Counter strike. Press the ~ key on the keyboard. It is to the left of the 1 key on the top row of the keyboard.

         Type connect hamachi ip :port to connect
         For example:


The game will connect and you can start playing.
Continue Reading

Configure MinGW on Eclipse C++ IDE

Configure MinGW on Eclipse C++ IDE

Follow below steps to setup MinGw on eclipse C++ IDE and to get started with First "Hello World" program.

Step 1 : Downloading Eclipse C++ IDE

 Download Eclipse C++ IDE from official eclipse web site or install CDT plugin for you existing eclipse IDE

Step 2 : Downloading and configuring MinGw and MSYS.

You need to download 2 packages
1.MinGw
It does not have the complete package, just a installer. While installing you need internet connection to download packages.
Some times downloading packages may fail for some reason. If you encounter this situation download a off line installer from below link
Once you are done with installing add the installation path bin directory to your s/m variable.
Eg: If your installation directory is "C:\MinGw\" add "C:\MinGw\bin" to PATH environment variable.
How to add BIN Directory to PATH env variable ?
Go to Control Panel -> System and Security -> System -> Advanced System
Settings (off on left side of window) -> Environment Variables (button near
bottom).Select the System Variable named Path and Click Edit. Add bin directory location to the end, not forgetting the semicolon at the beginning.
Eg:  "; C:\MinGw\bin"

Why to add MinGW BIN directory to PATH Environment variable?
If you dont add MinGw bin directory to PATH env variable the executables of MinGW will be only accessed with its folder  i.e. within "C:\MinGw\".To make the executables global and to allow other programs to use it we should add BIN directory to path env variable.
Check Point 
Once you have added bin directory to PATH env variable ,you can test it by typing "gcc --version" in command prompt.It you get "gcc not found" go to your installation directory by giving "cd C:\MinGw\" command and again type "gcc --version" if you could see the version then you have not added bin directory to path properly. If you still get "gcc not found" then you have not installed MinGw properly.  

2.MSYS
Download and install MSYS from above link. After installation it will ask for MinGw directory location .Give correct location and installation will be completed.
Add MSYS BIN directory to PATH env variable as you have done for MinGW.
Check Point  

To test whether installation is success or not type "mingw32-make" in cmd line .If you get "No Target Specified" then you installation is success .If you get "mingw32-make not found " then either you have not added bin folder to PATH variable or not installed MSYS properly.

Step 3 : Configure Eclipse C++ IDE 

Open Eclipse C++ IDE .Choose new C project. Uncheck "Show project types and tool chains only if they are supported".Now you can see "MinGW CC" in tool chains list .
Select "Makefile project" from project types list and "MinGW CC" from tools chain list and click finish.

Check Point
Once project is shown on project explorer list go to project properties(right click on project -> properties).In C/C++ build tab uncheck "use default build command" and give "mingw32-make" as build command.

Step 4 : Building and execution "Hello World" C program.

Create a new C file(helloworld.c) and add following lines.
#include
#include
void main()
{
      printf("Hello World");
     
}
Create a new file(makefile) and add following lines
all:
            gcc -o Helloworld.exe helloworld.c
Build the project by clicking "hammer" icon from tools menu.
You can see following log in console
**** Build of configuration MinGW GCC for project HelloWorld ****
 ****  WARNING: The "MinGW GCC" Configuration may not build  ****
****  because it uses the "cdt.managedbuild.toolchain.gnu.mingw.base"  ****
****  tool-chain that is unsupported on this system.  ****
****  Attempting to build...  ****
make all
gcc -o Helloworld.exe helloworld.c "
Click play button to run the program. You will see "Hello world " on the console.
Please provide comments if you are facing any issues.I will try to solve them .

Happy Programming !!!!
Continue Reading

Setup NFS most wanted LAN gaming

Setup NFS most wanted LAN gaming

Here is a detailed tutorial on how to setup NFS most wanted LAN gaming. I will start with my experience and the errors I came across while setup this game on LAN. In my college we had to organize an event on lan gaming .so we decide to go with CS and NFS .Everything went well with CS but when we setup NFS on lan we got an error while creating a server and the error is “connection lost with the server”. I browsed so many websites to find solution to this problem but none had provided any tutorial. I searched for more than 4 hours ,finally I could find solution to this problem .Here is a step by step procedure to setup NFS MW lan gaming .


Tutorial
Step1: Install NFS mw on all computers connected through lan.
Step2: To play game on lan we need to make one computer as a server. so run game in any one computer .
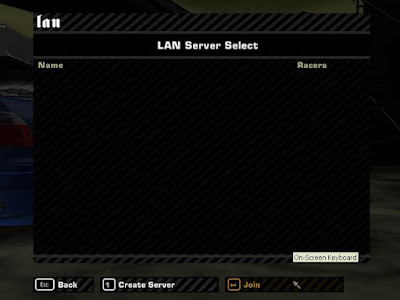
Step3: Then in the game main menu select lan game.

Step4 :click on create a server.


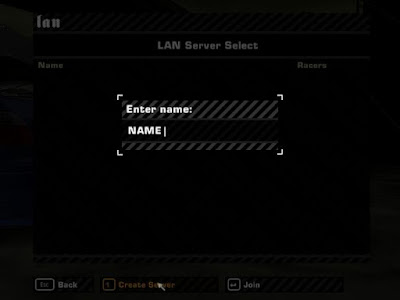
Step5: Enter game server name and then press enter
Step6:Here you may get an error stated ” connection lost with the server” .if you don’t get this error skip this step
This error occurs due to incorrect ip setting .follow this steps to remove this error


Server computer ip configuration (computer in which you have created the game server)
IP address:10.0.0.2 (this may be different in your computer)
Subnet mask:255.255.255.0(this may be different in your computer)
Default gateway:10.0.0.1(this may be different in your computer)
DNS server:10.0.0.1(this may be different in your computer)
All the other computers should have the same subnet mask, default gateway and dns server and a different ip address.
other computer ip configuration
IP address: 10.0.0.3 (assign different ip addresses for all other computers)
Subnet mask:255.255.255.0
Default gateway:10.0.0.1
DNS server:10.0.0.1
Then again try to create a server ,now you will not see any error and you will enter into nsf mw lan main menu .If you still see the error then you made an incorrect ip setting .read step6 again.
Step7:
Then in LAN main menu select create game .select the circuit and minimum number of players .Then ask all other computer players to join the game
Step8:How other computers will join the game?
All the other computers should run the game and select lan game from the nfs main menu.Then it will search for lan server and display the name of the server which you have created in the game server computer .if you could not see any server then go through step6 and make sure that every thing is correct and there is a connection between server and the other computers in lan.
Step9:

I cant see the name of the server because I am in the game server computer. all other computers connected through lan will see the name of the game server created .select and click on join.

Step10:


then you will enter into lan main menu click on quick race and select same circuit which was selected by server computer.
DONE now enjoy the lan gaming
Continue Reading