Showing posts with label wxPython. Show all posts

Step By Step wxPython tutorial

wxPython tutorial

This is wxPython tutorial. In this tutorial, you will learn the basics of GUI programming in wxPython. The tutorial is suitable for beginners and intermediate programmers.

Table of contents

wxPython

wxPython is a cross platform toolkit for creating desktop GUI applications. With wxPython developers can create applications on Windows, Mac and on various Unix systems. wxPython is a wrapper around wxWidgets, which is a mature cross platform C++ library.

E-book

A unique e-book covering advanced features of wxPython:
Advanced wxPython tutorial
Continue Reading

Tetris game clone in wxPython

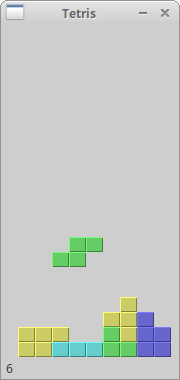
The Tetris game in wxPython

The Tetris game is one of the most popular computer games ever created. The original game was designed and programmed by a Russian programmer Alexey Pajitnov in 1985. Since then, tetris is available on almost every computer platform in lots of variations. Even my mobile phone has a modified version of the Tetris game.
Tetris is called a falling block puzzle game. In this game, we have seven different shapes called tetrominoes. S-shape, Z-shape, T-shape, L-shape, Line-shape, MirroredL-shape and a Square-shape. Each of these shapes is formed with four squares. The shapes are falling down the board. The object of the tetris game is to move and rotate the shapes, so that they fit as much as possible. If we manage to form a row, the row is destroyed and we score. We play the Tetris game until we top out.
Tetrominoes
Figure: Tetrominoes
wxPython is a toolkit designed to create applications. There are other libraries which are targeted at creating computer games. Nevertheless, wxPython and other application toolkits can be used to create games.

The development

We do not have images for our tetris game, we draw the tetrominoes using the drawing API available in the wxPython programming toolkit. Behind every computer game, there is a mathematical model. So it is in Tetris.
Some ideas behind the game.
  • We use wx.Timer to create a game cycle
  • The tetrominoes are drawn
  • The shapes move on a square by square basis (not pixel by pixel)
  • Mathematically a board is a simple list of numbers
The following example is a modified version of the tetris game, available with PyQt4 installation files.
#!/usr/bin/python

# tetris.py

import wx
import random

class Tetris(wx.Frame):
def __init__(self, parent, id, title):
wx.Frame.__init__(self, parent, id, title, size=(180, 380))

self.statusbar = self.CreateStatusBar()
self.statusbar.SetStatusText('0')
self.board = Board(self)
self.board.SetFocus()
self.board.start()

self.Centre()
self.Show(True)


class Board(wx.Panel):
BoardWidth = 10
BoardHeight = 22
Speed = 300
ID_TIMER = 1

def __init__(self, parent):
wx.Panel.__init__(self, parent)

self.timer = wx.Timer(self, Board.ID_TIMER)
self.isWaitingAfterLine = False
self.curPiece = Shape()
self.nextPiece = Shape()
self.curX = 0
self.curY = 0
self.numLinesRemoved = 0
self.board = []

self.isStarted = False
self.isPaused = False

self.Bind(wx.EVT_PAINT, self.OnPaint)
self.Bind(wx.EVT_KEY_DOWN, self.OnKeyDown)
self.Bind(wx.EVT_TIMER, self.OnTimer, id=Board.ID_TIMER)

self.clearBoard()

def shapeAt(self, x, y):
return self.board[(y * Board.BoardWidth) + x]

def setShapeAt(self, x, y, shape):
self.board[(y * Board.BoardWidth) + x] = shape

def squareWidth(self):
return self.GetClientSize().GetWidth() / Board.BoardWidth

def squareHeight(self):
return self.GetClientSize().GetHeight() / Board.BoardHeight

def start(self):
if self.isPaused:
return

self.isStarted = True
self.isWaitingAfterLine = False
self.numLinesRemoved = 0
self.clearBoard()

self.newPiece()
self.timer.Start(Board.Speed)

def pause(self):
if not self.isStarted:
return

self.isPaused = not self.isPaused
statusbar = self.GetParent().statusbar

if self.isPaused:
self.timer.Stop()
statusbar.SetStatusText('paused')
else:
self.timer.Start(Board.Speed)
statusbar.SetStatusText(str(self.numLinesRemoved))

self.Refresh()

def clearBoard(self):
for i in range(Board.BoardHeight * Board.BoardWidth):
self.board.append(Tetrominoes.NoShape)

def OnPaint(self, event):

dc = wx.PaintDC(self)

size = self.GetClientSize()
boardTop = size.GetHeight() - Board.BoardHeight * self.squareHeight()

for i in range(Board.BoardHeight):
for j in range(Board.BoardWidth):
shape = self.shapeAt(j, Board.BoardHeight - i - 1)
if shape != Tetrominoes.NoShape:
self.drawSquare(dc,
0 + j * self.squareWidth(),
boardTop + i * self.squareHeight(), shape)

if self.curPiece.shape() != Tetrominoes.NoShape:
for i in range(4):
x = self.curX + self.curPiece.x(i)
y = self.curY - self.curPiece.y(i)
self.drawSquare(dc, 0 + x * self.squareWidth(),
boardTop + (Board.BoardHeight - y - 1) * self.squareHeight(),
self.curPiece.shape())


def OnKeyDown(self, event):
if not self.isStarted or self.curPiece.shape() == Tetrominoes.NoShape:
event.Skip()
return

keycode = event.GetKeyCode()

if keycode == ord('P') or keycode == ord('p'):
self.pause()
return
if self.isPaused:
return
elif keycode == wx.WXK_LEFT:
self.tryMove(self.curPiece, self.curX - 1, self.curY)
elif keycode == wx.WXK_RIGHT:
self.tryMove(self.curPiece, self.curX + 1, self.curY)
elif keycode == wx.WXK_DOWN:
self.tryMove(self.curPiece.rotatedRight(), self.curX, self.curY)
elif keycode == wx.WXK_UP:
self.tryMove(self.curPiece.rotatedLeft(), self.curX, self.curY)
elif keycode == wx.WXK_SPACE:
self.dropDown()
elif keycode == ord('D') or keycode == ord('d'):
self.oneLineDown()
else:
event.Skip()


def OnTimer(self, event):
if event.GetId() == Board.ID_TIMER:
if self.isWaitingAfterLine:
self.isWaitingAfterLine = False
self.newPiece()
else:
self.oneLineDown()
else:
event.Skip()


def dropDown(self):
newY = self.curY
while newY > 0:
if not self.tryMove(self.curPiece, self.curX, newY - 1):
break
newY -= 1

self.pieceDropped()

def oneLineDown(self):
if not self.tryMove(self.curPiece, self.curX, self.curY - 1):
self.pieceDropped()


def pieceDropped(self):
for i in range(4):
x = self.curX + self.curPiece.x(i)
y = self.curY - self.curPiece.y(i)
self.setShapeAt(x, y, self.curPiece.shape())

self.removeFullLines()

if not self.isWaitingAfterLine:
self.newPiece()


def removeFullLines(self):
numFullLines = 0

statusbar = self.GetParent().statusbar

rowsToRemove = []

for i in range(Board.BoardHeight):
n = 0
for j in range(Board.BoardWidth):
if not self.shapeAt(j, i) == Tetrominoes.NoShape:
n = n + 1

if n == 10:
rowsToRemove.append(i)

rowsToRemove.reverse()

for m in rowsToRemove:
for k in range(m, Board.BoardHeight):
for l in range(Board.BoardWidth):
self.setShapeAt(l, k, self.shapeAt(l, k + 1))

numFullLines = numFullLines + len(rowsToRemove)

if numFullLines > 0:
self.numLinesRemoved = self.numLinesRemoved + numFullLines
statusbar.SetStatusText(str(self.numLinesRemoved))
self.isWaitingAfterLine = True
self.curPiece.setShape(Tetrominoes.NoShape)
self.Refresh()


def newPiece(self):
self.curPiece = self.nextPiece
statusbar = self.GetParent().statusbar
self.nextPiece.setRandomShape()
self.curX = Board.BoardWidth / 2 + 1
self.curY = Board.BoardHeight - 1 + self.curPiece.minY()

if not self.tryMove(self.curPiece, self.curX, self.curY):
self.curPiece.setShape(Tetrominoes.NoShape)
self.timer.Stop()
self.isStarted = False
statusbar.SetStatusText('Game over')

def tryMove(self, newPiece, newX, newY):
for i in range(4):
x = newX + newPiece.x(i)
y = newY - newPiece.y(i)
if x < 0 or x >= Board.BoardWidth or y < 0 or y >= Board.BoardHeight:
return False
if self.shapeAt(x, y) != Tetrominoes.NoShape:
return False

self.curPiece = newPiece
self.curX = newX
self.curY = newY
self.Refresh()
return True


def drawSquare(self, dc, x, y, shape):
colors = ['#000000', '#CC6666', '#66CC66', '#6666CC',
'#CCCC66', '#CC66CC', '#66CCCC', '#DAAA00']

light = ['#000000', '#F89FAB', '#79FC79', '#7979FC',
'#FCFC79', '#FC79FC', '#79FCFC', '#FCC600']

dark = ['#000000', '#803C3B', '#3B803B', '#3B3B80',
'#80803B', '#803B80', '#3B8080', '#806200']

pen = wx.Pen(light[shape])
pen.SetCap(wx.CAP_PROJECTING)
dc.SetPen(pen)

dc.DrawLine(x, y + self.squareHeight() - 1, x, y)
dc.DrawLine(x, y, x + self.squareWidth() - 1, y)

darkpen = wx.Pen(dark[shape])
darkpen.SetCap(wx.CAP_PROJECTING)
dc.SetPen(darkpen)

dc.DrawLine(x + 1, y + self.squareHeight() - 1,
x + self.squareWidth() - 1, y + self.squareHeight() - 1)
dc.DrawLine(x + self.squareWidth() - 1,
y + self.squareHeight() - 1, x + self.squareWidth() - 1, y + 1)

dc.SetPen(wx.TRANSPARENT_PEN)
dc.SetBrush(wx.Brush(colors[shape]))
dc.DrawRectangle(x + 1, y + 1, self.squareWidth() - 2,
self.squareHeight() - 2)


class Tetrominoes(object):
NoShape = 0
ZShape = 1
SShape = 2
LineShape = 3
TShape = 4
SquareShape = 5
LShape = 6
MirroredLShape = 7


class Shape(object):
coordsTable = (
((0, 0), (0, 0), (0, 0), (0, 0)),
((0, -1), (0, 0), (-1, 0), (-1, 1)),
((0, -1), (0, 0), (1, 0), (1, 1)),
((0, -1), (0, 0), (0, 1), (0, 2)),
((-1, 0), (0, 0), (1, 0), (0, 1)),
((0, 0), (1, 0), (0, 1), (1, 1)),
((-1, -1), (0, -1), (0, 0), (0, 1)),
((1, -1), (0, -1), (0, 0), (0, 1))
)

def __init__(self):
self.coords = [[0,0] for i in range(4)]
self.pieceShape = Tetrominoes.NoShape

self.setShape(Tetrominoes.NoShape)

def shape(self):
return self.pieceShape

def setShape(self, shape):
table = Shape.coordsTable[shape]
for i in range(4):
for j in range(2):
self.coords[i][j] = table[i][j]

self.pieceShape = shape

def setRandomShape(self):
self.setShape(random.randint(1, 7))

def x(self, index):
return self.coords[index][0]

def y(self, index):
return self.coords[index][1]

def setX(self, index, x):
self.coords[index][0] = x

def setY(self, index, y):
self.coords[index][1] = y

def minX(self):
m = self.coords[0][0]
for i in range(4):
m = min(m, self.coords[i][0])

return m

def maxX(self):
m = self.coords[0][0]
for i in range(4):
m = max(m, self.coords[i][0])

return m

def minY(self):
m = self.coords[0][1]
for i in range(4):
m = min(m, self.coords[i][1])

return m

def maxY(self):
m = self.coords[0][1]
for i in range(4):
m = max(m, self.coords[i][1])

return m

def rotatedLeft(self):
if self.pieceShape == Tetrominoes.SquareShape:
return self

result = Shape()
result.pieceShape = self.pieceShape
for i in range(4):
result.setX(i, self.y(i))
result.setY(i, -self.x(i))

return result

def rotatedRight(self):
if self.pieceShape == Tetrominoes.SquareShape:
return self

result = Shape()
result.pieceShape = self.pieceShape
for i in range(4):
result.setX(i, -self.y(i))
result.setY(i, self.x(i))

return result


app = wx.App()
Tetris(None, -1, 'Tetris')
app.MainLoop()
I have simplified the game a bit, so that it is easier to understand. The game starts immediately, after it is launched. We can pause the game by pressing the p key. The space key will drop the tetris piece immediately to the bottom. The d key will drop the piece one line down. (It can be used to speed up the falling a bit.) The game goes at constant speed, no acceleration is implemented. The score is the number of lines, that we have removed.
def __init__(self, parent):
wx.Panel.__init__(self, parent)
A note for Windows users. If you cannot use the arrow keys, add style=wx.WANTS_CHARS to the panel constructor.
...
self.curX = 0
self.curY = 0
self.numLinesRemoved = 0
self.board = []
...
Before we start the game cycle, we initialize some important variables. The self.board variable is a list of numbers from 0 ... 7. It represents the position of various shapes and remains of the shapes on the board.
for i in range(Board.BoardHeight):
for j in range(Board.BoardWidth):
shape = self.shapeAt(j, Board.BoardHeight - i - 1)
if shape != Tetrominoes.NoShape:
self.drawSquare(dc,
0 + j * self.squareWidth(),
boardTop + i * self.squareHeight(), shape)
The painting of the game is divided into two steps. In the first step, we draw all the shapes, or remains of the shapes, that have been dropped to the bottom of the board. All the squares are rememberd in the self.board list variable. We access it using the shapeAt() method.
if self.curPiece.shape() != Tetrominoes.NoShape:
for i in range(4):
x = self.curX + self.curPiece.x(i)
y = self.curY - self.curPiece.y(i)
self.drawSquare(dc, 0 + x * self.squareWidth(),
boardTop + (Board.BoardHeight - y - 1) * self.squareHeight(),
self.curPiece.shape())
The next step is drawing of the actual piece, that is falling down.
elif keycode == wx.WXK_LEFT:
self.tryMove(self.curPiece, self.curX - 1, self.curY)
In the OnKeyDown() method we check for pressed keys. If we press the left arrow key, we try to move the piece to the left. We say try, because the piece might not be able to move.
 def tryMove(self, newPiece, newX, newY):
for i in range(4):
x = newX + newPiece.x(i)
y = newY - newPiece.y(i)
if x < 0 or x >= Board.BoardWidth or y < 0 or y >= Board.BoardHeight:
return False
if self.shapeAt(x, y) != Tetrominoes.NoShape:
return False

self.curPiece = newPiece
self.curX = newX
self.curY = newY
self.Refresh()
return True
In the tryMove() method we try to move our shapes. If the shape is at the edge of the board or is adjacent to some other piece, we return false. Otherwise we place the current falling piece to a new position and return true.
 def OnTimer(self, event):
if event.GetId() == Board.ID_TIMER:
if self.isWaitingAfterLine:
self.isWaitingAfterLine = False
self.newPiece()
else:
self.oneLineDown()
else:
event.Skip()
In the OnTimer() method we either create a new piece, after the previous one was dropped to the bottom, or we move a falling piece one line down.
def removeFullLines(self):
numFullLines = 0

rowsToRemove = []

for i in range(Board.BoardHeight):
n = 0
for j in range(Board.BoardWidth):
if not self.shapeAt(j, i) == Tetrominoes.NoShape:
n = n + 1

if n == 10:
rowsToRemove.append(i)

rowsToRemove.reverse()

for m in rowsToRemove:
for k in range(m, Board.BoardHeight):
for l in range(Board.BoardWidth):
self.setShapeAt(l, k, self.shapeAt(l, k + 1))
...
If the piece hits the bottom, we call the removeFullLines() method. First we find out all full lines. And we remove them. We do it by moving all lines above the current full line to be removed one line down. Notice, that we reverse the order of the lines to be removed. Otherwise, it would not work correctly. In our case we use a naive gravity. This means, that the pieces may be floating above empty gaps.
 def newPiece(self):
self.curPiece = self.nextPiece
statusbar = self.GetParent().statusbar
self.nextPiece.setRandomShape()
self.curX = Board.BoardWidth / 2 + 1
self.curY = Board.BoardHeight - 1 + self.curPiece.minY()

if not self.tryMove(self.curPiece, self.curX, self.curY):
self.curPiece.setShape(Tetrominoes.NoShape)
self.timer.Stop()
self.isStarted = False
statusbar.SetStatusText('Game over')
The newPiece() method creates randomly a new tetris piece. If the piece cannot go into it's initial position, the game is over.
The Shape class saves information about the tetris piece.
 self.coords = [[0,0] for i in range(4)]
Upon creation we create an empty coordinates list. The list will save the coordinates of the tetris piece. For example, these tuples (0, -1), (0, 0), (1, 0), (1, 1) represent a rotated S-shape. The following diagram illustrates the shape.
Coordinates
Figure: Coordinates
When we draw the current falling piece, we draw it at self.curX, self.curY position. Then we look at the coordinates table and draw all the four squares.
Tetris
Figure: Tetris
This was a Tetris game in wxPython.
Continue Reading

Small gui scripts in wxPython

wxPython Gripts

In this section we will show some small, complete scripts. These graphical scripts or "gripts" will demonstrate various areas in programming.
We present three gripts. The first will send an email message. The second will connect to the anonymous ftp account and display a connected or disconnected image in the statusbar. The final one will create a small puzzle game.

Tom

Tom is a simple script that sends an email.
#!/usr/bin/python
# -*- coding: utf-8 -*-


import wx
import smtplib

class Example(wx.Dialog):

def __init__(self, *args, **kw):
super(Example, self).__init__(*args, **kw)

self.InitUI()

def InitUI(self):

pnl = wx.Panel(self)

vbox = wx.BoxSizer(wx.VERTICAL)
hbox1 = wx.BoxSizer(wx.HORIZONTAL)
hbox2 = wx.BoxSizer(wx.HORIZONTAL)
hbox3 = wx.BoxSizer(wx.HORIZONTAL)

st1 = wx.StaticText(pnl, label='From')
st2 = wx.StaticText(pnl, label='To ')
st3 = wx.StaticText(pnl, label='Subject')

self.tc1 = wx.TextCtrl(pnl, size=(180, -1))
self.tc2 = wx.TextCtrl(pnl, size=(180, -1))
self.tc3 = wx.TextCtrl(pnl, size=(180, -1))

self.tc = wx.TextCtrl(pnl, style=wx.TE_MULTILINE)
button_send = wx.Button(pnl, label='Send')

hbox1.Add(st1, flag=wx.LEFT, border=10)
hbox1.Add(self.tc1, flag=wx.LEFT, border=35)
hbox2.Add(st2, flag=wx.LEFT, border=10)
hbox2.Add(self.tc2, flag=wx.LEFT, border=50)
hbox3.Add(st3, flag=wx.LEFT, border=10)
hbox3.Add(self.tc3, flag=wx.LEFT, border=20)
vbox.Add(hbox1, flag=wx.TOP, border=10)
vbox.Add(hbox2, flag=wx.TOP, border=10)
vbox.Add(hbox3, flag=wx.TOP, border=10)
vbox.Add(self.tc, proportion=1, flag=wx.EXPAND | wx.TOP |
wx.RIGHT | wx.LEFT, border=15)
vbox.Add(button_send, flag=wx.ALIGN_CENTER | wx.TOP |
wx.BOTTOM, border=20)

self.Bind(wx.EVT_BUTTON, self.OnSend, button_send)
pnl.SetSizer(vbox)

self.SetSize((400, 420))
self.SetTitle('Tom')
self.Centre()
self.ShowModal()
self.Destroy()

def OnSend(self, e):

sender = self.tc1.GetValue()
recipient = self.tc2.GetValue()
subject = self.tc3.GetValue()
text = self.tc.GetValue()
header = 'From: %s\r\nTo: %s\r\nSubject: %s\r\n\r\n' %
(sender, recipient, subject)
message = header + text

try:

server = smtplib.SMTP('mail.chello.sk')
server.sendmail(sender, recipient, message)
server.quit()
dlg = wx.MessageDialog(self, 'Email was successfully sent', 'Success',
wx.OK | wx.ICON_INFORMATION)
dlg.ShowModal()
dlg.Destroy()

except smtplib.SMTPException, error:

dlg = wx.MessageDialog(self, 'Failed to send email',
'Error', wx.OK | wx.ICON_ERROR)
dlg.ShowModal()
dlg.Destroy()


def main():

ex = wx.App()
Example(None)
ex.MainLoop()


if __name__ == '__main__':
main()
We have a dialog window with from, to and subject text controls and a message text control. After pushing the send button the email is sent to the recipient.
import smtplib
For working with emails we need to import smtp module. This module is part of the Python language.
header = 'From: %s\r\nTo: %s\r\nSubject: %s\r\n\r\n' % 
(sender, recipient, subject)
From, To and Subject options must be separated by carriedge return and newline as shown here. This is requested by RFC 821 norm. So we must follow it.
server = smtplib.SMTP('mail.chello.sk')
server.sendmail(sender, recipient, message)
server.quit()
Next we create an SMTP connection. Here you specify your settings. Each ISP gives you the name of the pop and smtp servers. In my case, 'mail.chello.sk' is a name for both. A mail is sent by calling the sendmail() method. Finally, we quit the connection with the quit() method.
Tom
Figure: Tom

Kika

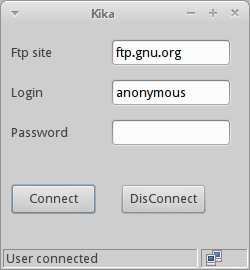
Kika is a gript that connects to an ftp site. If a login is successfull, Kika shows a connected icon on the statusbar. Otherwise, a disconnected icon is displayed. We use an ftplib module from the Python standard library. If you do not have an ftp account, you can try to login to some anonymous ftp sites.
#!/usr/bin/python


from ftplib import FTP, all_errors
import wx


class MyStatusBar(wx.StatusBar):

def __init__(self, parent):
super(MyStatusBar, self).__init__(parent)

self.SetFieldsCount(2)
self.SetStatusText('Welcome to Kika', 0)
self.SetStatusWidths([-1, 50])

self.icon = wx.StaticBitmap(self, bitmap=wx.Bitmap('disconnected.png'))
self.Bind(wx.EVT_SIZE, self.OnSize)
self.PlaceIcon()

def PlaceIcon(self):

rect = self.GetFieldRect(1)
self.icon.SetPosition((rect.x+5, rect.y+1))

def OnSize(self, e):

e.Skip()
self.PlaceIcon()


class Example(wx.Frame):

def __init__(self, *args, **kw):
super(Example, self).__init__(*args, **kw)

self.InitUI()

def InitUI(self):

wx.StaticText(self, label='Ftp site', pos=(10, 20))
wx.StaticText(self, label='Login', pos=(10, 60))
wx.StaticText(self, label='Password', pos=(10, 100))

self.ftpsite = wx.TextCtrl(self, pos=(110, 15),
size=(120, -1))
self.login = wx.TextCtrl(self, pos=(110, 55),
size=(120, -1))
self.password = wx.TextCtrl(self, pos=(110, 95),
size=(120, -1), style=wx.TE_PASSWORD)

self.ftp = None

con = wx.Button(self, label='Connect', pos=(10, 160))
discon = wx.Button(self, label='DisConnect', pos=(120, 160))

self.Bind(wx.EVT_BUTTON, self.OnConnect, con)
self.Bind(wx.EVT_BUTTON, self.OnDisConnect, discon)
self.Bind(wx.EVT_MAXIMIZE, self.OnMaximize)
self.Bind(wx.EVT_SHOW, self.OnShown)

self.sb = MyStatusBar(self)
self.SetStatusBar(self.sb)

self.SetSize((250, 270))
self.SetTitle('Kika')
self.Centre()
self.Show()


def OnShown(self, e):

if self.sb:
self.sb.PlaceIcon()

def OnMaximize(self, e):

self.sb.PlaceIcon()

def OnConnect(self, e):

if not self.ftp:

ftpsite = self.ftpsite.GetValue()
login = self.login.GetValue()
password = self.password.GetValue()

try:
self.ftp = FTP(ftpsite)
var = self.ftp.login(login, password)

self.sb.SetStatusText('User connected')
self.sb.icon.SetBitmap(wx.Bitmap('connected.png'))

except AttributeError:

self.sb.SetStatusText('Incorrect params')
self.ftp = None

except all_errors, err:

self.sb.SetStatusText(str(err))
self.ftp = None

def OnDisConnect(self, e):

if self.ftp:

self.ftp.quit()
self.ftp = None

self.sb.SetStatusText('User disconnected')
self.sb.icon.SetBitmap(wx.Bitmap('disconnected.png'))


def main():

ex = wx.App()
Example(None)
ex.MainLoop()


if __name__ == '__main__':
main()
In the code example, we will connect to an ftp site and show connected or disconnected icons in the statusbar.
from ftplib import FTP, all_errors
We use the standard ftplib Python module.
self.SetFieldsCount(2)
self.SetStatusText('Welcome to Kika', 0)
self.SetStatusWidths([-1, 50])
Our custom statusbar will have two fields. A welcome message is shown in the first field of the statusbar with the SetStatusText()method. The SetStatusWidths() method arranges the width for the status fields. The second field has a fixed width, the first one takes the rest of the statusbar's width.
def PlaceIcon(self):

rect = self.GetFieldRect(1)
self.icon.SetPosition((rect.x+5, rect.y+1))
The PlaceIcon() method positions the icon on the statusbar. With the GetFieldRect() method we determine the size of the second field of the statusbar. Later we place the icon using the SetPosition() method.
def OnSize(self, e):

e.Skip()
self.PlaceIcon()
Notice that each time the window is resized, we must position our icon to a new place.
self.Bind(wx.EVT_MAXIMIZE, self.OnMaximize) 
self.Bind(wx.EVT_SHOW, self.OnShown)
We also react to EVT_MAXIMIZE and EVT_SHOW events. In their event handlers, we replace the icon on the statusbar.
try:
self.ftp = FTP(ftpsite)
var = self.ftp.login(login, password)

self.sb.SetStatusText('User connected')
self.sb.icon.SetBitmap(wx.Bitmap('connected.png'))
We login to the provided ftp site. A connected icon is shown in the statusbar.
def OnDisConnect(self, e):

if self.ftp:

self.ftp.quit()
self.ftp = None

self.sb.SetStatusText('User disconnected')
self.sb.icon.SetBitmap(wx.Bitmap('disconnected.png'))
In the OnDisConnect() method, we quit the connection to the ftp site, if there is any. The statusbar will show a disconnected icon.
Kika
Figure: Kika

Puzzle

In this gript, we introduce a puzzle game. We have an image of a Sid character from the Ice Age movie. The goal is to form the picture.
$ convert sid.png -crop 120x90 sid%d.png
$ ls
sid0.png sid2.png sid4.png sid6.png sid8.png
sid1.png sid3.png sid5.png sid7.png sid.png
ImageMagick program can be used to easily slice an image to smaller images. If your image is 360x270, the above command will crop the image into nine parts.
#!/usr/bin/python
# -*- coding: utf-8 -*-


import wx
import random

class Example(wx.Dialog):

def __init__(self, *args, **kw):
super(Example, self).__init__(*args, **kw)

self.InitUI()

def InitUI(self):

images = ['sid1.png', 'sid2.png', 'sid3.png', 'sid4.png',
'sid5.png', 'sid6.png', 'sid7.png', 'sid8.png']

self.pos = [ [0, 1, 2], [3, 4, 5], [6, 7, 8] ]

self.sizer = wx.GridSizer(3, 3, 0, 0)

numbers = [0, 1, 2, 3, 4, 5, 6, 7]
random.shuffle(numbers)

for i in numbers:

btn = wx.BitmapButton(self, i, wx.Bitmap(images[i]))
btn.Bind(wx.EVT_BUTTON, self.OnPressButton, btn)
self.sizer.Add(btn)

self.empty = wx.BitmapButton(self, bitmap=wx.Bitmap('empty.png'))
self.empty.Bind(wx.EVT_BUTTON, self.OnPressButton, self.empty)
self.sizer.Add(self.empty)

self.SetSizerAndFit(self.sizer)
self.SetTitle('Puzzle')
self.Centre()
self.ShowModal()
self.Destroy()

def OnPressButton(self, e):

btn = e.GetEventObject()

width = self.empty.GetSize().x
height = self.empty.GetSize().y

btnX = btn.GetPosition().x
btnY = btn.GetPosition().y
emptyX = self.empty.GetPosition().x
emptyY = self.empty.GetPosition().y


if (((btnX == emptyX) and (emptyY - btnY) == height)
or ((btnX == emptyX) and (emptyY - btnY) == -height)
or ((btnY == emptyY) and (emptyX - btnX) == width)
or ((btnY == emptyY) and (emptyX - btnX) == -width)):

self.ExchangeImages(btn)


def ExchangeImages(self, btn):

bmp1 = self.empty.GetBitmapLabel()
bmp2 = btn.GetBitmapLabel()

self.empty.SetBitmapLabel(bmp2)
btn.SetBitmapLabel(bmp1)

self.empty = btn


def main():

ex = wx.App()
Example(None)
ex.MainLoop()


if __name__ == '__main__':
main()
The image is sliced into 9 subimages. 8 subimages are used in the program. One empty image is used as well.
images = ['sid1.png', 'sid2.png', 'sid3.png', 'sid4.png', 
'sid5.png', 'sid6.png', 'sid7.png', 'sid8.png']
These are the images, that will be shown in button widgets.
self.sizer = wx.GridSizer(3, 3, 0, 0)
For this gript, wx.GridSizer fits ideally.
numbers = [0, 1, 2, 3, 4, 5, 6, 7]
random.shuffle(numbers)
We have eight numbers. Those numbers are shuffled so that we have a random number order. Each time we start the gript, we will have a different order of bitmaps.
for i in numbers:

btn = wx.BitmapButton(self, i, wx.Bitmap(images[i]))
btn.Bind(wx.EVT_BUTTON, self.OnPressButton, btn)
self.sizer.Add(btn)
In this for loop, we create 8 bitmap buttons with the provided images. To each button an event handler is attached.
self.empty = wx.BitmapButton(self, bitmap=wx.Bitmap('empty.png'))
self.empty.Bind(wx.EVT_BUTTON, self.OnPressButton, self.empty)
self.sizer.Add(self.empty)
The ninth button displays an empty image. The self.empty variable serves as a pointer to the button, which has an empty image. Buttons will exchange their images so the self.empty variable will point to different buttons over time.
def OnPressButton(self, e):

btn = e.GetEventObject()

width = self.empty.GetSize().x
height = self.empty.GetSize().y
...
When we press a button, the OnPressButton() handler is called. The GetEventObject() method retrieves the event source; it is the button that triggerd the EVT_BUTTON event. We get the width and height of the emtpy button. (All the buttons have the same size). These values will be used to determine the buttons adjacent to the empty button.
btnX = btn.GetPosition().x
btnY = btn.GetPosition().y
emptyX = self.empty.GetPosition().x
emptyY = self.empty.GetPosition().y
We get the x, y coordinates of the currently pressed button and the empty button.
if (((btnX == emptyX) and (emptyY - btnY) == height)
or ((btnX == emptyX) and (emptyY - btnY) == -height)
or ((btnY == emptyY) and (emptyX - btnX) == width)
or ((btnY == emptyY) and (emptyX - btnX) == -width)):

self.ExchangeImages(btn)
Here we find out, if the pressed button is adjacent to the empty button. If true, we call the ExchangeImages() method which will switch the images for the two buttons.
def ExchangeImages(self, btn):

bmp1 = self.empty.GetBitmapLabel()
bmp2 = btn.GetBitmapLabel()

self.empty.SetBitmapLabel(bmp2)
btn.SetBitmapLabel(bmp1)

self.empty = btn
In the ExchangeImages() method, we get the images of the two buttons in question. We switch them. Finally, the self.empty button points to the new button, which has the empty image.
Puzzle
Figure: Puzzle
In this chapter, we have presented three interesting gripts.
Continue Reading

Cool tips and tricks of wxPython

Tips and Tricks

In this section we will show various interesting tips in wxPython. Here we will see examples, that could not be put elsewhere.

Interactive Button

When we enter the area of the button widget with a mouse pointer, wx.EVT_ENTER_WINDOW event is generated. Similarly, wx.EVT_LEAVE_WINDOW event is generated, when we leave the area of the widget. We bind two methods to these events.
#!/usr/bin/python
# -*- coding: utf-8 -*-

'''
ZetCode wxPython tutorial

This example shows an interactive button.

author: Jan Bodnar
website: www.zetcode.com
last modified: September 2011
'''

import wx
from wx.lib.buttons import GenButton

class Example(wx.Frame):

def __init__(self, *args, **kwargs):
super(Example, self).__init__(*args, **kwargs)

self.InitUI()

def InitUI(self):

panel = wx.Panel(self)

btn = GenButton(panel, label='Button',
pos=(100, 100))
btn.SetBezelWidth(1)
btn.SetBackgroundColour('DARKGREY')

wx.EVT_ENTER_WINDOW(btn, self.OnEnter)
wx.EVT_LEAVE_WINDOW(btn, self.OnLeave)

self.SetSize((300, 200))
self.SetTitle('Interactive button')
self.Centre()
self.Show(True)

def OnEnter(self, e):

btn = e.GetEventObject()
btn.SetBackgroundColour('GREY79')
btn.Refresh()

def OnLeave(self, e):

btn = e.GetEventObject()
btn.SetBackgroundColour('DARKGREY')
btn.Refresh()

def main():

ex = wx.App()
Example(None)
ex.MainLoop()


if __name__ == '__main__':
main()
We have used a GenButton instead of a basic wx.Button.
from wx.lib.buttons import GenButton
The GenButton is located in the wx.lib.buttons module.
btn.SetBezelWidth(1)
The SetBezelWidth() method creates some 3D effect on the button.
def OnEnter(self, e):

btn = e.GetEventObject()
btn.SetBackgroundColour('GREY79')
btn.Refresh()
In reaction to the wx.EVT_ENTER_WINDOW, we change the background color of the button.

Isabelle

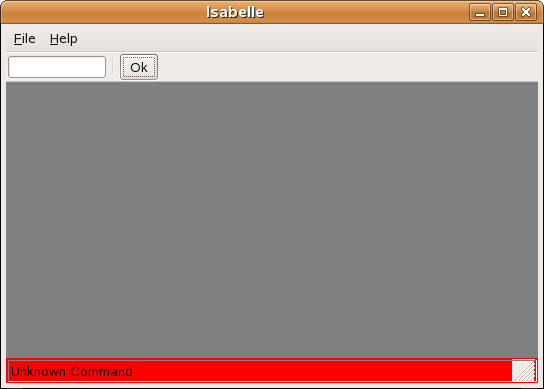
When an error occurs in an application, an error dialog usually appears. This might get annoying. I have noticed a better solution in a SAP system. When a user enters an invalid command, statusbar turs red and an error message is displayed on stausbar. The red colour catches the eye and the user can easily read the error message. The following code mimics this situation.
#!/usr/bin/python

# Isabelle

import wx

ID_TIMER = 1
ID_EXIT = 2
ID_ABOUT = 3
ID_BUTTON = 4

class Isabelle(wx.Frame):
def __init__(self, parent, id, title):
wx.Frame.__init__(self, parent, id, title)

self.timer = wx.Timer(self, ID_TIMER)
self.blick = 0

file = wx.Menu()
file.Append(ID_EXIT, '&Quit\tCtrl+Q', 'Quit Isabelle')

help = wx.Menu()
help.Append(ID_ABOUT, '&About', 'O Programe')


menubar = wx.MenuBar()
menubar.Append(file, '&File')
menubar.Append(help, '&Help')
self.SetMenuBar(menubar)

toolbar = wx.ToolBar(self, -1)
self.tc = wx.TextCtrl(toolbar, -1, size=(100, -1))
btn = wx.Button(toolbar, ID_BUTTON, 'Ok', size=(40, 28))

toolbar.AddControl(self.tc)
toolbar.AddSeparator()
toolbar.AddControl(btn)
toolbar.Realize()
self.SetToolBar(toolbar)

self.Bind(wx.EVT_BUTTON, self.OnLaunchCommandOk, id=ID_BUTTON)
self.Bind(wx.EVT_MENU, self.OnAbout, id=ID_ABOUT)
self.Bind(wx.EVT_MENU, self.OnExit, id=ID_EXIT)
self.Bind(wx.EVT_TIMER, self.OnTimer, id=ID_TIMER)

self.panel = wx.Panel(self, -1, (0, 0), (500 , 300))
self.panel.SetBackgroundColour('GRAY')
self.sizer=wx.BoxSizer(wx.VERTICAL)
self.sizer.Add(self.panel, 1, wx.EXPAND)
self.SetSizer(self.sizer)
self.statusbar = self.CreateStatusBar()
self.statusbar.SetStatusText('Welcome to Isabelle')
self.Centre()
self.Show(True)

def OnExit(self, event):
dlg = wx.MessageDialog(self, 'Are you sure to quit Isabelle?',
'Please Confirm', wx.YES_NO | wx.NO_DEFAULT | wx.ICON_QUESTION)
if dlg.ShowModal() == wx.ID_YES:
self.Close(True)


def OnAbout(self, event):
dlg = wx.MessageDialog(self, 'Isabelle\t\n' '2004\t', 'About',
wx.OK | wx.ICON_INFORMATION)
dlg.ShowModal()
dlg.Destroy()


def OnLaunchCommandOk(self, event):
input = self.tc.GetValue()
if input == '/bye':
self.OnExit(self)
elif input == '/about':
self.OnAbout(self)
elif input == '/bell':
wx.Bell()
else:
self.statusbar.SetBackgroundColour('RED')
self.statusbar.SetStatusText('Unknown Command')
self.statusbar.Refresh()
self.timer.Start(50)

self.tc.Clear()

def OnTimer(self, event):
self.blick = self.blick + 1
if self.blick == 25:
self.statusbar.SetBackgroundColour('#E0E2EB')
self.statusbar.Refresh()
self.timer.Stop()
self.blick = 0

app = wx.App()
Isabelle(None, -1, 'Isabelle')
app.MainLoop()
There is a wx.TextCtrl on the Statusbar. There you enter your commands. We have defined three commands. /bye, /about and /beep. If you mistype any of them, Statusbar turns red and displays an error. This is done with the wx.Timer class.
Isabelle
Figure: Isabelle

Undo/Redo framework

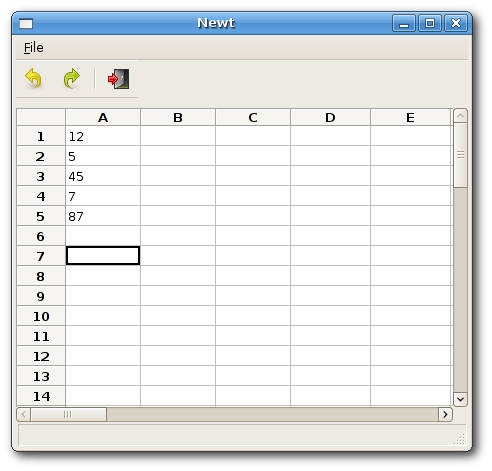
Many applications have the ability to undo and redo the user's actions. The following example shows how it can be accomplished in wxPython.
Undo/Redo
Figure: undoredo.py
#!/usr/bin/python

# undoredo.py

from wx.lib.sheet import *
import wx

stockUndo = []
stockRedo = []

ID_QUIT = 10
ID_UNDO = 11
ID_REDO = 12
ID_EXIT = 13

ID_COLSIZE = 80
ID_ROWSIZE = 20


class UndoText:
def __init__(self, sheet, text1, text2, row, column):
self.RedoText = text2
self.row = row
self.col = column
self.UndoText = text1
self.sheet = sheet

def undo(self):
self.RedoText = self.sheet.GetCellValue(self.row, self.col)
if self.UndoText == None:
self.sheetSetCellValue('')
else: self.sheet.SetCellValue(self.row, self.col, self.UndoText)

def redo(self):
if self.RedoText == None:
self.sheet.SetCellValue('')
else: self.sheet.SetCellValue(self.row, self.col, self.RedoText)

class UndoColSize:
def __init__(self, sheet, position, size):
self.sheet = sheet
self.pos = position
self.RedoSize = size
self.UndoSize = ID_COLSIZE

def undo(self):
self.RedoSize = self.sheet.GetColSize(self.pos)
self.sheet.SetColSize(self.pos, self.UndoSize)
self.sheet.ForceRefresh()

def redo(self):
self.UndoSize = ID_COLSIZE
self.sheet.SetColSize(self.pos, self.RedoSize)
self.sheet.ForceRefresh()

class UndoRowSize:
def __init__(self, sheet, position, size):
self.sheet = sheet
self.pos = position
self.RedoSize = size
self.UndoSize = ID_ROWSIZE

def undo(self):
self.RedoSize = self.sheet.GetRowSize(self.pos)
self.sheet.SetRowSize(self.pos, self.UndoSize)
self.sheet.ForceRefresh()

def redo(self):
self.UndoSize = ID_ROWSIZE
self.sheet.SetRowSize(self.pos, self.RedoSize)
self.sheet.ForceRefresh()

class MySheet(CSheet):
instance = 0
def __init__(self, parent):
CSheet.__init__(self, parent)
self.SetRowLabelAlignment(wx.ALIGN_CENTRE, wx.ALIGN_CENTRE)
self.text = ''

def OnCellChange(self, event):
toolbar = self.GetParent().toolbar
if (toolbar.GetToolEnabled(ID_UNDO) == False):
toolbar.EnableTool(ID_UNDO, True)
r = event.GetRow()
c = event.GetCol()
text = self.GetCellValue(r, c)
# self.text - text before change
# text - text after change
undo = UndoText(self, self.text, text, r, c)
stockUndo.append(undo)

if stockRedo:
# this might be surprising, but it is a standard behaviour
# in all spreadsheets
del stockRedo[:]
toolbar.EnableTool(ID_REDO, False)

def OnColSize(self, event):
toolbar = self.GetParent().toolbar

if (toolbar.GetToolEnabled(ID_UNDO) == False):
toolbar.EnableTool(ID_UNDO, True)

pos = event.GetRowOrCol()
size = self.GetColSize(pos)
undo = UndoColSize(self, pos, size)
stockUndo.append(undo)

if stockRedo:
del stockRedo[:]
toolbar.EnableTool(ID_REDO, False)

def OnRowSize(self, event):
toolbar = self.GetParent().toolbar
if (toolbar.GetToolEnabled(ID_UNDO) == False):
toolbar.EnableTool(ID_UNDO, True)

pos = event.GetRowOrCol()
size = self.GetRowSize(pos)
undo = UndoRowSize(self, pos, size)

stockUndo.append(undo)
if stockRedo:
del stockRedo[:]
toolbar.EnableTool(ID_REDO, False)

class Newt(wx.Frame):
def __init__(self,parent,id,title):
wx.Frame.__init__(self, parent, -1, title, size=(550, 500))

box = wx.BoxSizer(wx.VERTICAL)
menuBar = wx.MenuBar()
menu = wx.Menu()
quit = wx.MenuItem(menu, ID_QUIT, '&Quit\tCtrl+Q', 'Quits Newt')
quit.SetBitmap(wx.Bitmap('icons/exit16.png'))
menu.AppendItem(quit)
menuBar.Append(menu, '&File')
self.Bind(wx.EVT_MENU, self.OnQuitNewt, id=ID_QUIT)
self.SetMenuBar(menuBar)


self.toolbar = wx.ToolBar(self, id=-1, style=wx.TB_HORIZONTAL | wx.NO_BORDER |
wx.TB_FLAT | wx.TB_TEXT)
self.toolbar.AddSimpleTool(ID_UNDO, wx.Bitmap('icons/undo.png'),
'Undo', '')
self.toolbar.AddSimpleTool(ID_REDO, wx.Bitmap('icons/redo.png'),
'Redo', '')
self.toolbar.EnableTool(ID_UNDO, False)

self.toolbar.EnableTool(ID_REDO, False)
self.toolbar.AddSeparator()
self.toolbar.AddSimpleTool(ID_EXIT, wx.Bitmap('icons/exit.png'),
'Quit', '')
self.toolbar.Realize()
self.toolbar.Bind(wx.EVT_TOOL, self.OnUndo, id=ID_UNDO)
self.toolbar.Bind(wx.EVT_TOOL, self.OnRedo, id=ID_REDO)
self.toolbar.Bind(wx.EVT_TOOL, self.OnQuitNewt, id=ID_EXIT)

box.Add(self.toolbar, border=5)
box.Add((5,10), 0)

self.SetSizer(box)
self.sheet1 = MySheet(self)
self.sheet1.SetNumberRows(55)
self.sheet1.SetNumberCols(25)

for i in range(self.sheet1.GetNumberRows()):
self.sheet1.SetRowSize(i, ID_ROWSIZE)

self.sheet1.SetFocus()
box.Add(self.sheet1, 1, wx.EXPAND)
self.CreateStatusBar()
self.Centre()
self.Show(True)

def OnUndo(self, event):
if len(stockUndo) == 0:
return

a = stockUndo.pop()
if len(stockUndo) == 0:
self.toolbar.EnableTool(ID_UNDO, False)

a.undo()
stockRedo.append(a)
self.toolbar.EnableTool(ID_REDO, True)

def OnRedo(self, event):
if len(stockRedo) == 0:
return

a = stockRedo.pop()
if len(stockRedo) == 0:
self.toolbar.EnableTool(ID_REDO, False)

a.redo()
stockUndo.append(a)

self.toolbar.EnableTool(ID_UNDO, True)

def OnQuitNewt(self, event):
self.Close(True)

app = wx.App()
Newt(None, -1, 'Newt')
app.MainLoop()
stockUndo = []
stockRedo = []
There are two list objects. stockUndo is a list that holds all changes, that we can undo. stockRedo keeps all changes, that can be redone. The changes are instantiated into a UndoText object. This object has two methods. undo and redo.
class MySheet(CSheet):
def __init__(self, parent):
CSheet.__init__(self, parent)
Our example inherits from CSheet class. It is a grid widget with some additional logic.
self.SetRowLabelAlignment(wx.ALIGN_CENTRE, wx.ALIGN_CENTRE)
Here we center the labels in rows. By default, they are aligned to the right.
r = event.GetRow()
c = event.GetCol()
text = self.GetCellValue(r, c)
# self.text - text before change
# text - text after change
undo = UndoText(self, self.text, text, r, c)
stockUndo.append(undo)
Every time we do some changes, an UndoText object is created and appended to the stockUndo list..
if stockRedo:
# this might be surprising, but it is a standard behaviour
# in all spreadsheets
del stockRedo[:]
toolbar.EnableTool(ID_REDO, False)
Yes, this behaviour was surprising for me. I did not know that it works this way, until I made this example. Basically, if you undo some changes and then start typing again, all redo changes are lost. OpenOffice Calc works this way. Gnumeric as well.
if len(stockUndo) == 0:
self.toolbar.EnableTool(ID_UNDO, False)
...
self.toolbar.EnableTool(ID_REDO, True)
The undo and redo buttons are enabled or disabled accordingly. If there is nothing to undo, the undo button is disabled.
a = stockUndo.pop()
if len(stockUndo) == 0:
self.toolbar.EnableTool(ID_UNDO, False)

a.undo()
stockRedo.append(a)
If we click undo, we pop up an UndoText object from the stockUndo list. Call the undo() method and append the object to the stockRedo list.

Configuring application settings

Many applications allow users to configure their settings. Users can toggle tooltips on and of, change fonts, default download paths etc. Mostly they have a menu option called preferences. Application settings are saved to the hard disk, so that users do not have to change the settings each time the application starts.
In wxPython we have wx.Config class to do our job.
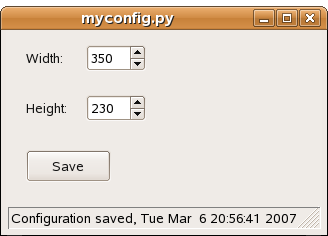
On Linux, settings are stored in a simple hidden file. This file is located in the home user directory by default. The location of the configuration file can be changed. The name of the file is specified in the constructor of the wx.Config class. In the following code example, we can cofigure the size of the window. If there is no configuration file, the height and the width of the window is set to the defaul 250 px value. We can set these values to a range from 200 - 500px. After we save our values and restart the application, the window size is set to our preffered values.
#!/usr/bin/python

# myconfig.py

import wx

class MyConfig(wx.Frame):
def __init__(self, parent, id, title):
self.cfg = wx.Config('myconfig')
if self.cfg.Exists('width'):
w, h = self.cfg.ReadInt('width'), self.cfg.ReadInt('height')
else:
(w, h) = (250, 250)
wx.Frame.__init__(self, parent, id, title, size=(w, h))

wx.StaticText(self, -1, 'Width:', (20, 20))
wx.StaticText(self, -1, 'Height:', (20, 70))
self.sc1 = wx.SpinCtrl(self, -1, str(w), (80, 15), (60, -1), min=200, max=500)
self.sc2 = wx.SpinCtrl(self, -1, str(h), (80, 65), (60, -1), min=200, max=500)
wx.Button(self, 1, 'Save', (20, 120))

self.Bind(wx.EVT_BUTTON, self.OnSave, id=1)
self.statusbar = self.CreateStatusBar()
self.Centre()
self.Show(True)

def OnSave(self, event):
self.cfg.WriteInt("width", self.sc1.GetValue())
self.cfg.WriteInt("height", self.sc2.GetValue())
self.statusbar.SetStatusText('Configuration saved, %s ' % wx.Now())


app = wx.App()
MyConfig(None, -1, 'myconfig.py')
app.MainLoop()
Here we have the contents of a configuration file to our code example. It consists of two key, value pairs.
$ cat .myconfig
height=230
width=350
MyConfig
Figure: myconfig.py

Mouse gestures

A mouse gesture is a way of combining computer mouse movements and clicks which the software recognizes as a specific command. We can find mouse gestures in such applications like Firefox or Opera. They help users save their time while browsing on the Interent. Mouse gestures are created with wx.lib.gestures.MouseGestures class in wxPython.
Available gestures:
  • L for left
  • R for right
  • U for up
  • D for down
  • 7 for northwest
  • 9 for northeast
  • 1 for southwest
  • 3 for southeast
If you wonder why these numbers were chosen, have a look at the numerical pad. Mouse gestures can be combined. This way 'RDLU' is a mouse gesture triggered, when we do a square with a mouse pointer.
Possible flags are:
  • wx.MOUSE_BTN_LEFT
  • wx.MOUSE_BTN_MIDDLE
  • wx.MOUSE_BTN_RIGHT
#!/usr/bin/python

# mousegestures.py

import wx
import wx.lib.gestures as gest

class MyMouseGestures(wx.Frame):

def __init__ (self, parent, id, title):
wx.Frame.__init__(self, parent, id, title, size=(300, 200))

panel = wx.Panel(self, -1)
mg = gest.MouseGestures(panel, True, wx.MOUSE_BTN_LEFT)
mg.SetGesturePen(wx.Colour(255, 0, 0), 2)
mg.SetGesturesVisible(True)
mg.AddGesture('DR', self.OnDownRight)

self.Centre()
self.Show(True)

def OnDownRight(self):
self.Close()

app = wx.App()
MyMouseGestures(None, -1, 'mousegestures.py')
app.MainLoop()
In our example, we have registered a mouse gesture for a panel. Mouse gesture is triggered, when a left button is pressed and we go down and right with a cursor. As in letter 'L'. Our mouse gesture will close the application.
mg = gest.MouseGestures(panel, True, wx.MOUSE_BTN_LEFT)
If we want to use mouse gestures, we have to create a MouseGesture object. The first parameter is a window, where the mouse gesture is registered. Second parameter defines a way to register a gesture. True is for automatic, False for manual. Manual is not fully implemented and we are happy with the automatic way. Last parameter defines a mouse button, which will be pressed when triggering gestures. The button can be later changed with the SetMouseButton() method.
mg.SetGesturePen(wx.Colour(255, 0, 0), 2)
Our gestures will be painted as red lines. They will be 2 pixels wide.
mg.SetGesturesVisible(True)
We set this gesture visible with the SetGesturesVisible() method.
mg.AddGesture('DR', self.OnDownRight)
We register a mouse gesture with the AddGesture() method. The first parameter is the gesture. Second parameter is the method triggered by the gesture.
In this chapter, we presented some tips in wxPython.
Continue Reading

Creating custom widgets in wxPython

Creating custom widgets

Have you ever looked at an application and wondered, how a particular GUI item was created? Probably every wannabe programmer has. Then you were looking at a list of widgets provided by your favourite gui library. But you couldn't find it. Toolkits usually provide only the most common widgets like buttons, text widgets, sliders etc. No toolkit can provide all possible widgets.
There are actually two kinds of toolkits. Spartan toolkits and heavy weight toolkits. The FLTK toolkit is a kind of a spartan toolkit. It provides only the very basic widgets and assumes, that the programemer will create the more complicated ones himself. wxPython is a heavy weight one. It has lots of widgets. Yet it does not provide the more specialized widgets. For example a speed meter widget, a widget that measures the capacity of a CD to be burned (found e.g. in nero). Toolkits also don't have usually charts.
Programmers must create such widgets by themselves. They do it by using the drawing tools provided by the toolkit. There are two possibilities. A programmer can modify or enhance an existing widget. Or he can create a custom widget from scratch.

A hyperlink widget

The first example will create a hyperlink. The hyperlink widget will be based on an existing wx.lib.stattext.GenStaticText widget.
#!/usr/bin/python


import wx
from wx.lib.stattext import GenStaticText
import webbrowser


class Link(GenStaticText):

def __init__(self, *args, **kw):
super(Link, self).__init__(*args, **kw)

self.font1 = wx.Font(9, wx.SWISS, wx.NORMAL, wx.BOLD, True, 'Verdana')
self.font2 = wx.Font(9, wx.SWISS, wx.NORMAL, wx.BOLD, False, 'Verdana')

self.SetFont(self.font2)
self.SetForegroundColour('#0000ff')

self.Bind(wx.EVT_MOUSE_EVENTS, self.OnMouseEvent)
self.Bind(wx.EVT_MOTION, self.OnMouseEvent)

def SetUrl(self, url):

self.url = url


def OnMouseEvent(self, e):

if e.Moving():

self.SetCursor(wx.StockCursor(wx.CURSOR_HAND))
self.SetFont(self.font1)

elif e.LeftUp():

webbrowser.open_new(self.url)

else:
self.SetCursor(wx.NullCursor)
self.SetFont(self.font2)

e.Skip()


class Example(wx.Frame):

def __init__(self, *args, **kw):
super(Example, self).__init__(*args, **kw)

self.InitUI()

def InitUI(self):

panel = wx.Panel(self)
lnk = Link(panel, label='ZetCode', pos=(10, 60))
lnk.SetUrl('http://www.zetcode.com')

motto = GenStaticText(panel, label='Knowledge only matters', pos=(10, 30))
motto.SetFont(wx.Font(9, wx.SWISS, wx.NORMAL, wx.BOLD, False, 'Verdana'))

self.SetSize((220, 150))
self.SetTitle('A Hyperlink')
self.Centre()
self.Show(True)


def main():

ex = wx.App()
Example(None)
ex.MainLoop()


if __name__ == '__main__':
main()
This hyperlink widget is based on an existing widget. In this example we don't draw anything, we just use an existing widget, which we modify a bit.
 from wx.lib.stattext import GenStaticText
import webbrowser
Here we import the base widget from which we derive our hyperlink widget and the webbrowser module. webbrowser module is a standard python module. We will use it to open links in a default browser.
self.SetFont(self.font2)
self.SetForegroundColour('#0000ff')
The idea behind creating a hyperlink widget is simple. We inherit from a base wx.lib.stattext.GenStaticText widget class. So we have a text widget. Then we modify it a bit. We change the font and the colour of the text.
if e.Moving():

self.SetCursor(wx.StockCursor(wx.CURSOR_HAND))
self.SetFont(self.font1)
If we hover a mouse pointer over the link, we change the font to underlined and also change the mouse pointer to a hand cursor.
elif e.LeftUp():

webbrowser.open_new(self.url)
If we left click on the link, we open the link in a default browser.
Link widget
Figure: A Hyperlink widget

Burning widget

This is an example of a widget, that we create from a ground up. We put a wx.Panel on the bottom of the window and draw the entire widget manually. If you have ever burned a cd or a dvd, you already saw this kind of widget.
Remark for windows users. To avoid flicker, use double buffering.
#!/usr/bin/python

# burning.py

import wx

class Widget(wx.Panel):
def __init__(self, parent, id):
wx.Panel.__init__(self, parent, id, size=(-1, 30), style=wx.SUNKEN_BORDER)
self.parent = parent
self.font = wx.Font(9, wx.FONTFAMILY_DEFAULT, wx.FONTSTYLE_NORMAL,
wx.FONTWEIGHT_NORMAL, False, 'Courier 10 Pitch')


self.Bind(wx.EVT_PAINT, self.OnPaint)
self.Bind(wx.EVT_SIZE, self.OnSize)


def OnPaint(self, event):
num = range(75, 700, 75)
dc = wx.PaintDC(self)
dc.SetFont(self.font)
w, h = self.GetSize()

self.cw = self.parent.GetParent().cw

step = int(round(w / 10.0))

j = 0

till = (w / 750.0) * self.cw
full = (w / 750.0) * 700


if self.cw >= 700:
dc.SetPen(wx.Pen('#FFFFB8'))
dc.SetBrush(wx.Brush('#FFFFB8'))
dc.DrawRectangle(0, 0, full, 30)
dc.SetPen(wx.Pen('#ffafaf'))
dc.SetBrush(wx.Brush('#ffafaf'))
dc.DrawRectangle(full, 0, till-full, 30)
else:
dc.SetPen(wx.Pen('#FFFFB8'))
dc.SetBrush(wx.Brush('#FFFFB8'))
dc.DrawRectangle(0, 0, till, 30)


dc.SetPen(wx.Pen('#5C5142'))
for i in range(step, 10*step, step):
dc.DrawLine(i, 0, i, 6)
width, height = dc.GetTextExtent(str(num[j]))
dc.DrawText(str(num[j]), i-width/2, 8)
j = j + 1

def OnSize(self, event):
self.Refresh()


class Burning(wx.Frame):
def __init__(self, parent, id, title):
wx.Frame.__init__(self, parent, id, title, size=(330, 200))

self.cw = 75

panel = wx.Panel(self, -1)
CenterPanel = wx.Panel(panel, -1)
self.sld = wx.Slider(CenterPanel, -1, 75, 0, 750, (-1, -1), (150, -1), wx.SL_LABELS)

vbox = wx.BoxSizer(wx.VERTICAL)
hbox = wx.BoxSizer(wx.HORIZONTAL)
hbox2 = wx.BoxSizer(wx.HORIZONTAL)
hbox3 = wx.BoxSizer(wx.HORIZONTAL)

self.wid = Widget(panel, -1)
hbox.Add(self.wid, 1, wx.EXPAND)

hbox2.Add(CenterPanel, 1, wx.EXPAND)
hbox3.Add(self.sld, 0, wx.TOP, 35)

CenterPanel.SetSizer(hbox3)

vbox.Add(hbox2, 1, wx.EXPAND)
vbox.Add(hbox, 0, wx.EXPAND)


self.Bind(wx.EVT_SCROLL, self.OnScroll)

panel.SetSizer(vbox)

self.sld.SetFocus()

self.Centre()
self.Show(True)

def OnScroll(self, event):
self.cw = self.sld.GetValue()
self.wid.Refresh()


app = wx.App()
Burning(None, -1, 'Burning widget')
app.MainLoop()
All the important code resides in the OnPaint() method of the Widget class. This widget shows graphically the total capacity of a medium and the free space available to us. The widget is controlled by a slider widget. The minimum value of our custom widget is 0, the maximum is 750. If we reach value 700, we began drawing in red colour. This normally indicates overburning.
w, h = self.GetSize()
self.cw = self.parent.GetParent().cw
...
till = (w / 750.0) * self.cw
full = (w / 750.0) * 700
We draw the widget dynamically. The greater the window, the greater the burning widget. And vice versa. That is why we must calculate the size of the wx.Panel onto which we draw the custom widget. The till parameter determines the total size to be drawn. This value comes from the slider widget. It is a proportion of the whole area. The full parameter determines the point, where we begin to draw in red color. Notice the use of floating point arithmetics. This is to achieve greater precision.
The actual drawing consists of three steps. We draw the yellow or red and yellow rectangle. Then we draw the vertical lines, which divide the widget into several parts. Finally, we draw the numbers, which indicate the capacity of the medium.
def OnSize(self, event):
self.Refresh()
Every time the window is resized, we refresh the widget. This causes the widget to repaint itself.
def OnScroll(self, event):
self.cw = self.sld.GetValue()
self.wid.Refresh()
If we scroll the thumb of the slider, we get the actual value and save it into the self.cw parameter. This value is used, when the burning widget is drawn. Then we cause the widget to be redrawn.
Burning widget Burning widget
Figure: Burning widget

The CPU widget

There are system applications that measure system resources. The temperature, memory and CPU consuption etc. By displaying a simple text like CPU 54% you probably won't impress your users. Specialized widgets are created to make the application more appealing.
The following widget is often used in system applications.
Remark for windows users. To avoid flicker, use double buffering. Change the size of the application and the width of the slider.
#!/usr/bin/python

# cpu.py

import wx


class CPU(wx.Panel):
def __init__(self, parent, id):
wx.Panel.__init__(self, parent, id, size=(80, 110))

self.parent = parent

self.SetBackgroundColour('#000000')


self.Bind(wx.EVT_PAINT, self.OnPaint)


def OnPaint(self, event):

dc = wx.PaintDC(self)

dc.SetDeviceOrigin(0, 100)
dc.SetAxisOrientation(True, True)

pos = self.parent.GetParent().GetParent().sel
rect = pos / 5

for i in range(1, 21):
if i > rect:
dc.SetBrush(wx.Brush('#075100'))
dc.DrawRectangle(10, i*4, 30, 5)
dc.DrawRectangle(41, i*4, 30, 5)
else:
dc.SetBrush(wx.Brush('#36ff27'))
dc.DrawRectangle(10, i*4, 30, 5)
dc.DrawRectangle(41, i*4, 30, 5)


class CPUWidget(wx.Frame):
def __init__(self, parent, id, title):
wx.Frame.__init__(self, parent, id, title, size=(190, 140))

self.sel = 0

panel = wx.Panel(self, -1)
centerPanel = wx.Panel(panel, -1)

self.cpu = CPU(centerPanel, -1)

hbox = wx.BoxSizer(wx.HORIZONTAL)
self.slider = wx.Slider(panel, -1, self.sel, 0, 100, (-1, -1), (25, 90),
wx.VERTICAL | wx.SL_LABELS | wx.SL_INVERSE)
self.slider.SetFocus()

hbox.Add(centerPanel, 0, wx.LEFT | wx.TOP, 20)
hbox.Add(self.slider, 0, wx.LEFT | wx.TOP, 23)


self.Bind(wx.EVT_SCROLL, self.OnScroll)

panel.SetSizer(hbox)

self.Centre()
self.Show(True)


def OnScroll(self, event):
self.sel = event.GetInt()
self.cpu.Refresh()


app = wx.App()
CPUWidget(None, -1, 'cpu')
app.MainLoop()
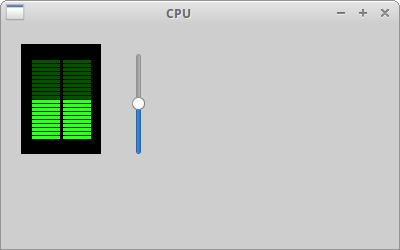
Creating this widget is quite simple. We create a black panel. Then we draw small rectangles onto this panel. The color of the rectangles depend on the value of the slider. The color can be dark green or bright green.
dc.SetDeviceOrigin(0, 100)
dc.SetAxisOrientation(True, True)
Here we change the default coordinate system to cartesian. This is to make the drawing intuitive.
pos = self.parent.GetParent().GetParent().sel
rect = pos / 5
Here we get the value of the sizer. We have 20 rectangles in each column. The slider has 100 numbers. The rect parameter makes a convertion from slider values into rectangles, that will be drawn in bright green color.
for i in range(1, 21):
if i > rect:
dc.SetBrush(wx.Brush('#075100'))
dc.DrawRectangle(10, i*4, 30, 5)
dc.DrawRectangle(41, i*4, 30, 5)
else:
dc.SetBrush(wx.Brush('#36ff27'))
dc.DrawRectangle(10, i*4, 30, 5)
dc.DrawRectangle(41, i*4, 30, 5)
Here we draw 40 rectangles, 20 in each column. If the number of the rectangle being drawn is greater than the converted rect value, we draw it in a dark green color. Otherwise in bright green.
CPU widget
Figure: CPU widget
In this chapter, we have created custom widgets in wxPython.
Continue Reading

Graphics Device Interface in wxPython

The GDI

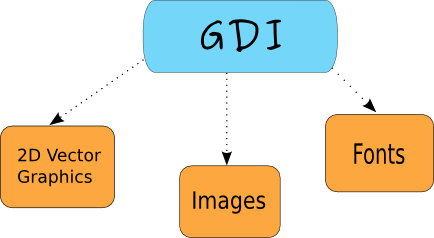
The GDI (Graphics Device Interface) is an interface for working with graphics. It is used to interact with graphic devices such as monitor, printer or a file. The GDI allows programmers to display data on a screen or printer without having to be concerned about the details of a particular device. The GDI insulates the programmer from the hardware.
The GDI
Figure: The GDI structure
To begin drawing graphics, we must create a device context (DC) object. In wxPython the device context is called wx.DC. The documentation defines wx.DC as a device context onto which which graphics and text can be drawn. It represents number of devices in a generic way. Same piece of code can write to different kinds of devices. Be it a screen or a printer. The wx.DC is not intended to be used directly. Instead a programmer should choose one of the derived classes. Each derived class is intended to be used under specific conditions.

Derived wx.DC classes

  • wxBufferedDC
  • wxBufferedPaintDC
  • wxPostScriptDC
  • wxMemoryDC
  • wxPrinterDC
  • wxScreenDC
  • wxClientDC
  • wxPaintDC
  • wxWindowDC
The wx.ScreenDC is used to draw anywhere on the screen. The wx.WindowDC is used if we want to paint on the whole window (Windows only). This includes window decorations. The wx.ClientDC is used to draw on the client area of a window. The client area is the area of a window without it's decorations (title and border). The wx.PaintDC is used to draw on the client area as well. But there is one difference between the wx.PaintDC and the wx.ClientDC. The wx.PaintDC should be used only from a wx.PaintEvent. The wx.ClientDC shoud not be used from a wx.PaintEvent. The wx.MemoryDC is used to draw graphics on the bitmap. The wx.PostScriptDC is used to write to PostScript files on any platform. The wx.PrinterDC is used to access a printer (Windows only).

Drawing a simple line

Our first example will draw a simple line onto the client area of a window.
 DrawLine(int x1, int y1, int x2, int y2)
This method draws a line from the first point to the second. Excluding the second point.
#!/usr/bin/python
# -*- coding: utf-8 -*-

"""
ZetCode wxPython tutorial

This program draws a line on the
frame window after a while

author: Jan Bodnar
website: zetcode.com
last edited: November 2010
"""

import wx

class Example(wx.Frame):
def __init__(self, parent, title):
super(Example, self).__init__(parent, title=title,
size=(250, 150))

wx.FutureCall(2000, self.DrawLine)

self.Centre()
self.Show()

def DrawLine(self):
dc = wx.ClientDC(self)
dc.DrawLine(50, 60, 190, 60)

if __name__ == '__main__':
app = wx.App()
Example(None, 'Line')
app.MainLoop()
We draw a line on the frame window after two seconds have elapsed.
wx.FutureCall(2000, self.DrawLine)
We call the DrawLine() method after the window has been created. We do it because, when the window is created, it is drawn. All our drawings would be therefore lost. We can start drawing after the window has been created. This is the reason, why we call the wx.FutureCall() method.
def DrawLine(self):
dc = wx.ClientDC(self)
dc.DrawLine(50, 60, 190, 60)
We create a wx.ClientDC device context. The only parameter is the window on which we want to draw. In our case it is self, which is a reference to our wx.Frame widget. We call the DrawLine() method of the device context. This call actually draws a line on our window.
It is very important to understand the following behaviour. If we resize the window, the line will disappear. Why is this happening? Every window is redrawn, if it is resized. It is also redrawn, if it is maximized. The window is also redrawn, if we cover it by another window and uncover afterwards. The window is drawn to it's default state and our line is lost. We have to draw the line each time the window is resized. The solution is the wx.PaintEvent. This event is triggered every time, the window is redrawn. We will draw our line inside a method that will be hooked to the paint event.
The following example shows how it is done.
#!/usr/bin/python
# -*- coding: utf-8 -*-

"""
ZetCode wxPython tutorial

This program draws a line in
a paint event

author: Jan Bodnar
website: zetcode.com
last edited: November 2010
"""

import wx

class Example(wx.Frame):
def __init__(self, parent, title):
super(Example, self).__init__(parent, title=title,
size=(250, 150))

self.Bind(wx.EVT_PAINT, self.OnPaint)

self.Centre()
self.Show()

def OnPaint(self, e):
dc = wx.PaintDC(self)
dc.DrawLine(50, 60, 190, 60)

if __name__ == '__main__':
app = wx.App()
Example(None, 'Line')
app.MainLoop()
We draw the same line. This time in reaction to a paint event.
self.Bind(wx.EVT_PAINT, self.OnPaint)
Here we bind the OnPaint method to the wx.PaintEvent event. It means, that each time our window is repainted, we call the OnPaint method. Now the line will not disappear, if we resize our window (cover it, maximize it).
 dc = wx.PaintDC(self)
Notice, that this time we have used the wx.PaintDC device context.
Drawing a line
Figure: drawing a line

Computer graphics

There are two different computer graphics. Vector and raster graphics. Raster graphics represents images as a collection of pixels. Vector graphics is the use of geometrical primitives such as points, lines, curves or polygons to represent images. These primitives are created using mathematical equations. Both types of computer graphics have advantages and disadvantages. The advantages of vector graphics over raster are:
  • smaller size
  • ability to zoom indefinitely
  • moving, scaling, filling or rotating does not degrade the quality of an image
Types of primitives
  • points
  • lines
  • polylines
  • polygons
  • circles
  • ellipses
  • Splines
Device context attributes
AttributeObjectDefault valueGet MethodSet Method
Brushwx.Brushwx.WHITE_BRUSHwx.Brush GetBrush()SetBrush(wx.Brush brush)
Penwx.Penwx.BLACK_PENwx.Pen GetPen()SetPen(wx.Pen pen)
Mapping Mode-wx.MM_TEXTint GetMapMode()SetMapMode(int mode)
BackgroundMode-wx.TRANSPARENTint GetBackgroundMode()SetBackgroundMode(int mode)
Text background colourwx.Colourwx.WHITEwx.Colour GetTextBackground()SetTextBackground(wx.Colour colour)
Text foreground colourwx.Colourwx.BLACKwx.Colour GetTextForeground()SetTextForeground(wx.Colour colour)

Basic elements

In the following lines we will introduce several elementary objects. Colours, Brushes, Pens, Joins, Caps, Gradients.

Colours

A colour is an object representing a combination of Red, Green, and Blue (RGB) intensity values. Valid RGB values are in the range 0 to 255. There are three ways for setting colours. We can create a wx.Colour object, use a predefined colour name or use hex value string. wx.Colour(0,0,255), 'BLUE', '#0000FF'. These three notations produce the same colour.
A perfect tool for working with colours can be found on the colorjack.com website. Or we can use such a tool as Gimp.
We have also a list of predefined colour names that we can use in our programs.


Standard Colour Database
AQUAMARINEBLACKBLUEBLUE VIOLETBROWN
CADET BLUECORALCORNFLOWER BLUECYANDARK GREY
DARK GREENDARK OLIVE GREENDARK ORCHIDDARK SLATE BLUEDARK SLATE GREY
DARK TURQUOISEDIM GREYFIREBRICKFOREST GREENGOLD
GOLDENRODGREYGREENGREEN YELLOWINDIAN RED
KHAKILIGHT BLUELIGHT GREYLIGHT STEEL BLUELIME GREEN
MAGENTAMAROONMEDIUM AQUAMARINEMEDIUM BLUEMEDIUM FOREST GREEN
MEDIUM GOLDENRODMEDIUM ORCHIDMEDIUM SEA GREENMEDIUM SLATE BLUEMEDIUM SPRING GREEN
MEDIUM TURQUOISEMEDIUM VIOLET REDMIDNIGHT BLUENAVYORANGE
ORANGE REDORCHIDPALE GREENPINKPLUM
PURPLEREDSALMONSEA GREENSIENNA
SKY BLUESLATE BLUESPRING GREENSTEEL BLUETAN
THISTLE TURQUOISEVIOLETVIOLET REDWHEAT
WHITEYELLOWYELLOW GREEN

#!/usr/bin/python
# -*- coding: utf-8 -*-

"""
ZetCode wxPython tutorial

This program draws nine colours
on the window

author: Jan Bodnar
website: zetcode.com
last edited: November 2010
"""

import wx

class Example(wx.Frame):
def __init__(self, parent, title):
super(Example, self).__init__(parent, title=title,
size=(350, 280))

self.Bind(wx.EVT_PAINT, self.OnPaint)

self.Centre()
self.Show()


def OnPaint(self, e):
dc = wx.PaintDC(self)
dc.SetPen(wx.Pen('#d4d4d4'))

dc.SetBrush(wx.Brush('#c56c00'))
dc.DrawRectangle(10, 15, 90, 60)

dc.SetBrush(wx.Brush('#1ac500'))
dc.DrawRectangle(130, 15, 90, 60)

dc.SetBrush(wx.Brush('#539e47'))
dc.DrawRectangle(250, 15, 90, 60)

dc.SetBrush(wx.Brush('#004fc5'))
dc.DrawRectangle(10, 105, 90, 60)

dc.SetBrush(wx.Brush('#c50024'))
dc.DrawRectangle(130, 105, 90, 60)

dc.SetBrush(wx.Brush('#9e4757'))
dc.DrawRectangle(250, 105, 90, 60)

dc.SetBrush(wx.Brush('#5f3b00'))
dc.DrawRectangle(10, 195, 90, 60)

dc.SetBrush(wx.Brush('#4c4c4c'))
dc.DrawRectangle(130, 195, 90, 60)

dc.SetBrush(wx.Brush('#785f36'))
dc.DrawRectangle(250, 195, 90, 60)


if __name__ == '__main__':
app = wx.App()
Example(None, 'Colours')
app.MainLoop()

We draw nine rectangles and fill them with different colours.
dc.SetBrush(wx.Brush('#c56c00'))
dc.DrawRectangle(10, 15, 90, 60)
We specify the colour of the brush in hexadecimal notation. The brush is the background fill of the shape. Then we draw the rectangle.
Colours
Figure: Colours

wx.Pen

Pen is an elementary graphics object. It is used to draw lines, curves and outlines of rectangles, ellipses, polygons or other shapes.
wx.Pen(wx.Colour colour, width=1, style=wx.SOLID)
The wx.Pen constructor has three parameters. Colour, width and style. Follows a list of possible pen styles.
Pen styles
  • wx.SOLID
  • wx.DOT
  • wx.LONG_DASH
  • wx.SHORT_DASH
  • wx.DOT_DASH
  • wx.TRANSPARENT
#!/usr/bin/python

# pens.py

import wx

class Pens(wx.Frame):
def __init__(self, parent, id, title):
wx.Frame.__init__(self, parent, id, title, size=(350, 190))

self.Bind(wx.EVT_PAINT, self.OnPaint)

self.Centre()
self.Show(True)

def OnPaint(self, event):
dc = wx.PaintDC(self)

dc.SetPen(wx.Pen('#4c4c4c', 1, wx.SOLID))
dc.DrawRectangle(10, 15, 90, 60)

dc.SetPen(wx.Pen('#4c4c4c', 1, wx.DOT))
dc.DrawRectangle(130, 15, 90, 60)

dc.SetPen(wx.Pen('#4c4c4c', 1, wx.LONG_DASH))
dc.DrawRectangle(250, 15, 90, 60)

dc.SetPen(wx.Pen('#4c4c4c', 1, wx.SHORT_DASH))
dc.DrawRectangle(10, 105, 90, 60)

dc.SetPen(wx.Pen('#4c4c4c', 1, wx.DOT_DASH))
dc.DrawRectangle(130, 105, 90, 60)

dc.SetPen(wx.Pen('#4c4c4c', 1, wx.TRANSPARENT))
dc.DrawRectangle(250, 105, 90, 60)

app = wx.App()
Pens(None, -1, 'Pens')
app.MainLoop()
If we don't specify a custom brush, a default one is used. The default brush is wx.WHITE_BRUSH. The perimeter of the rectangles is drawn by the pen. The last one has no border. It is transparent, e.g. not visible.
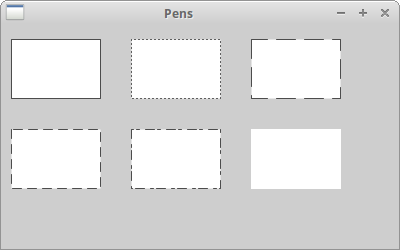
Pens
Figure: Pens

Joins and Caps

A pen object has additional two parameters. The Join and the Cap. The Join defines how joins between lines will be drawn. The Join style has the following options:
  • wx.JOIN_MITER
  • wx.JOIN_BEVEL
  • wx.JOIN_ROUND
When using wx.JOIN_MITER the outer edges of the lines are extended. They meet at an angle, and this area is filled. In wx.JOIN_BEVEL the triangular notch between two lines is filled. In wx.JOIN_ROUND the circular arc between the two lines is filled. The default value is wx.JOIN_ROUND.
The Cap defines how the line ends will be drawn by the pen. The options are:
  • wx.CAP_ROUND
  • wx.CAP_PROJECTING
  • wx.CAP_BUTT
The wx.CAP_ROUND will draw rounded ends. The wx.CAP_PROJECTING and the wx.CAP_BUTT will both draw square ends. The difference between them is that the wx.CAP_PROJECTING will extend beyond the end point by the half of the line size. The wx.CAP_ROUND will extend beyond the end point as well.
#!/usr/bin/python

# joinscaps.py

import wx

class JoinsCaps(wx.Frame):
def __init__(self, parent, id, title):
wx.Frame.__init__(self, parent, id, title, size=(330, 300))

self.Bind(wx.EVT_PAINT, self.OnPaint)

self.Centre()
self.Show(True)

def OnPaint(self, event):
dc = wx.PaintDC(self)

pen = wx.Pen('#4c4c4c', 10, wx.SOLID)

pen.SetJoin(wx.JOIN_MITER)
dc.SetPen(pen)
dc.DrawRectangle(15, 15, 80, 50)

pen.SetJoin(wx.JOIN_BEVEL)
dc.SetPen(pen)
dc.DrawRectangle(125, 15, 80, 50)

pen.SetJoin(wx.JOIN_ROUND)
dc.SetPen(pen)
dc.DrawRectangle(235, 15, 80, 50)

pen.SetCap(wx.CAP_BUTT)
dc.SetPen(pen)
dc.DrawLine(30, 150, 150, 150)

pen.SetCap(wx.CAP_PROJECTING)
dc.SetPen(pen)
dc.DrawLine(30, 190, 150, 190)

pen.SetCap(wx.CAP_ROUND)
dc.SetPen(pen)
dc.DrawLine(30, 230, 150, 230)

pen2 = wx.Pen('#4c4c4c', 1, wx.SOLID)
dc.SetPen(pen2)
dc.DrawLine(30, 130, 30, 250)
dc.DrawLine(150, 130, 150, 250)
dc.DrawLine(155, 130, 155, 250)

app = wx.App()
JoinsCaps(None, -1, 'Joins and Caps')
app.MainLoop()
 pen = wx.Pen('#4c4c4c', 10, wx.SOLID)
In order to see the various Join and Cap styles, we need to set the pen width to be greater than 1.
 dc.DrawLine(150, 130, 150, 250)
dc.DrawLine(155, 130, 155, 250)
Notice the two enclosing vertical lines. The distance between them is 5px. It is exactly the half of the current pen width.
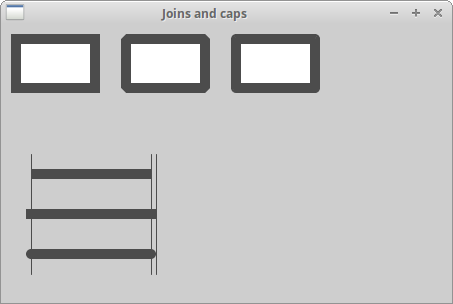
Joins and Caps
Figure: Joins and Caps

Gradients

In computer graphics, gradient is a smooth blending of shades from light to dark or from one color to another. In 2D drawing programs and paint programs, gradients are used to create colorful backgrounds and special effects as well as to simulate lights and shadows. (answers.com)
GradientFillLinear(wx.Rect rect, wx.Colour initialColour, wx.Colour destColour, int nDirection=wx.EAST)
This method fills the area specified by a rect with a linear gradient, starting from initialColour and eventually fading to destColour. The nDirection parameter specifies the direction of the colour change, the default value is wx.EAST.
#!/usr/bin/python

# gradients.py

import wx

class Gradients(wx.Frame):
def __init__(self, parent, id, title):
wx.Frame.__init__(self, parent, id, title, size=(220, 260))

self.Bind(wx.EVT_PAINT, self.OnPaint)

self.Centre()
self.Show(True)

def OnPaint(self, event):
dc = wx.PaintDC(self)

dc.GradientFillLinear((20, 20, 180, 40), '#ffec00', '#000000', wx.NORTH)
dc.GradientFillLinear((20, 80, 180, 40), '#ffec00', '#000000', wx.SOUTH)
dc.GradientFillLinear((20, 140, 180, 40), '#ffec00', '#000000', wx.EAST)
dc.GradientFillLinear((20, 200, 180, 40), '#ffec00', '#000000', wx.WEST)


app = wx.App()
Gradients(None, -1, 'Gradients')
app.MainLoop()
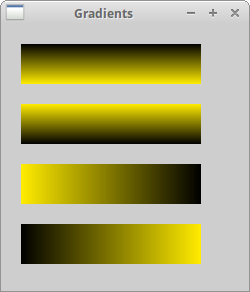
Gradients
Figure: Gradients

wx.Brush

Brush is an elementary graphics object. It is used to paint the background of graphics shapes, such as rectangles, ellipses or polygons.
 wx.Brush(wx.Colour colour, style=wx.SOLID)
The constructor of the wx.Brush accepts two parameters. Colour name and style. The following is a list of possible brush styles.

Brush styles

  • wx.SOLID
  • wx.STIPPLE
  • wx.BDIAGONAL_HATCH
  • wx.CROSSDIAG_HATCH
  • wx.FDIAGONAL_HATCH
  • wx.CROSS_HATCH
  • wx.HORIZONTAL_HATCH
  • wx.VERTICAL_HATCH
  • wx.TRANSPARENT
#!/usr/bin/python

# brushes.py

import wx

class Brush(wx.Frame):
def __init__(self, parent, id, title):
wx.Frame.__init__(self, parent, id, title, size=(350, 280))

self.Bind(wx.EVT_PAINT, self.OnPaint)

self.Centre()
self.Show(True)

def OnPaint(self, event):
dc = wx.PaintDC(self)

dc.SetBrush(wx.Brush('#4c4c4c', wx.CROSS_HATCH))
dc.DrawRectangle(10, 15, 90, 60)

dc.SetBrush(wx.Brush('#4c4c4c', wx.SOLID))
dc.DrawRectangle(130, 15, 90, 60)

dc.SetBrush(wx.Brush('#4c4c4c', wx.BDIAGONAL_HATCH))
dc.DrawRectangle(250, 15, 90, 60)

dc.SetBrush(wx.Brush('#4c4c4c', wx.CROSSDIAG_HATCH))
dc.DrawRectangle(10, 105, 90, 60)

dc.SetBrush(wx.Brush('#4c4c4c', wx.FDIAGONAL_HATCH))
dc.DrawRectangle(130, 105, 90, 60)

dc.SetBrush(wx.Brush('#4c4c4c', wx.HORIZONTAL_HATCH))
dc.DrawRectangle(250, 105, 90, 60)

dc.SetBrush(wx.Brush('#4c4c4c', wx.VERTICAL_HATCH))
dc.DrawRectangle(10, 195, 90, 60)

dc.SetBrush(wx.Brush('#4c4c4c', wx.TRANSPARENT))
dc.DrawRectangle(130, 195, 90, 60)


app = wx.App()
Brush(None, -1, 'Brushes')
app.MainLoop()
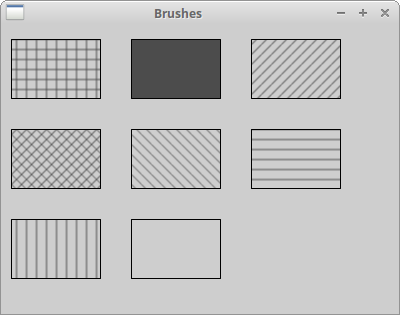
Brushes
Figure: Brushes

Custom Patterns

We are not restricted to use predefined patterns. We can easily create our own custom patterns.
wx.Brush BrushFromBitmap(wx.Bitmap stippleBitmap)
This method creates a custom brush from the bitmap.
#!/usr/bin/python

# custompatterns.py

import wx

class CustomPatterns(wx.Frame):
def __init__(self, parent, id, title):
wx.Frame.__init__(self, parent, id, title, size=(350, 280))

self.Bind(wx.EVT_PAINT, self.OnPaint)

self.Centre()
self.Show(True)

def OnPaint(self, event):
dc = wx.PaintDC(self)

dc.SetPen(wx.Pen('#C7C3C3'))

brush1 = wx.BrushFromBitmap(wx.Bitmap('pattern1.png'))
dc.SetBrush(brush1)
dc.DrawRectangle(10, 15, 90, 60)

brush2 = wx.BrushFromBitmap(wx.Bitmap('pattern2.png'))
dc.SetBrush(brush2)
dc.DrawRectangle(130, 15, 90, 60)

brush3 = wx.BrushFromBitmap(wx.Bitmap('pattern3.png'))
dc.SetBrush(brush3)
dc.DrawRectangle(250, 15, 90, 60)

brush4 = wx.BrushFromBitmap(wx.Bitmap('pattern4.png'))
dc.SetBrush(brush4)
dc.DrawRectangle(10, 105, 90, 60)

brush5 = wx.BrushFromBitmap(wx.Bitmap('pattern5.png'))
dc.SetBrush(brush5)
dc.DrawRectangle(130, 105, 90, 60)

brush6 = wx.BrushFromBitmap(wx.Bitmap('pattern6.png'))
dc.SetBrush(brush6)
dc.DrawRectangle(250, 105, 90, 60)

brush7 = wx.BrushFromBitmap(wx.Bitmap('pattern7.png'))
dc.SetBrush(brush7)
dc.DrawRectangle(10, 195, 90, 60)

brush8 = wx.BrushFromBitmap(wx.Bitmap('pattern8.png'))
dc.SetBrush(brush8)
dc.DrawRectangle(130, 195, 90, 60)

brushr9 = wx.BrushFromBitmap(wx.Bitmap('pattern9.png'))
dc.SetBrush(brushr9)
dc.DrawRectangle(250, 195, 90, 60)


app = wx.App()
CustomPatterns(None, -1, 'Custom Patterns')
app.MainLoop()
I have created some small bitmaps. For this I used the Gimp. These bitmaps are rectangles, usually around 40-150px.
Custom Patterns
Figure: Custom Patterns

Basic primitives

Point

The simplest geometrical object is a point. It is a plain dot on the window.
DrawPoint(int x, int y)
This method draws a point at x, y coordinates.
#!/usr/bin/python

# points.py

import wx
import random

class Points(wx.Frame):
def __init__(self, parent, id, title):
wx.Frame.__init__(self, parent, id, title, size=(250, 150))

self.Bind(wx.EVT_PAINT, self.OnPaint)

self.Centre()
self.Show(True)

def OnPaint(self, event):
dc = wx.PaintDC(self)

dc.SetPen(wx.Pen('RED'))

for i in range(1000):
w, h = self.GetSize()
x = random.randint(1, w-1)
y = random.randint(1, h-1)
dc.DrawPoint(x, y)


app = wx.App()
Points(None, -1, 'Points')
app.MainLoop()
A single point might be difficult to see. So we create 1000 points.
dc.SetPen(wx.Pen('RED'))
Here we set the colour of the pen to red.
w, h = self.GetSize()
x = random.randint(1, w-1)
The points are distributed randomly around the client area of the window. They are also distributed dynamically. If we resize the window, the points will be drawn randomly over a new client size. The randint(a, b) method returns a random integer in range [a, b], e.g. including both points.
Points
Figure: drawing points

Shapes

Shapes are more sophisticated geometrical objects. We will draw various geometrical shapes in the following example.
#!/usr/bin/python

# shapes.py

import wx

class Shapes(wx.Frame):
def __init__(self, parent, id, title):
wx.Frame.__init__(self, parent, id, title, size=(350, 300))

self.Bind(wx.EVT_PAINT, self.OnPaint)

self.Centre()
self.Show(True)

def OnPaint(self, event):
dc = wx.PaintDC(self)

dc.DrawEllipse(20, 20, 90, 60)
dc.DrawRoundedRectangle(130, 20, 90, 60, 10)
dc.DrawArc(240, 40, 340, 40, 290, 20)

dc.DrawPolygon(((130, 140), (180, 170), (180, 140), (220, 110), (140, 100)))
dc.DrawRectangle(20, 120, 80, 50)
dc.DrawSpline(((240, 170), (280, 170), (285, 110), (325, 110)))

dc.DrawLines(((20, 260), (100, 260), (20, 210), (100, 210)))
dc.DrawCircle(170, 230, 35)
dc.DrawRectangle(250, 200, 60, 60)

app = wx.App()
Shapes(None, -1, 'Shapes')
app.MainLoop()
In our example we have drawn an ellipse, a rounded rectangle, an arc, a rectangle ,a polygon, splines, lines, a circle and a square (from right to left, from top to bottom). A circle is a special kind of ellipse and a square is a special kind of rectangle.
Shapes
Figure: Shapes

Regions

The device context can be divided into several parts called Regions. A region can be of any shape. A region can be a simple rectangle or circle. With Union, Intersect, Substract and Xor operations we can create complex regions from simple ones. Regions are used for outlining, filling or clipping.
We can create regions in three ways. The easiest way is to create a rectangular region. More complex regions can be created from a list of points of from a bitmap.
wx.Region(int x=0, int y=0, int width=0, int height=0)
This constructor creates a rectangular region.
wx.RegionFromPoints(list points, int fillStyle=wx.WINDING_RULE)
This constructor creates a polygonal region. The fillStyle parameter can be wx.WINDING_RULE or wx.ODDEVEN_RULE.
wx.RegionFromBitmap(wx.Bitmap bmp)
The most complex regions can be created with the previous method.
Before we go to the regions, we will create a small example first. We divide the topic into several parts so that it is easier to understand. You may find it a good idea to revise your school math. Here we can find a good article.
#!/usr/bin/python
# -*- coding: utf-8 -*-

import wx
from math import hypot, sin, cos, pi

class Example(wx.Frame):

def __init__(self, *args, **kw):
super(Example, self).__init__(*args, **kw)

self.Bind(wx.EVT_PAINT, self.OnPaint)

self.SetSize((350, 250))
self.SetTitle('Lines')
self.Centre()
self.Show(True)

def OnPaint(self, event):

dc = wx.PaintDC(self)
size_x, size_y = self.GetClientSizeTuple()
dc.SetDeviceOrigin(size_x/2, size_y/2)

radius = hypot(size_x/2, size_y/2)
angle = 0

while (angle < 2*pi):
x = radius*cos(angle)
y = radius*sin(angle)
dc.DrawLinePoint((0, 0), (x, y))
angle = angle + 2*pi/360

def main():

ex = wx.App()
Example(None)
ex.MainLoop()

if __name__ == '__main__':
main()
In this example we draw 260 lines from the middle of the client area. The distance between two lines is 1 degree. We create an interesting figure.
import wx
from math import hypot, sin, cos, pi
We need three mathematical functions and one constant from the math module.
dc.SetDeviceOrigin(size_x/2, size_y/2)
The method SetDeviceOrigin() creates a new beginning of the coordinate system. We place it into the middle of the client area. By repositioning the coordinate system, we make our drawing less complicated.
radius = hypot(size_x/2, size_y/2)
Here we get the Hypotenuse. It is the longest line, we can draw from the middle of the client area. It is the length of the line, that should be drawn from the beginning into the corner of the window. This way most of the lines are not drawn fully. The overlapping parts are not visible. see Hypotenuse.
x = radius*cos(angle)
y = radius*sin(angle)
These are parametric functions. They are used to find [x, y] points on the curve. All 360 lines are drawn from the beginning of the coordinate system up to the points on the circle.
Lines
Figure: Lines

Clipping

Clipping is restricting drawing to a certain area. Clipping is used in two cases. To create effects and to improve performance of the application. We restrict drawing to a certain region with the SetClippingRegionAsRegion() method.
In the following example we will modify and enhance our previous script.
#!/usr/bin/python

# star.py

import wx
from math import hypot, sin, cos, pi

class Star(wx.Frame):
def __init__(self, parent, id, title):
wx.Frame.__init__(self, parent, id, title, size=(350, 300))

self.Bind(wx.EVT_PAINT, self.OnPaint)

self.Centre()
self.Show(True)

def OnPaint(self, event):
dc = wx.PaintDC(self)

dc.SetPen(wx.Pen('#424242'))
size_x, size_y = self.GetClientSizeTuple()
dc.SetDeviceOrigin(size_x/2, size_y/2)

points = (((0, 85), (75, 75), (100, 10), (125, 75), (200, 85),
(150, 125), (160, 190), (100, 150), (40, 190), (50, 125)))

region = wx.RegionFromPoints(points)
dc.SetClippingRegionAsRegion(region)

radius = hypot(size_x/2, size_y/2)
angle = 0

while (angle < 2*pi):
x = radius*cos(angle)
y = radius*sin(angle)
dc.DrawLinePoint((0, 0), (x, y))
angle = angle + 2*pi/360

dc.DestroyClippingRegion()


app = wx.App()
Star(None, -1, 'Star')
app.MainLoop()
We draw again all the 360 lines. But this time, only a portion of the client aren is drawn. The region that we restrict our drawing to is a star object.
region = wx.RegionFromPoints(points)
dc.SetClippingRegionAsRegion(region)
We create a region from the list of points with the wx.RegionFromPoins() method. The SetClippingRegionAsRegion()method restricts the drawing to the specified region. In our case it is a star object.
dc.DestroyClippingRegion()
We must destroy the clipping region.
Star
Figure: Star

Operations over Regions

Regions can be combined to create more complex shapes. We can use four set operations. Union, Intersect, Substract and Xor.
The following example shows all four operations in action.
#!/usr/bin/python

# operations.py

import wx

class Operations(wx.Frame):
def __init__(self, parent, id, title):
wx.Frame.__init__(self, parent, id, title, size=(270, 220))

self.Bind(wx.EVT_PAINT, self.OnPaint)

self.Centre()
self.Show(True)

def OnPaint(self, event):
dc = wx.PaintDC(self)
dc.SetPen(wx.Pen('#d4d4d4'))

dc.DrawRectangle(20, 20, 50, 50)
dc.DrawRectangle(30, 40, 50, 50)

dc.SetBrush(wx.Brush('#ffffff'))
dc.DrawRectangle(100, 20, 50, 50)
dc.DrawRectangle(110, 40, 50, 50)
region1 = wx.Region(100, 20, 50, 50)
region2 = wx.Region(110, 40, 50, 50)
region1.IntersectRegion(region2)
rect = region1.GetBox()
dc.SetClippingRegionAsRegion(region1)
dc.SetBrush(wx.Brush('#ff0000'))
dc.DrawRectangleRect(rect)
dc.DestroyClippingRegion()

dc.SetBrush(wx.Brush('#ffffff'))
dc.DrawRectangle(180, 20, 50, 50)
dc.DrawRectangle(190, 40, 50, 50)
region1 = wx.Region(180, 20, 50, 50)
region2 = wx.Region(190, 40, 50, 50)
region1.UnionRegion(region2)
dc.SetClippingRegionAsRegion(region1)
rect = region1.GetBox()
dc.SetBrush(wx.Brush('#fa8e00'))
dc.DrawRectangleRect(rect)
dc.DestroyClippingRegion()

dc.SetBrush(wx.Brush('#ffffff'))
dc.DrawRectangle(20, 120, 50, 50)
dc.DrawRectangle(30, 140, 50, 50)
region1 = wx.Region(20, 120, 50, 50)
region2 = wx.Region(30, 140, 50, 50)
region1.XorRegion(region2)
rect = region1.GetBox()
dc.SetClippingRegionAsRegion(region1)
dc.SetBrush(wx.Brush('#619e1b'))
dc.DrawRectangleRect(rect)
dc.DestroyClippingRegion()

dc.SetBrush(wx.Brush('#ffffff'))
dc.DrawRectangle(100, 120, 50, 50)
dc.DrawRectangle(110, 140, 50, 50)
region1 = wx.Region(100, 120, 50, 50)
region2 = wx.Region(110, 140, 50, 50)
region1.SubtractRegion(region2)
rect = region1.GetBox()
dc.SetClippingRegionAsRegion(region1)
dc.SetBrush(wx.Brush('#715b33'))
dc.DrawRectangleRect(rect)
dc.DestroyClippingRegion()

dc.SetBrush(wx.Brush('#ffffff'))
dc.DrawRectangle(180, 120, 50, 50)
dc.DrawRectangle(190, 140, 50, 50)
region1 = wx.Region(180, 120, 50, 50)
region2 = wx.Region(190, 140, 50, 50)
region2.SubtractRegion(region1)
rect = region2.GetBox()
dc.SetClippingRegionAsRegion(region2)
dc.SetBrush(wx.Brush('#0d0060'))
dc.DrawRectangleRect(rect)
dc.DestroyClippingRegion()

app = wx.App()
Operations(None, -1, 'Operations')
app.MainLoop()
Set operations on Regions
Figure: Set operations on Regions

Mapping modes

Speak in English, measure in Metric The English language became the global language for communication. So did the metric system become the global system in measuremet. According to this wikipedia article, there are only three exceptions. The USA, Liberia and Myanmar. For example, Americans use Fahrenheits to measure temperature, gallons to tank their cars or pounds to weigh loads.
Even though we in Europe use the metric system, there are still exceptions. The USA is dominating the IT and we are importing their standards. So we also say that we have a 17 Inch monitor. Graphics can be put into a file, displayed on the screen of a monitor or other device (cameras, videocameras, mobile phones) or printed with a printer. Paper size can be set in millimeters, points or inches, the resolution of a screen is in pixels, the quality of a text is determined by the number of dots per inch. We have also dots, bits or samples. This is one of the reasons we have logical and device units.
Logical and device units If we draw text or geometrical primitives on the client area, we position them using logical units.
Drawing text If we want to draw some text, we provide the text parameter and the x, y positions. x, y are in logical units. The device then draws the text in device units. Logical and device units may be the same, or they may differ. Logical units are used by people (millimeters), device units are are native to a particular device. For example a native device unit for a screen is pixel. The native device unit for the HEWLETT PACKARD LaserJet 1022 is 1200 dpi. (dots per inch).
So far we have talked about various measurement units. The mapping mode of the device is a way how to convert logical units to device units. wxPython has the following mapping modes:
Mapping ModeLogical Unit
wx.MM_TEXT 1 pixel
wx.MM_METRIC1 millimeter
wx.MM_LOMETRIC 1/10 of a millimeter
wx.MM_POINTS1 point, 1/72 of an inch
wx.MM_TWIPS1/20 of a point or 1/1440 of an inch
The default mapping mode is wx.MM_TEXT. In this mode, the logical unit is the same as the device unit. When people position object on a screen or design a web page, they think usually in pixels. Web designers create three column pages and these columns are set in pixels. The lowest common denominator for a page is often 800 px etc. This thinking is natural as we know our monitors have e.g. 1024x768 pxs. We are not going to do convertions, rather we are accustomed to think in pixels. If we want to draw a structure in millimeters, we can use the two metric mapping modes. Drawing directly in millimeters is too thick for a screen, that's why we have the wx.MM_LOMETRIC mapping mode.
Map mode To set a different mapping mode, we use the SetMapMode() method.
First ruler example The first ruler example will measure screen objects in pixels.
#!/usr/bin/python

# ruler1.py

import wx


RW = 701 # ruler widht
RM = 10 # ruler margin
RH = 60 # ruler height


class Ruler1(wx.Frame):
def __init__(self, parent, id, title):
wx.Frame.__init__(self, parent, id, title, size=(RW + 2*RM, 60),
style=wx.FRAME_NO_TASKBAR | wx.NO_BORDER | wx.STAY_ON_TOP)
self.font = wx.Font(7, wx.FONTFAMILY_DEFAULT, wx.FONTSTYLE_NORMAL,
wx.FONTWEIGHT_BOLD, False, 'Courier 10 Pitch')

self.Bind(wx.EVT_PAINT, self.OnPaint)
self.Bind(wx.EVT_LEFT_DOWN, self.OnLeftDown)
self.Bind(wx.EVT_RIGHT_DOWN, self.OnRightDown)
self.Bind(wx.EVT_MOTION, self.OnMouseMove)

self.Centre()
self.Show(True)

def OnPaint(self, event):
dc = wx.PaintDC(self)

brush = wx.BrushFromBitmap(wx.Bitmap('granite.png'))
dc.SetBrush(brush)
dc.DrawRectangle(0, 0, RW+2*RM, RH)
dc.SetFont(self.font)


dc.SetPen(wx.Pen('#F8FF25'))
dc.SetTextForeground('#F8FF25')


for i in range(RW):
if not (i % 100):
dc.DrawLine(i+RM, 0, i+RM, 10)
w, h = dc.GetTextExtent(str(i))
dc.DrawText(str(i), i+RM-w/2, 11)
elif not (i % 20):
dc.DrawLine(i+RM, 0, i+RM, 8)
elif not (i % 2): dc.DrawLine(i+RM, 0, i+RM, 4)

def OnLeftDown(self, event):
pos = event.GetPosition()
x, y = self.ClientToScreen(event.GetPosition())
ox, oy = self.GetPosition()
dx = x - ox
dy = y - oy
self.delta = ((dx, dy))

def OnMouseMove(self, event):
if event.Dragging() and event.LeftIsDown():
x, y = self.ClientToScreen(event.GetPosition())
fp = (x - self.delta[0], y - self.delta[1])
self.Move(fp)

def OnRightDown(self, event):
self.Close()

app = wx.App()
Ruler1(None, -1, '')
app.MainLoop()
In this example we create a ruler. This ruler will measure screen objects in pixels. We left the default mapping mode, which is wx.MM_TEXT. As we have already mentioned, this mode has the same logical and device units. In our case, pixels.
wx.Frame.__init__(self, parent, id, title, size=(RW + 2*RM, 60), style=wx.FRAME_NO_TASKBAR | 
wx.NO_BORDER | wx.STAY_ON_TOP)
We have created a borderless window. The ruler is 721 px wide. The ruler is RW + 2*RM = 701 + 20 = 721. The ruler shows 700 numbers. 0 ... 700 is 701 pixels. A ruler has a margin on both sides, 2*10 is 20 pixels. Together it makes 721 pixels.
brush = wx.BrushFromBitmap(wx.Bitmap('granite.png'))
dc.SetBrush(brush)
dc.DrawRectangle(0, 0, RW+2*RM, RH)
Here we draw a custom pattern onto the window. I have used a predefined pattern available in the GIMP. It is called granite.
w, h = dc.GetTextExtent(str(i))
dc.DrawText(str(i), i+RM-w/2, 11)
These lines ensure, that we align the text correctly. The GetTextExtent() method returns the width and the height of the text.
We do not have a border around our window. So we must handle moving manually by additional code. The OnLeftDown() and the OnMouseMove() methods enable us to move the ruler. (TODO:link to dragging.)
Ruler
Figure: First ruler example

Practical examples

You might ask yourself, why do we need all those lines, pens, gradients? What is it good for? The following scripts will bring some practical examples. We will utilize, what we have learnt in practice.
Charts Creating charts is an excelent example of utilizing gdi drawing functions. Charts are not GUI widgets. No gui toolkit provides charts as part of the library. One exception is wxWidgets toolkit (and so the wxPython). But these charts are very simple and cannot be used in real applications. A developer has usually two options. To create his own charting library or use a third-party library.
In the following example we create a simple line chart. We do not dwell into all details. I kept the example intentionally simple. A lot of things still remain undone. But you can grasp the idea and follow it.
#!/usr/bin/python

# linechart.py

import wx

data = ((10, 9), (20, 22), (30, 21), (40, 30), (50, 41),
(60, 53), (70, 45), (80, 20), (90, 19), (100, 22),
(110, 42), (120, 62), (130, 43), (140, 71), (150, 89),
(160, 65), (170, 126), (180, 187), (190, 128), (200, 125),
(210, 150), (220, 129), (230, 133), (240, 134), (250, 165),
(260, 132), (270, 130), (280, 159), (290, 163), (300, 94))

years = ('2003', '2004', '2005')


class LineChart(wx.Panel):
def __init__(self, parent):
wx.Panel.__init__(self, parent)
self.SetBackgroundColour('WHITE')

self.Bind(wx.EVT_PAINT, self.OnPaint)

def OnPaint(self, event):
dc = wx.PaintDC(self)
dc.SetDeviceOrigin(40, 240)
dc.SetAxisOrientation(True, True)
dc.SetPen(wx.Pen('WHITE'))
dc.DrawRectangle(1, 1, 300, 200)
self.DrawAxis(dc)
self.DrawGrid(dc)
self.DrawTitle(dc)
self.DrawData(dc)

def DrawAxis(self, dc):
dc.SetPen(wx.Pen('#0AB1FF'))
font = dc.GetFont()
font.SetPointSize(8)
dc.SetFont(font)
dc.DrawLine(1, 1, 300, 1)
dc.DrawLine(1, 1, 1, 201)

for i in range(20, 220, 20):
dc.DrawText(str(i), -30, i+5)
dc.DrawLine(2, i, -5, i)

for i in range(100, 300, 100):
dc.DrawLine(i, 2, i, -5)

for i in range(3):
dc.DrawText(years[i], i*100-13, -10)


def DrawGrid(self, dc):
dc.SetPen(wx.Pen('#d5d5d5'))

for i in range(20, 220, 20):
dc.DrawLine(2, i, 300, i)

for i in range(100, 300, 100):
dc.DrawLine(i, 2, i, 200)

def DrawTitle(self, dc):
font = dc.GetFont()
font.SetWeight(wx.FONTWEIGHT_BOLD)
dc.SetFont(font)
dc.DrawText('Historical Prices', 90, 235)


def DrawData(self, dc):
dc.SetPen(wx.Pen('#0ab1ff'))
for i in range(10, 310, 10):
dc.DrawSpline(data)


class LineChartExample(wx.Frame):
def __init__(self, parent, id, title):
wx.Frame.__init__(self, parent, id, title, size=(390, 300))

panel = wx.Panel(self, -1)
panel.SetBackgroundColour('WHITE')

hbox = wx.BoxSizer(wx.HORIZONTAL)
linechart = LineChart(panel)
hbox.Add(linechart, 1, wx.EXPAND | wx.ALL, 15)
panel.SetSizer(hbox)

self.Centre()
self.Show(True)


app = wx.App()
LineChartExample(None, -1, 'A line chart')
app.MainLoop()
dc.SetDeviceOrigin(40, 240)
dc.SetAxisOrientation(True, True)
By default the coordinate system in wxPython begins at point [0, 0]. The beginning point is located at the upper left corner of the clinet area. The orientation of x values is from left to right and the orientation of y values is from top to bottom. The values can be only positive. This system is used in all GUI toolkits. (All I am aware of.)
For charting we use cartesian coordinate system. In cartesian system, we can have both positive and negative values. The orientation of the x values is from left to right and the orientation of y values is from bottom to top. The origin is usually in the middle. But it is not compulsory.
dc.SetDeviceOrigin(40, 240)
dc.SetAxisOrientation(True, True)
The SetDeviceOrigin() method moves the origin to a new point on the client area. This is called linear translation. Then we change the axis orientation with the SetAxisOrientation() method.
SetAxisOrientation(bool xLeftRight, bool yBottomUp)
The method signature is self-explanatory. We can put true or false values to these two parameters.
self.DrawAxis(dc)
self.DrawGrid(dc)
self.DrawTitle(dc)
self.DrawData(dc)
We separate the construction of the chart into four methods. The first will draw axis, the second will draw the grid, the third the title and the last one will draw the data.
 for i in range(3):
dc.DrawText(years[i], i*100-13, -10)
Because of the simplicity of the script, there are some magic numbers. In reality, we would have to calculate them. In the previous code example, we draw the years alongside the x axis. We subtract 13 px from the x value. This is done to center the years over the vertical lines. It works on my linux box. I might not work correctly on other platforms. It might not work even on linux boxes with different themes. You just play a bit with this example. Adjusting it to fit under the different circumstances is no rocket science. Normally, we need to calculate the width of the chart, the width of the text and center the text manually.
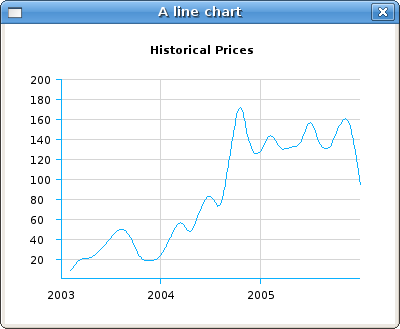
A line chart
Figure: A line chart
Note Note is a small script that shows several interesting features of the GDI. We will see, how we can create a custom shaped window. There are small applications that are used to take visible notes. They work as reminders for people, that work with computers a lot. (e.g. us).

#!/usr/bin/python

# note.py

import wx

class Note(wx.Frame):
def __init__(self, parent, id, title):
wx.Frame.__init__(self, parent, id, title,
style=wx.FRAME_SHAPED |
wx.SIMPLE_BORDER |
wx.FRAME_NO_TASKBAR)

self.font = wx.Font(11, wx.FONTFAMILY_DEFAULT, wx.FONTSTYLE_NORMAL,
wx.FONTWEIGHT_BOLD, False, 'Comic Sans MS')
self.bitmap = wx.Bitmap('note.png', wx.BITMAP_TYPE_PNG)
self.cross = wx.Bitmap('cross.png', wx.BITMAP_TYPE_PNG)

w = self.bitmap.GetWidth()
h = self.bitmap.GetHeight()
self.SetClientSize((w, h))

if wx.Platform == '__WXGTK__':
self.Bind(wx.EVT_WINDOW_CREATE, self.SetNoteShape)
else: self.SetNoteShape()

self.Bind(wx.EVT_PAINT, self.OnPaint)
self.Bind(wx.EVT_LEFT_DOWN, self.OnLeftDown)
self.Bind(wx.EVT_MOTION, self.OnMouseMove)

self.bitmapRegion = wx.RegionFromBitmap(self.bitmap)
self.crossRegion = wx.RegionFromBitmap(self.cross)

self.bitmapRegion.IntersectRegion(self.crossRegion)
self.bitmapRegion.Offset(170, 10)

dc = wx.ClientDC(self)
dc.DrawBitmap(self.bitmap, 0, 0, True)
self.PositionTopRight()
self.Show(True)

def PositionTopRight(self):
disx, disy = wx.GetDisplaySize()
x, y = self.GetSize()
self.Move((disx-x, 0))

def SetNoteShape(self, *event):
region = wx.RegionFromBitmap(self.bitmap)
self.SetShape(region)

def OnLeftDown(self, event):
pos = event.GetPosition()
if self.bitmapRegion.ContainsPoint(pos):
self.Close()
x, y = self.ClientToScreen(event.GetPosition())
ox, oy = self.GetPosition()
dx = x - ox
dy = y - oy
self.delta = ((dx, dy))


def OnMouseMove(self, event):
if event.Dragging() and event.LeftIsDown():
x, y = self.ClientToScreen(event.GetPosition())
fp = (x - self.delta[0], y - self.delta[1])
self.Move(fp)

def OnPaint(self, event):
dc = wx.PaintDC(self)
dc.SetFont(self.font)
dc.SetTextForeground('WHITE')

dc.DrawBitmap(self.bitmap, 0, 0, True)
dc.DrawBitmap(self.cross, 170, 10, True)
dc.DrawText('- Go shopping', 20, 20)
dc.DrawText('- Make a phone call', 20, 50)
dc.DrawText('- Write an email', 20, 80)


app = wx.App()
Note(None, -1, '')
app.MainLoop()
The idea behind creating a shaped window is simple. Most applications are rectangular. They share lots of similarities. They have menus, toolbars, titles etc. This might be boring. Some developers create more fancy applications. We can make our applications more attractive by using images. The idea is as follows. We create a frame without a border. We can draw a custom image on the frame during the paint event.
wx.Frame.__init__(self, parent, id, title,
style=wx.FRAME_SHAPED |
wx.SIMPLE_BORDER |
wx.FRAME_NO_TASKBAR)
In order to create a custom shaped application, we must set necessary style options. The wx.FRAME_SHAPED enables to create a shaped window. The wx.SIMPLE_BORDER removes the thick border. The wx.FRAME_NO_TASKBAR prevents the application from appearing on the taskbar.
self.font = wx.Font(11, wx.FONTFAMILY_DEFAULT, wx.FONTSTYLE_NORMAL, 
wx.FONTWEIGHT_BOLD, False, 'Comic Sans MS')
I was looking for a nice font for the note example. I finally chose Comic Sans MS. This is a proprietary font. Linux users must install msttcorefonts package. If we do not have a font installed, the system chooses another one. Usually not to our taste.
self.bitmap = wx.Bitmap('note.png', wx.BITMAP_TYPE_PNG)
self.cross = wx.Bitmap('cross.png', wx.BITMAP_TYPE_PNG)
I have created two bitmaps. The first is a rounded rectangle. With a kind of an orange fill. I have used Inkscape vector illustrator to create it. The second one is a small cross. It is used to close the application. For this I used Gimp image editor.
w = self.bitmap.GetWidth()
h = self.bitmap.GetHeight()
self.SetClientSize((w, h))
We are going to draw a bitmap on the frame. I order to cover the whole frame, we figure out the bitmap size. Then we set the site of the frame to the size of the bitmap.
if wx.Platform == '__WXGTK__':
self.Bind(wx.EVT_WINDOW_CREATE, self.SetNoteShape)
else: self.SetNoteShape()
This is some platform dependent code. Linux developers should call the SetNoteShape() method immediately after the wx.WindowCreateEvent event.
dc = wx.ClientDC(self)
dc.DrawBitmap(self.bitmap, 0, 0, True)
These lines are not necessary, because a paint event is generated during the creation of the application. But we believe, it makes the example smoother. I say we, because this is what I have learnt from the others.
def SetNoteShape(self, *event):
region = wx.RegionFromBitmap(self.bitmap)
self.SetShape(region)
Here we set the shape of the frame to that of the bitmap. The pixels outside the image become transparent.
If we remove a border from the frame, we cannot move the window. The OnLeftDown() and the OnMouseMove() methods enable the user to move the window by clicking on the client area of the frame and dragging it.
dc.DrawBitmap(self.bitmap, 0, 0, True)
dc.DrawBitmap(self.cross, 170, 10, True)
dc.DrawText('- Go shopping', 20, 20)
dc.DrawText('- Make a phone call', 20, 50)
dc.DrawText('- Write an email', 20, 80)
Within the OnPaint() method we draw two bitmaps and three texts.
Finally we will talk about how we close the note script.
self.bitmapRegion = wx.RegionFromBitmap(self.bitmap)
self.crossRegion = wx.RegionFromBitmap(self.cross)

self.bitmapRegion.IntersectRegion(self.crossRegion)
self.bitmapRegion.Offset(170, 10)
...
pos = event.GetPosition()
if self.bitmapRegion.ContainsPoint(pos):
self.Close()
We create two regions from two bitmaps. We intersect these two regions. This way we get all pixels that share both bitmaps. Finally we move the region to the point, where we draw the cross bitmap. We use the Offset() method. By default the region starts at [0, 0] point.
Inside the OnLeftDown() method we check if we clicked inside the region. If true, we close the script.
Note example
Figure: Note
In this chapter we have worked with the GDI.
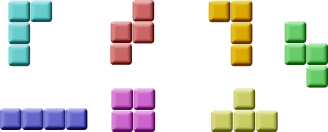
Continue Reading