Eclipse IDE
Eclipse IDE (Integrated Development Environment) is one of the top Java IDEs. It competes heavily with another widely used IDE called Netbeans. Both Eclipse and Netbeans are primarily Java IDEs. Recently they have added support for other languages.Eclipse was originally developed by the IBM corporation. Now it is maintained by the Eclipse Foundation. Eclipse is a multiplatform, open source, free of charge IDE. It is a choise of thousands of developers worldwide.
Eclipse IDE is coded in Java programming language. The GUI is created using the SWT, Standard Widget Toolkit. The SWT toolkit comes from IBM too. Unlike Swing, which is written in Java, the SWT lets the underlying OS to create the GUI. SWT uses the java native interface to do the job. The main advantages of the SWT are speed and native look and feel.
The C development environment is available as a plugin or as a standalone package. There are several packages of Eclipse IDE available. For the C/C++ development, we choose the Eclipse IDE for C/C++ Developers from the downloads page of the eclipse.org site.
The IDE
The following screenshot shows the Eclipse IDE.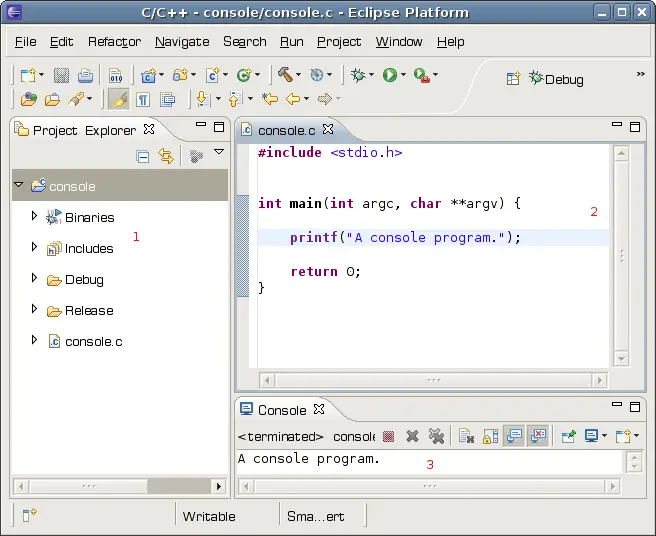
Figure: Eclipse IDE
The current Eclipse running is called the Workbench. A Workbench is divided into parts calles Perspectives. A Perspective is a logical group of certain views and editors.
- Project Explorer view
- Source editor window
- Console view
Console C project
Next we will create a simple C console application. To create an application in Eclipse, we must start a project. A project is a group of directories, files and other resources needed in a C application.From the File menu we select New, C Project. We can also create the project by using the context menu, right click on the Project Explorer view and select New, C Project from the pop up window. We can also click on the New button on the toolbar and select C Project.
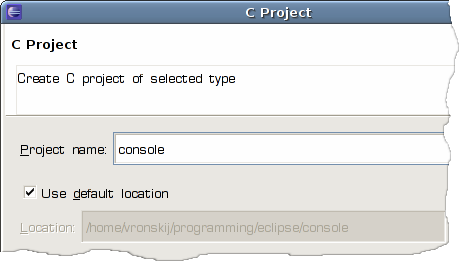
Figure: C Project
In the dialog window, we provide a name for our C project. And click on the Finish button.
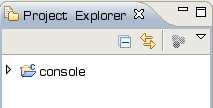
Figure: Project
In the Project Explorer view, we see our newly created C Project. The next step is to create a C file. We right click on the project in the Project Explorer, select New, Source file.
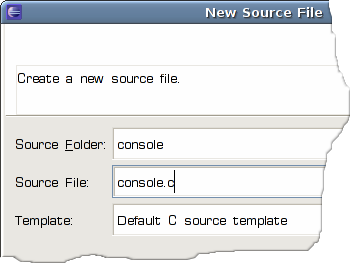
Figure: C Source file
In the dialog window, we provide a name for our C Source file. We must give it a .c extension. We type in the following C code:
#include <stdio.h>Finally, we build and run the console application. To build the project, we go to the Project menu and select Build Project option or right click on the console project in the Project Explorer and select Built Project option. If all went OK, we can run the application with the Ctrl + F11 shortcut.
int main(int argc, char **argv) {
printf("A console program.");
return 0;
}
In the Console View, we can see the "A console program." string.
Simple GTK+ application
In the next example, we will create a simple GTK+ application in C language.In order to create even a simple GTK+ application, we must use a quite a few include files and libraries. Fortunately, there is one handy tool called pkg-config, which will greatly help us setting up project settings.
The pgk-config returns metadata about installed libraries. Simply put, if we want to use a specific library, it will provide us necessary dependent libraries and include files, that we need. The pkg-config program retrieves information about packages from special metadata files.
$ pwdHere is the metadata file for cairo library, a multiplatform 2D graphics library. In order to use cairo library, we need freetype2, fontconfig, libpng12, xrender and x11 libraries.
/usr/lib/pkgconfig
$ cat cairo.pc
prefix=/usr
exec_prefix=${prefix}
libdir=${exec_prefix}/lib
includedir=${prefix}/include
Name: cairo
Description: Multi-platform 2D graphics library
Version: 1.4.2
Requires.private: freetype2 >= 8.0.2 fontconfig libpng12 xrender >= 0.6 x11
Libs: -L${libdir} -lcairo
Libs.private: -lz -lm
Cflags: -I${includedir}/cairo
$ pkg-config --cflags gtk+-2.0By providing the --cflags option, we get all necessary include files for a GTK+ 2.0 application.
-I/usr/include/gtk-2.0 -I/usr/lib/gtk-2.0/include -I/usr/include/atk-1.0
-I/usr/include/cairo -I/usr/include/pango-1.0 -I/usr/include/glib-2.0
-I/usr/lib/glib-2.0/include -I/usr/include/freetype2 -I/usr/include/libpng12
$ pkg-config --libs gtk+-2.0Similarly, we get all libraries with the --libs option. Notice that we might not need all libs. The math library (-lm) is not needed, unless we do some mathematical computations.
-lgtk-x11-2.0 -lgdk-x11-2.0 -latk-1.0 -lgdk_pixbuf-2.0 -lm -lpangocairo-1.0
-lfontconfig -lXext -lXrender -lXinerama -lXi -lXrandr
-lXcursor -lXfixes -lpango-1.0 -lcairo -lX11 -lgobject-2.0
-lgmodule-2.0 -ldl -lglib-2.0
#include <stdio.h>We create a small window in GTK+. Before we can build and run the application, we must set up our project settings. We must specify the include files and libraries, that are needed to build the application.
#include <stdlib.h>
#include <gtk/gtk.h>
/*
* simple gtk application
* author jan bodnar
* date July 1, 2008
*/
int main(int argc, char** argv) {
GtkWidget *window;
gtk_init(&argc, &argv);
window = gtk_window_new(GTK_WINDOW_TOPLEVEL);
gtk_window_set_position(GTK_WINDOW(window), GTK_WIN_POS_CENTER);
gtk_window_set_default_size(GTK_WINDOW(window), 200, 100);
gtk_window_set_title(GTK_WINDOW(window), "gtkapp");
gtk_widget_show(window);
g_signal_connect(window, "destroy",
G_CALLBACK (gtk_main_quit), NULL);
gtk_main();
return (EXIT_SUCCESS);
}
To provide necessary include directories, right click on the project icon and select properties. Expand C/C++ General. Select Paths and Symbols. Click on the Includes tabs. From the languages group, click on the GNU C. Add necessary paths to the include directories. From the pkg-config tool, we got the list of the directories.
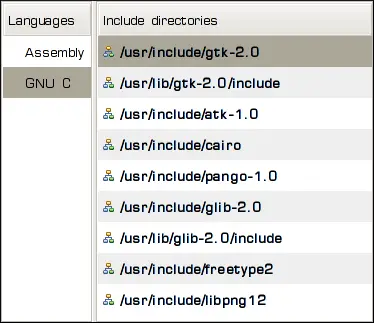
Figure: Include directories
Next we need to include necessary libraries. For our application, we need to add only the /usr/lib/libgtk-x11-2.0.so dynamic library. Select Project Properties. Expand the C/C++ Build tab. Select settings. From the Tool Settings tab, expand the GCC C Linker option. Click on libraries. Add the /usr/lib/libgtk-x11-2.0.so to the Libraries window. Notice, that this path may be different on your system.
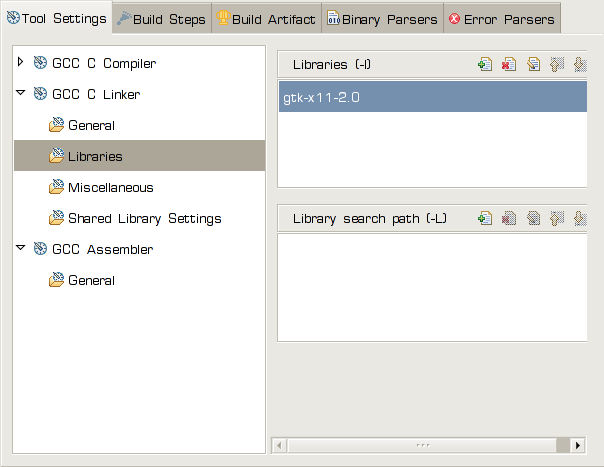
Figure: Libraries
We build the project and run it. We should see a small GTK+ window on the screen.

Figure: GTK+ application
Final word
Eclipse IDE provides excellent tools for C/C++ development that makes the programming more efficient. UNIX/Linux provides a plethora of development tools for C/C++ projects. Some developers prefer the traditional Vi/Emacs/command line tools. Some prefer modern IDEs.When creating large projects, IDEs like Eclipse gain momentum. Eclipse provides lots of features like code completion, code folding, syntax highlighting, code templates, integrated compiler and debugger. Just to name a few. Especially, it is much easier for a human to cope with multiple files when usign a GUI, than with command line tools or traditional non GUI editors. Finally, choosing the tool for programming has always been a matter of subjective preference.
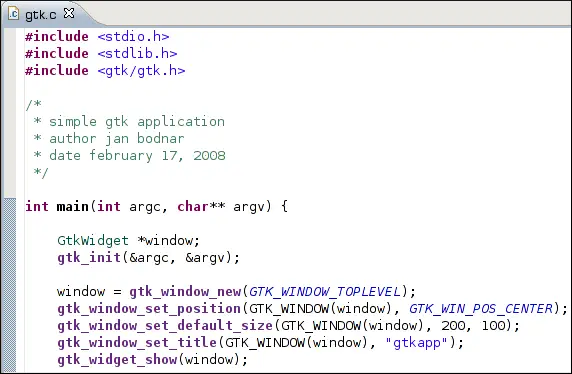
Figure: Syntax highlighting in Eclipse

0 comments:
Post a Comment