Netbeans IDE
Netbeans IDE (Integrated Development Environment) is one of the top Java IDEs. Netbeans IDE was first a student project at Charles University in Prague. The project was bought by Sun in 1999. In 2000, Sun open-sourced Netbeans. Since then, Netbeans grows in usability, stability and features. Thousands of developers around the world use Netbeans. Netbeans was created as a Java IDE. It seems that Netbeans IDE is moving towards a more versatile IDE. Except for the three java platforms, Mobile, Desktop and Enterprise, Netbeans provides tools for creating C/C++ and Ruby projects.Netbeans is created in Java language and Swing GUI. This combination is ideal for a multiplatform, multilanguage IDE.
System requirements
To comfortly use Netbeans IDE, we need enough memory. Using Netbeans is OK, unless we have little memory. 512 MB is minimum requirement. We must not use other memory hungry applications, when we run Netbeans. If we use more than 100% of our memory the system will do a lot of swapping. The performance of Netbeans will then degrade.For Ubuntu linux, minimal system requirements are: 800 MHz processor, 512 MB memory, 650 MB free disk space. Recommended system requirements are: 2.6 GHz processor, 1 GB memory and 850 free disk space.
The IDE
The following screenshot shows the Netbeans IDE with the traditional metal look and feel.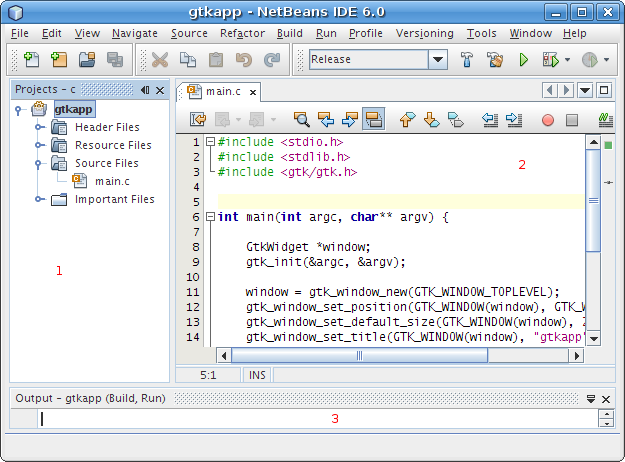
Figure: Netbeans IDE
The Netbeans IDE is divided into several parts, called simply windows. These are probably the most common windows:
- Projects window
- Source editor window
- Output window
Project groups
The Netbeans IDE 6.0 can be used to create projects in Java, Ruby and C/C++. It is a good idea to separate those projects into specific project groups, if we have more than one language pack installed.To manage project groups, we right click on the projects window, and select Project groups option. Here we can create, rename or remove project groups. Here we can also select the active visible project group.
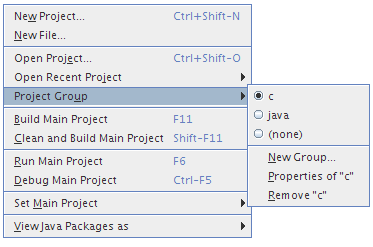
Figure: Project groups
Creating a C/C++ project
There are several ways, how we can create a C/C++ project. From File menu, we select New Project option, or use the Ctrl+Shift+N shortcut. We can also create the project by using the context menu, right click on the project window and select New Project from the pop up window. The fastest way is to click on the new project button on the edit toolbar.
Figure: The edit toolbar
Next we do two steps. Choose a type of a project and then provide a name and location for the project. From the Categories box, we select C/C++, from the Projects box, C/C++ Application.
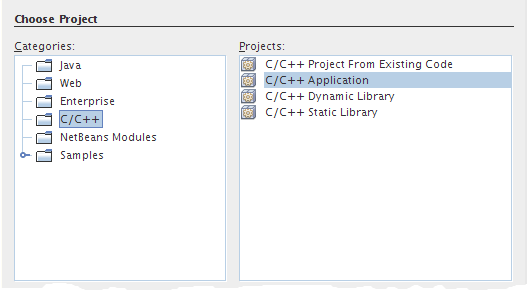
Figure: Choose project
In the next dialog window, we provide a name and location for our C/C++ project. The is also a check box. It is checked by default. It means, that by default a new project is set to be the main project. We can have several projects opened in Netbeans. If we click on the build, debug or run button, this is applied to the current main project in the IDE. We can set, unset a main project from the File menu, or by right clicking on the project icon in the projects window.
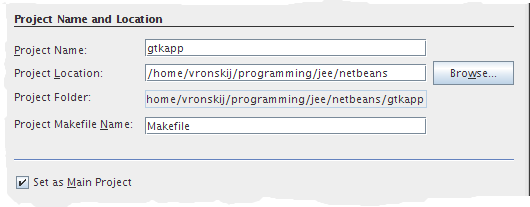
Figure: Name and location
Simple GTK+ application
In the next example, we will create a simple GTK+ application in C language.In order to create even a simple GTK+ application, we must use a quite a few include files and libraries. Fortunately, there is one handy tool called pkg-config, which will greatly help us settip up project settings.
The pgk-config returns metadata about installed libraries. Simply put, if we want to use a specific library, it will provide us necessary dependent libraries and include files, that we need. The pkg-config program retrieves information about packages from special metadata files.
$ pwdHere is the metadata file for cairo library, a multiplatform 2D graphics library. In order to use cairo library, we need freetype2, fontconfig, libpng12, xrender and x11 libraries.
/usr/lib/pkgconfig
$ cat cairo.pc
prefix=/usr
exec_prefix=${prefix}
libdir=${exec_prefix}/lib
includedir=${prefix}/include
Name: cairo
Description: Multi-platform 2D graphics library
Version: 1.4.2
Requires.private: freetype2 >= 8.0.2 fontconfig libpng12 xrender >= 0.6 x11
Libs: -L${libdir} -lcairo
Libs.private: -lz -lm
Cflags: -I${includedir}/cairo
$ pkg-config --cflags gtk+-2.0By providing the --cflags option, we get all necessary include files for a GTK+ 2.0 application.
-I/usr/include/gtk-2.0 -I/usr/lib/gtk-2.0/include -I/usr/include/atk-1.0
-I/usr/include/cairo -I/usr/include/pango-1.0 -I/usr/include/glib-2.0
-I/usr/lib/glib-2.0/include -I/usr/include/freetype2 -I/usr/include/libpng12
$ pkg-config --libs gtk+-2.0Similarly, we get all libraries with the --libs option. Notice that we might not need all libs. The math library (-lm) is not needed, unless we do some mathematical computations.
-lgtk-x11-2.0 -lgdk-x11-2.0 -latk-1.0 -lgdk_pixbuf-2.0 -lm -lpangocairo-1.0
-lfontconfig -lXext -lXrender -lXinerama -lXi -lXrandr
-lXcursor -lXfixes -lpango-1.0 -lcairo -lX11 -lgobject-2.0
-lgmodule-2.0 -ldl -lglib-2.0
Now we will continue by creating a source file for our GTK+ application. Create a new file, from Categories select C Files, from File Types select Empty C File. Provide a name and location for the file.
#include <stdio.h>We create a small window in GTK+. Before we can build and run the application, we must set up our project settings. We must specify the include files and libraries, that are needed to build the application.
#include <stdlib.h>
#include <gtk/gtk.h>
/*
* simple gtk application
* author jan bodnar
* date february 17, 2008
*/
int main(int argc, char** argv) {
GtkWidget *window;
gtk_init(&argc, &argv);
window = gtk_window_new(GTK_WINDOW_TOPLEVEL);
gtk_window_set_position(GTK_WINDOW(window), GTK_WIN_POS_CENTER);
gtk_window_set_default_size(GTK_WINDOW(window), 200, 100);
gtk_window_set_title(GTK_WINDOW(window), "gtkapp");
gtk_widget_show(window);
g_signal_connect(window, "destroy",
G_CALLBACK (gtk_main_quit), NULL);
gtk_main();
return (EXIT_SUCCESS);
}
To provide necessary include directories, right click on the project icon and select properties. From the Categories box, select C/C++, C compiler, general node. Click on the button near Include Directories. Add necessary paths to the include directories. From the pkg-config tool, we got the list of the directories.
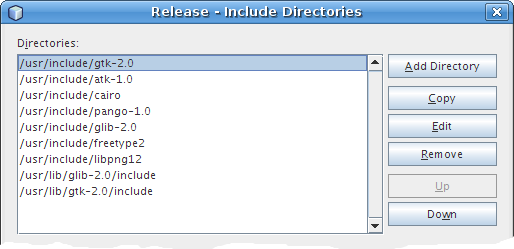
Figure: Include directories
To provide the libraries, we select Linker, Libraries node. For our appliation, we need to add only the /usr/lib/libgtk-x11-2.0.so dynamic library.
Finally, we press F6 to build and run the project.

Figure: GTK+ application
Final word
Netbeans IDE provides excellent tools for C/C++ development that makes the programming more efficient. UNIX/Linux provides a plethora of development tools for C/C++ projects. Some developers prefer the traditional Vi/Emacs/command line tools. Some prefer modern IDEs.When creating large projects, IDEs like Netbeans gain momentum. Netbeans provides lots of features like code completion, code folding, syntax highlighting, code templates, integrated compiler and debugger. Just to name a few. Especially, it is much easier for a human to cope with multiple files when usign a GUI, than with command line tools or traditional non GUI editors. Finally, choosing the tool for programming has always been a matter of subjective preference. I recommend at least trying this excellent application.
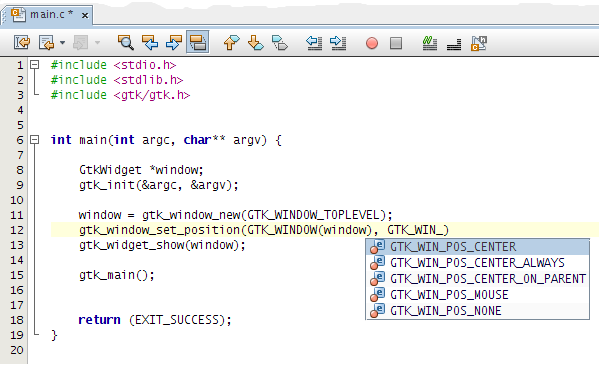
Figure: Code completion in action

0 comments:
Post a Comment