Layout management
In this part of the JRuby Swing programming tutorial, we will introduce layout managers.When we design the GUI of our application, we decide what components we will use and how we will organize those components in the application. To organize our components, we use specialized non visible objects called layout managers. The Swing toolkit has two kind of components. Containers and children. The containers group children into suitable layouts. To create layouts, we use layout managers.
Absolute positioning
In most cases, programmers should use layout managers. There are a few situations, where we can use absolute positioning. In absolute positioning, the programmer specifies the position and the size of each component in pixels. The size and the position of a component do not change, if you resize a window. Applications look different on various platforms, and what looks OK on Linux, might not look OK on Mac. Changing fonts in your application might spoil the layout. If you translate your application into another language, you must redo your layout. For all these issues, use the absolute positioning only when you have a reason to do so.#!/usr/local/bin/jrubyIn this example, we show three images using absolute positioning.
# ZetCode JRuby Swing tutorial
#
# In this program, we lay out three images
# using absolute positioning.
#
# author: Jan Bodnar
# website: www.zetcode.com
# last modified: December 2010
include Java
import java.awt.Color
import javax.swing.ImageIcon
import javax.swing.JLabel
import javax.swing.JPanel
import javax.swing.JFrame
class Example < JFrame
def initialize
super "Absolute"
self.initUI
end
def initUI
panel = JPanel.new
panel.setLayout nil
panel.setBackground Color.new 66, 66, 66
self.getContentPane.add panel
rot = ImageIcon.new "rotunda.jpg"
rotLabel = JLabel.new rot
rotLabel.setBounds 20, 20, rot.getIconWidth, rot.getIconHeight
min = ImageIcon.new "mincol.jpg"
minLabel = JLabel.new min
minLabel.setBounds 40, 160, min.getIconWidth, min.getIconHeight
bar = ImageIcon.new "bardejov.jpg"
barLabel = JLabel.new bar
barLabel.setBounds 170, 50, bar.getIconWidth, bar.getIconHeight
panel.add rotLabel
panel.add minLabel
panel.add barLabel
self.setDefaultCloseOperation JFrame::EXIT_ON_CLOSE
self.setSize 350, 300
self.setLocationRelativeTo nil
self.setVisible true
end
end
Example.new
panel.setLayout nilContainers in Swing already have a default layout manager.
JPanelhas a FlowLayout manager as its default layout manager. We use the setLayout method with a nil parameter to remove the default layout manager and use absolute positioning instead. rot = ImageIcon.new "rotunda.jpg"We create an
rotLabel = JLabel.new rot
rotLabel.setBounds 20, 20, rot.getIconWidth, rot.getIconHeight
ImageIcon object. We put the icon into the JLabelcomponent to display it. Then we use the setBounds method to position the label on the panel. The first two parameters are the x, y positions of the label. The 3th and 4th parameters are the width and the height of the icon. panel.add rotLabelWe add the label to the panel container.
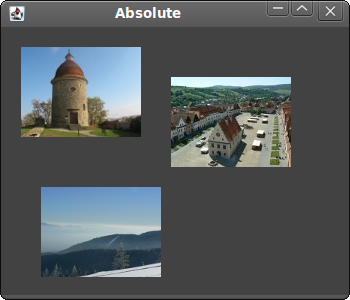
Figure: Absolute positioning
Buttons example
In the following example, we will position two buttons in the bottom right corner of the window.#!/usr/local/bin/jrubyWe will create two panels. The basic panel has a vertical box layout. The bottom panel has a horizontal one. We will put a bottom panel into the basic panel. We will right align the bottom panel. The space between the top of the window and the bottom panel is expandable. It is done by the vertical glue.
# ZetCode JRuby Swing tutorial
#
# In this program, we use the BoxLayout
# manager to position two buttons in the
# bottom right corner of the window.
#
# author: Jan Bodnar
# website: www.zetcode.com
# last modified: December 2010
include Java
import java.awt.Dimension
import javax.swing.JButton
import javax.swing.JPanel
import javax.swing.JFrame
import javax.swing.BoxLayout
import javax.swing.Box
class Example < JFrame
def initialize
super "Buttons"
self.initUI
end
def initUI
basic = JPanel.new
basic.setLayout BoxLayout.new basic, BoxLayout::Y_AXIS
self.add basic
basic.add Box.createVerticalGlue
bottom = JPanel.new
bottom.setLayout BoxLayout.new bottom, BoxLayout::X_AXIS
bottom.setAlignmentX 1.0
okButton = JButton.new "OK"
closeButton = JButton.new "Close"
bottom.add okButton
bottom.add Box.createRigidArea Dimension.new 5, 0
bottom.add closeButton
bottom.add Box.createRigidArea Dimension.new 15, 0
basic.add bottom
basic.add Box.createRigidArea Dimension.new 0, 15
self.setDefaultCloseOperation JFrame::EXIT_ON_CLOSE
self.setSize 300, 200
self.setLocationRelativeTo nil
self.setVisible true
end
end
Example.new
basic = JPanel.newThe basic panel has a vertical box layout. The bottom panel has a horizontal box layout.
basic.setLayout BoxLayout.new basic, BoxLayout::Y_AXIS
...
bottom = JPanel.new
bottom.setLayout BoxLayout.new bottom, BoxLayout::X_AXIS
bottom.setAlignmentX 1.0The bottom panel is right aligned.
basic.add Box.createVerticalGlueWe create a vertical glue. The glue is vertically expandable white space, which will push the horizontal box with the buttons to the bottom.
okButton = JButton.new "OK"These are the two buttons, that will go into the bottom right corner of the window.
closeButton = JButton.new "Close"
bottom.add okButtonWe put the OK button into the horizontal box. We put some rigid space next to the button. So that there is some space between the two buttons.
bottom.add Box.createRigidArea Dimension.new 5, 0
basic.add Box.createRigidArea Dimension.new 0, 15We put some space between the buttons and the border of the window.
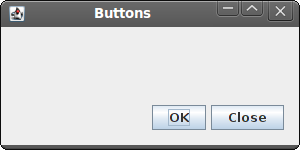
Figure: Buttons example
Windows example
The following example creates the windows dialog using theGroupLayout manager. The dialog comes from the JDeveloper application. The
GroupLayout manager divides the creation of the layout into two steps. In one step, we lay out components alongside the horizontal axis. In the second step, we lay out components along the vertical axis. This is an unusual idea within layout managers, but it works well. There are two types of arrangements. Sequential and parallel. In both kinds of layouts we can arrange components sequentially or in parallel. In a horizontal layout, a row of components is called a sequential group. A column of components is called a parallel group. In a vertical layout, a column of components is called a sequential group. And a row of components is called a parallel group. You must understand these definitions right in order to work with the
GroupLayout manager. #!/usr/local/bin/jrubyWe use
# ZetCode JRuby Swing tutorial
#
# In this program, GroupLayout
# manager to create a Windows
# example.
#
# author: Jan Bodnar
# website: www.zetcode.com
# last modified: December 2010
include Java
import java.awt.Dimension
import java.awt.Color
import javax.swing.JButton
import javax.swing.SwingConstants
import javax.swing.JFrame
import javax.swing.JLabel
import javax.swing.JTextArea
import javax.swing.BorderFactory
import javax.swing.GroupLayout
class Example < JFrame
def initialize
super "Windows"
self.initUI
end
def initUI
layout = GroupLayout.new self.getContentPane
self.getContentPane.setLayout layout
layout.setAutoCreateGaps true
layout.setAutoCreateContainerGaps true
self.setPreferredSize Dimension.new 350, 300
windows = JLabel.new "Windows"
area = JTextArea.new
area.setEditable false
area.setBorder BorderFactory.createLineBorder Color.gray
activateButton = JButton.new "Activate"
closeButton = JButton.new "Close"
helpButton = JButton.new "Help"
okButton = JButton.new "OK"
sg = layout.createSequentialGroup
pg1 = layout.createParallelGroup
pg2 = layout.createParallelGroup
pg1.addComponent windows
pg1.addComponent area
pg1.addComponent helpButton
sg.addGroup pg1
pg2.addComponent activateButton
pg2.addComponent closeButton
pg2.addComponent okButton
sg.addGroup pg2
layout.setHorizontalGroup sg
sg1 = layout.createSequentialGroup
sg2 = layout.createSequentialGroup
pg1 = layout.createParallelGroup
pg2 = layout.createParallelGroup
sg1.addComponent windows
pg1.addComponent area
sg2.addComponent activateButton
sg2.addComponent closeButton
pg1.addGroup sg2
sg1.addGroup pg1
pg2.addComponent helpButton
pg2.addComponent okButton
sg1.addGroup pg2
layout.setVerticalGroup sg1
layout.linkSize SwingConstants::HORIZONTAL,
    okButton, helpButton, closeButton, activateButton
self.pack
self.setDefaultCloseOperation JFrame::EXIT_ON_CLOSE
self.setLocationRelativeTo nil
self.setVisible true
end
end
Example.new
GroupLayout manager to create a layout which consists of six components. Groups of components are formed along both axes. sg = layout.createSequentialGroupIn the first step, we have a horizontal layout. It consists of two parallel groups of three components.
pg1 = layout.createParallelGroup
pg2 = layout.createParallelGroup
pg1.addComponent windows
pg1.addComponent area
pg1.addComponent helpButton
sg.addGroup pg1
pg2.addComponent activateButton
pg2.addComponent closeButton
pg2.addComponent okButton
sg.addGroup pg2
layout.setHorizontalGroup sg
sg1 = layout.createSequentialGroupVertical layout is a bit more complex. First, we add a single component. Then we add a parallel group of a single component and a sequential group of two components. Finally, we add a parallel group of two components.
sg2 = layout.createSequentialGroup
pg1 = layout.createParallelGroup
pg2 = layout.createParallelGroup
sg1.addComponent windows
pg1.addComponent area
sg2.addComponent activateButton
sg2.addComponent closeButton
pg1.addGroup sg2
sg1.addGroup pg1
pg2.addComponent helpButton
pg2.addComponent okButton
sg1.addGroup pg2
layout.setVerticalGroup sg1
layout.linkSize SwingConstants::HORIZONTAL,This code makes all buttons the same size. We only need to set their width, because their height is already the same by default.
okButton, helpButton, closeButton, activateButton

Figure: Windows example
Look at the screenshot of the example. Notice, that components can be grouped into vertical and horizontal sets of components. For example, the label, the area and the Help button components can form a vertical group of components. This is exactly what the GroupLayout manager does. It lays out components by forming vertical and horizontal groups of components. In this part of the JRuby Swing tutorial, we mentioned layout management of components.

0 comments:
Post a Comment